4AD CAVES · p.1
Open source p.1# Caves of the Kobold Slave-Masters
A solitaire adventure for Four Against Darkness — Recommended for characters of level 1 or 2. Written and illustrated by Andrea Sfiligoi.
How to Play This Adventure
This adventure for Four Against Darkness can be played in a couple of hours, and split over three separate sessions. It has been designed for beginning characters: most of your characters should be level 1 or 2. However, if two or more characters are level 3, increase the chance of wandering monsters to 2 in 6 and increase the number of all minions encountered by 1. The Four Against Darkness book is needed to play this adventure.
This adventure is in three parts. The first is a programmed dungeon. The second is a random dungeon using the standard dungeon building tables found in Four Against Darkness, but replacing the room content tables with those from this book. The third is an abstract battle.
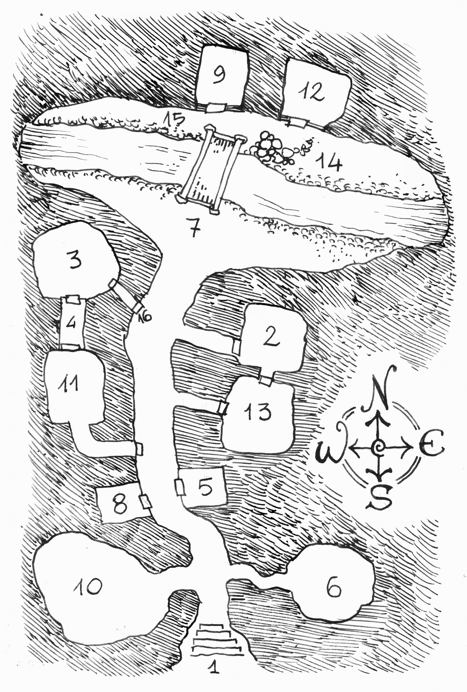
In part one, use the Map of the Caves. You'll find the numbered locations in chapter one. Do not start reading until your party is created and ready to go. Follow the layout of that map, decide which location you are going to visit, and read the entry corresponding to that number. You may “skip” a room that is behind a door, including the two entry rooms that do not have a door, until you decide to enter that room at a later time. You may search rooms only if instructed to do so by the numbered entry.
Do not read the entries in advance! Read them only as you reach the room or area. Reading the entries in advance will spoil all the fun. When you trace your way back out of the dungeon, make a wandering monster roll once for each numbered location you move through. The chance to meet a wandering monster is 1 in 6.
To determine what wandering monsters are met in chapter one and two, roll . On a 1-3, use the Kobold Caves vermin table on p. 20. On a 4-6, roll the demonic minion tables on p. 18.
Maps (1)
Sections (9)
How to Play This Adventure p.3
How to Play This Adventure
This adventure for Four Against Darkness can be played in a couple of hours, and split over three separate sessions. It has been designed for beginning characters: most of your characters should be level 1 or 2. However, if two or more characters are level 3, increase the chance of wandering monsters to 2 in 6 and increase the number of all minions encountered by 1. The Four Against Darkness book is needed to play this adventure.
This adventure is in three parts. The first is a programmed dungeon. The second is a random dungeon using the standard dungeon building tables found in Four Against Darkness, but replacing the room content tables with those from this book. The third is an abstract battle.
In part one, use the Map of the Caves. You'll find the numbered locations in chapter one. Do not start reading until your party is created and ready to go. Follow the layout of that map, decide which location you are going to visit, and read the entry corresponding to that number. You may “skip” a room that is behind a door, including the two entry rooms that do not have a door, until you decide to enter that room at a later time. You may search rooms only if instructed to do so by the numbered entry.
Do not read the entries in advance! Read them only as you reach the room or area. Reading the entries in advance will spoil all the fun. When you trace your way back out of the dungeon, make a wandering monster roll once for each numbered location you move through. The chance to meet a wandering monster is 1 in 6.
To determine what wandering monsters are met in chapter one and two, roll . On a 1-3, use the Kobold Caves vermin table on p. 20. On a 4-6, roll the demonic minion tables on p. 18.
Map of the Caves - Chapter One p.4
Map of the Caves - Chapter One
(Map image — the Chapter One dungeon map is printed on this page; S3 extracts the image.)
The programmed dungeon of Chapter One is played on this map. Follow the layout of the map, decide which numbered location you visit, and read the corresponding entry in Chapter One. Your party enters the map at section 1.
Chapter One - Caves of the Kobold Slave-Masters p.5
Chapter One — Caves of the Kobold Slave-Masters
The kobold slave-masters are a plague upon the lands, capturing goblins and other creatures. Recently, they have even captured Elvyn, an old, much-loved adventurer who started to police their area, wanting to put wrongs to right. However, in a new development, an escaped goblin has revealed the location where the kobolds keep Elvyn. The town council has hired a party of four adventurers (yes, that's your party) to rescue Elvyn. Your party will be paid 100 gold pieces if you can return Elvyn safely to town before nightfall. It would also be great if you could discover why the kobolds are acting so aggressively of late.
Your party enters the map at section 1.
Use the Map of the Caves (folio 4). The numbered locations below are keyed to that map. Enter at section 1. You may “skip” a room behind a door (including the two entry rooms that have no door) until you decide to enter it later. Search rooms only if instructed. Do not read entries in advance. When tracing your way back out, make a wandering-monster roll (1 in 6) once for each numbered location you move through.
Programmed Locations
1) You step down the stone stairs and enter the darkness of the kobolds' lair. An unnatural sense of dread permeates the air. This is an old spell that protects the cave from nosy intruders. Each character must save versus level 2 fear or suffer a when attacking any kobolds until the end of the adventure. A Blessing spell will remove this condition.
2) This is an armory, guarded by 6 kobolds counting as level 3 minions. They are armed with flails which wrap around shields. When defending from their attacks, your characters may not enjoy any defense bonus from shields.
Reactions (): 1-3 bribe (10 gp total), 4–5 fight, 6 fight to the death.
Treasure: the room is filled with weapons. You may take non-magical weapons of any variety or type as desired, but as the kobolds are small, you will not find any two-handed weapons. If a flail is used by a party member, it simply counts as a crushing hand weapon with no additional benefits.
3) A pulsating sphere of energy glows in this room. A wizard may inspect it. If you choose to do so, roll on the Energy Sphere Table (p.20). Add the wizard's level to the roll. Decide before looking at the table!
4) This corridor is filled with spider webs. You may leave them alone or search them, rolling on the Spider Web Table (p. 21) at the end of the book. Decide before looking at the table!
5) This room is a library. Shelves hewn from the stone walls are filled with dusty old tomes and scrolls. You may leave it alone or search it, rolling on the library table (p. 21). Decide before looking at the table!
6) There is a pool of fresh water in this chamber. You may decide that one or more of your characters will drink from it. For each character who does take a drink, roll on the Pool Table (p. 21). Decide before looking at the table!
7) Your party's advance is blocked by a fast-flowing subterranean river. There are three options: 1) cross the river on a run-down wooden bridge covered in mysterious writings (go to 15); 2) try to ford the river (go to 14); 3) Only if you have a wizard, you can investigate the strange writings on the bridge (go to 17).
8) As you enter this room, the character in first rank and right position of the marching order is attacked by a level 3 trap. A magically-animated noose descends from the ceiling and tightens around his neck, strangling him. If he fails to avoid the trap, the hero will lose 1 life and be lifted off his feet. He can now perform multiple attempts to break free. Each failed attempt will cost him 1 life.
In the room sits a chest containing 50 gold pieces.
9) This is the lair of a zombie dragon. Which is a level 6 undead boss with 6 life. The dragon will fight to the death. Whenever it attacks, roll . On a 1–3, the dragon breathes a foul gas and all the characters must save versus level 5 poison or lose 1 life. On a 4–6, the dragon will bite two random characters, inflicting 2 life with each successful hit.
Treasure: the zombie dragon has 120 gold pieces and one random magic item, determined by rolling on the Magic Treasure Table (page 34 in the Four Against Darkness book). Upon defeating the dragon, the party gains two xp rolls that are used immediately.
10) A goblin is chained to a wall of this large chamber. The chains are weak and rusted, and you may easily free him. If you do so, he can join your party. His name is Rikka. Treat him as a level 0 warrior (no Attack bonus) except that he attacks kobolds at . Rikka may only use light armor, shield, a bow or a sling, a light weapon, or a hand weapon. You have to provide the equipment. Any shield belonging to a dwarf, and armor belonging to a dwarf or halfling, will be small enough for the goblin to use. Rikka originally had 2 life, but is now down to 1 life because of the beatings that the kobolds have inflicted upon him. You can restore him to 2 life if you use a healing spell or apply bandages. If he joins the party, you will have to give him at least 20 gold pieces at the end of the adventure. If you free him but you do not let him join the party, Rikka will exit the dungeon.
11) This is the lair of a manticore, a monster with a lion's body, a human's head, the tail of a scorpion, and huge bat wings.
Manticore, level 5 boss, 3 life.
Reactions: 1 bribe (50 gp), 2–5 fight, 6 fight to the death.
A manticore always performs two attacks per turn, against the same target. Roll to determine the nature of these attacks. 1–2 a claw attack inflicting 1 wound, 3–4 a bite inflicting 2 wounds, and 5–6 a tail sting inflicting a wound and requiring the target to save versus Poison 2 or die immediately.
Treasure: around the manticore's neck, there is a pendant worth 80 gold pieces. If you have any rogue in the party, he may roll + Level. On a 7 or better, the rogue recognizes the pendant as part of a set that was stolen from a noble family in town. Once back in town, he may attempt to sell for more than double the value to the original owners by rolling on the pendant table (p. 21). Upon defeating the manticore, the party gains one xp roll.
12) Elvyn, the old adventurer, is in this room chained to a wall. Eight kobold slave-masters are tormenting him with their whips. When you enter, the kobolds turn to you and demand a ransom of 200 gold pieces to free Elvyn. If you do not accept, or do not have that amount of money, they will fight and strike first.
The 8 kobold slave-masters are level 4 minions. They are armed with swords and whips. When defending against them, and your Defense roll is a 1, the whip disarms you and you lose 1 life. If disarmed, your following attacks will be at , or you can spend the turn readying another weapon (if you have it) or picking up your original weapon. If you retrieve your original weapon, a kobold slave master will gain a free, out of sequence attack and try to hit you as you kneel to pick it up (make a Defense roll at ). If you roll a 1 on this Defense roll, the kobold has prevented you from picking up the weapon, in addition to the 1 life damage inflicted.
The slave masters fight to the death.
Treasure: The kobolds have a potion of healing and a random treasure, determined by rolling on the Treasure Table (page 34 in the Four Against Darkness book). Upon defeating the slave-masters, the party gains one xp roll.
If you defeat the kobold slave masters your mission is not yet accomplished: you must still free Elvyn and walk out of the dungeon alive. Unfortunately, after searching the fallen kobolds, you do not find the keys to the manacles binding Elvyn. Freeing him will require a rogue passing a lockpick roll against level 4. If you have no rogue in the party, or if the rogue fails, you'll have to smash the manacles using a crushing weapon. Each attempt requires a roll of 6 or better. Dwarves and barbarians add their level to the roll, warriors add . Whenever you roll a 1 during an attempt to break the chains, the clanging noise will attract wandering monsters to the room.
13) A troll lives here, and he is a greedy weapon collector. If a rogue is leading the party into this room (he must be in the front rank of the marching order), you catch the troll unawares while he is polishing a sword, giving you a attack bonus on your first turn.
Troll, level 5 boss, 4 life, 2 attacks. Crushing weapons have a attack against the troll. Every turn the troll attacks, roll a . On a 4 or 5 it regains one lost life, on a 6 two lost life (but never exceeding the original 4). If brought to zero or less life points, roll . On a 3 or better, it comes back to life with 1 life point only, unless a character can attack it with a slashing weapon when it is on zero or less life points. It does not make any “regeneration” roll on a turn after it was damaged by a wizard's fireball.
Reactions: 1–4 ask for a bribe (party must surrender all of their weapons, including extra weapons carried in their backpacks), 5–6 fight to the death.
Treasure: The room contains non-magical weapons of any variety or type as desired. However, on a 6, roll again. On a 5 or 6 one of the weapons found is indeed magical, of ancient elven make. Treat it as if 4 was rolled on the Magic Treasure Table (page 34 in the Four Against Darkness book). Upon defeating the troll, the party gains one xp roll.
14) You try to ford the river, but the current is too strong. Each character must save versus the current (which is level 3). Dwarves and halflings roll at , barbarians roll at . Those who fail are carried away. A character who is carried away loses 1 life banging against rocks, and rolls again versus level 3, losing 1 life on each failure, until he manages to cross the river or he dies.
15) As you walk across the bridge, the kobold runes activate and engulf the party in magical flames. All characters must save versus a level 5 danger (wizards and elves add their level) or lose 2 life. Survivors manage to cross the bridge. Any character killed by the runic energies falls into the river and is carried away by the current, never to be found again. All of his equipment and treasure carried is lost.
16) This door is locked. A rogue may lockpick it (it's a level 3 lock). If there is no rogue, or if he fails, the door can be bashed (see page 60 in the Four Against Darkness book), in which case the door is treated as level 5. Remember that this might attract wandering monsters.
17) If you gained a clue in this adventure, you may spend it to know about the mysterious writings on the bridge and you automatically pass the roll. If you have not gained a clue in this adventure, roll and add your wizard's level, if any. On a 5 or better, you decipher the writings (go to 18). If your roll fails, go back to 7 and choose another course of action.
18) The wizard is pretty sure that the strange swirls on the bridge are some sort of defensive runes. They could be a trap or an alarm, and he knows no way to disenchant them, so probably it is better not to walk on the bridge. Go back to entry 7 and choose another course of action.
Chapter One - Ending the Chapter p.10
Ending the Chapter (Chapter One)
If you manage to exit the dungeon and bring Elvyn to safety, select a character to make one xp roll. You gain more by defeating the zombie dragon (2 xp rolls, because it is treated as a “final boss”), slaying the manticore (one xp roll), slaying the troll (one xp roll) and slaying the kobold slave-masters (one xp roll).
Chapter One - Rikka's Fate p.10
Rikka's Fate
If Rikka joins your party and manages to kill at least one kobold slave-master, Rikka becomes a level 1 warrior (gaining 1 life, for a total of 3 life) and may continue to adventure with you as a fifth party member, as long as you do not have two or more dwarves in your party (two dwarves would vote against having a goblin in the party). From this moment on, you can assign him xp rolls and treasure like any other member of the party. You must give Rikka at least 20 gp at the end of any adventure. If you have Rikka in the party, and you meet goblins, you may alter the result of their reactions up or down by 1, as you see fit, and goblins will never surprise your party.
Chapter Two - The Demons of Kokras Tharn p.12
Chapter Two — The Demons of Kokras Tharn
Your characters are back in town resting, and all their wounds are healed. A rogue in the party may deal with the pendant (location 11) if the conditions exist. If you managed to free Elvyn or Rikka in chapter one, either will tell what was learned during captivity: there is a demon inspiring the evil deeds of the kobold slave-masters. The demon resides in Kokras Tharn, a complex of caves not far from the location of the first adventure. This will be a randomly-generated dungeon. If neither are freed, you just hear that some monster is hiding in the caves of Kokras Tharn, and want to get into the caves to explore them.
Holy Water
If you learn of the demon, you can purchase one vial of holy water (at the discounted cost of 20 gp per vial) for each character (and Rikka, if he is with the party) to use against the demon. If your characters did not learn that a demon is involved, they may not purchase holy water. Of course, if you purchased holy water prior to this adventure, you are free to keep it.
A Magical Sword
If you rescued Elvyn, the old adventurer will be too weak to embark on another adventure, but will lend you his magic sword Ailisia.
Ailisia, magical sword: This ornate sword gives a to Attack rolls versus undead and demons until the wielder rolls a 1 on the Attack roll die. When that happens, a lack of faith in the character's heart stops the weapon's powers until the end of the game. Ailisia may be used only by a warrior or elf. A barbarian will not want to have anything to do with it, as it is obviously glowing in magical energies.
The party must give the magic sword back to Elwyn at the end of this chapter, unless it was lost. If you do not have a warrior or elf in the party, you will not be offered the sword.
Playing This Chapter
Play this chapter as a random dungeon, with the following changes:
- Instead of the vermin, minions, and boss tables found in Four Against Darkness, use the tables on pp. 18-20.
- All traps found in the dungeon are level 3 teleport traps. A character affected by the trap is teleported into the demon's room (encounter 6 on the Demonic Boss Table on page 19), and has to fight alone against the demon. If the character defeats the demon, he may pick up the demon's treasure, and is teleported back to the party. If the character is killed by the demon, the rest of the party will find his belongings and bones (picked clean) among the demon's treasure.
- The final boss is always the demon (encounter 6 on the Demonic Boss Table on page 19). Do not read its information until a character is teleported by a trap or you meet the demon. Do not increase its statistics for being a final boss, this is already factored in.
- For wandering monsters, roll on the Demonic Minions Table (p. 18), but add to the number of monsters appearing. Remember there may be an additional minion if the party started at a higher level (see page 3).
- The party can give up the dungeon if they are too beaten up to continue. In this case, read the “Ending the Chapter” section below to see what happens next.
Other Changes
There can be no blessed temple (from the Special Features Table, event 2, p. 32 in Four Against Darkness) in this game. If you roll it, treat it as a cursed altar (event 4) instead. If you meet the healer (Special Events Table, event 5, page 33 in Four Against Darkness), he is not a healer, but a traveling priest selling up to one vial of holy water for character. You may meet him only once in the adventure. If you roll him up again, ignore the encounter.
Use of Clues
Clues work as normal in this adventure. You may use them as described in Four Against Darkness.
Use of Holy Water
Characters with vials of holy water may throw them at a demon. This action is equivalent to performing an Attack roll, but does not require a roll to hit the target. Each vial will automatically inflict one wound on the monster. In addition, if any demonic boss monster takes a wound from holy water, any cleric in the party will have a to his Attack and Defense rolls against him until the end of the battle.
Chapter Two - Ending the Chapter p.14
Ending the Chapter (Chapter Two)
This chapter ends when your party or the demon are killed. If the demon is killed, all your surviving characters may take his treasure (which includes all the belongings of any party member previously teleported into the demon's room). As soon as you return to civilization with the demon's head, you are gifted one vial of holy water per character and a single free resurrection attempt (you may use it now, for any character killed in this adventure, or keep it and use it in the future).
If the party quits the dungeon before killing the demon, or in addition to the above if the demon was killed, your characters heal up to 4 lost life points. Elves, clerics, and wizards recover all their spells.
Proceed to play chapter 3.
Chapter Three - Demonic Siege p.15
Chapter Three — Demonic Siege
In this last chapter, the heroes are in a temple besieged by minor demons. If you killed the demon in chapter two, the demon's servants are coming to avenge their lord. If you did not kill him, he will be part of the force besieging the temple. If any of your characters were killed in the previous chapter, create new heroes, who come to the temple answering a call for help from the temple priestesses.
This adventure does not require you to generate a dungeon. It is a long battle taking place in a single building.
There are three locations in the temple: the altar, the door, and the hall. Draw three circles on a sheet of paper and name them altar, hall, and door. You must now deploy your forces. You may keep all your characters in one location, or you may split them as you see fit.
You must also deploy the temple defenders. Three priestesses, Argolia, Limna, and Thesia: 1st level clerics armed with a hand weapon and wearing no armor, and 2 life each. There are also four scholars, Migrus, Taltas, Deo, and Farah: 1st level wizards with no spells, armed with a light weapon, and 2 Life each. Migrus has a scroll allowing him to cast one Lightning spell, that may not be given to any other character.
If you managed to free Elvyn from the kobold slave-masters (see chapter 1), you may deploy him as well. Elvyn is a 3rd level warrior, and is wearing heavy armor with shield. He fights with his magic sword that gives him a to attack demons, unless he lent the sword to the party in chapter 2 and the sword was lost.
Make a note of where your characters, the priestesses, Elvyn, and the scholars are. Then roll on the Demons' Strategy Table (p. 20) to determine where the demons attack from. Then run all the locations simultaneously as three combat encounters. Play the turns as follows:
- Demons' turn at the door
- Characters' turn at the door
- Demons' turn on the altar
- Characters' turn on the altar
- Demons' turn in the hall
- Characters' turn in the hall
If the demons kill all the characters in a location, or the characters withdraw from that location, the demons have conquered that location.
If a location is left unguarded (that is, if no priestess, scholar, or party member is deployed there), one demon will move there and occupy the location. A demon that does this cannot attack that turn. If the demon is moving out of a combat, a character of your choice may perform an Attack roll at against that demon.
Once the demons have conquered all locations, the demons win the game.
Your characters are trapped inside the temple. If they move out, abandoning the temple, the adventure ends. The characters survive, but the scenario is considered unsuccessful and no xp rolls are gained.
Characters and other temple defenders can leave a location and move to another location, for example moving from the altar to the hall (this counts as their action for that turn, so no spell casting or attack may be performed while they move). All characters and other temple defenders may use the withdraw option to move from one location to another, but if they all do so, that location counts as conquered by the demons.
Demonic Forces
The besiegers will be a total of 18 red-skinned minor demons (level 6 minions), armed with poisoned pitchforks (save versus level 4 poison, barbarians and halflings roll at , on a failure lose 1 from your Defense rolls until healed or lose 1 life, your choice). The demons are vulnerable to holy water. Throwing one vial is an action equivalent to performing an attack, but no attack roll is needed, the hit is automatic so one character will kill one minor demon per turn using one vial.
If the major demon from chapter 2 was not killed, he will appear in a random location (1-2 altar, 2-3 hall, 4-5 door) at some point during the battle. Roll starting on the second turn, and add to the roll every turn. On a 6+, the major demon appears. If no roll is successful, the demon will automatically appear when the characters defeat the last enemy in play.
The demon hates the priestesses and will attack them first if they are in the location that the demon is attacking. The demon will appear in a cloud of smoke and automatically surprise all characters in that location unless a rogue or elf is deployed in that location; in this case, roll +L for each elf or rogue. On a 5 or better, the character manages to warn the party and other defenders in that location who now act before the demon.
It may happen that a fight involves both the demon (a boss monster) and the minor demons (minions). In this case, first you resolve the minions' attacks, and then resolve the major demon's attacks. Characters may choose whom they attack during their turn, as normal.
All the demons will fight to the death and will not roll morale in this scenario.
If the demons kill all the characters in one location, one demon will remain in that location to garrison it, and the other demons will move to other locations where there are characters to be attacked.
Chapter Three - Ending the Adventure p.17
Ending the Adventure
Once all demons are killed, you win the game. The demons have no treasure but the church will give 200 gold pieces to every surviving character. In addition, they will pay for a resurrection attempt for any one character killed in the battle. All characters surviving the battle get an XP roll. The priestesses and scholars surviving the battle become full-fledged 1st level clerics and wizards unless they roll a 1 on . You may use them as beginning characters in the future, should you lose or retire one of your characters. The advantage, compared to taking standard first level characters, is that they will have 200 gp each in starting wealth.