Beneath the Well of Brass
Lv 0DCC DAYA2 · p.1
Open source p.1INTRODUCTION
Remember the good old days, when adventurers were running scared, NPCs were there to murder you, and the finale of every dungeon was the chaos lord on the 666th level? These are the good old days! Dungeon Crawl Classics RPG adventures don’t waste your time with humdrum scenarios, boilerplate campaign settings, or NPCs who want you to kill ten shadow cats. Each adventure is 100% good, solid
fore, traps that spare the flesh but destroy the soul, and the secret portals that lead to a thousand insane worlds.
Beneath the Well of Brass is a 0-level adventure for 12 or more characters. Many of the challenges are puzzles; a smaller party of careful delvers can triumph where a larger, blundering mob will fail. For players given to creative, imaginative play, the adventure offers mastery of magic, diabolic favor, and the promise of immortality.
The adventure is designed to be run in a single four-hour session. However, if time permits, judges might consider allowing surviving PCs to level up between encounter area 1-12 and the adventure’s conclusion.
ADVENTURE SUMMARY
Three days ago, the bandit naming himself the Black King marched a band of brigands into the PCs’ village. Fearful of the Black King’s wrath, the village elders did their best to appease the man-giant and his men, plying them with the best meat and drink the hamlet could muster.
But the Black King’s yearnings are not of the material world. Haunted by a vision of his own doom, the brigand is in search of immortality.
The answer to the Black King’s melancholy lies in a nearby cave complex. Once the site of a chaos cult, the cave has long been forbidden to the villagers, for fear of awakening the object of the cult’s sinister devotion.
Rather than risk sending his own reavers into the unknown, the Black King presses the PCs into service with a single, impossible command: Venture into the cave and return with the key to immortality. Should the PCs refuse or fail in their quest, the Black King commands his reavers to raze the village and slaughter its people.
THE DEVIL’S MAW
Since time immemorial, sages and mystics have sought out the burning caverns, hoping to master the mystery of destruction and rebirth. A naturally-occurring fissure, the flame-licked caves are saturated with oil and suffocating gasses. But the sages were not mistaken in their quest: at the furthest reach of the caves, far beneath the earth, is a primal link to the Elemental Plane of Fire.
More recently, a chaos cult declaring themselves Theophages (or “God Eaters”) sought out the caverns for their own, sinister purposes:
Invoking the names of forbidden patrons, the Theophages sundered the elemental fissure, cracking open a mighty portal to the mythic City of Brass. Luring an ifrit prince and his consort through the portal, the Theophages set the elemental pair to the task of binding raw chaos with material form. (The consequences of this alchemycal wedding and its cataclysmic failure are detailed in DCC #100: The Music of the Spheres is Chaos.) Their ends accomplished, the God Eaters abandoned the burning caverns and withdrew to their hidden monastery atop the world.
In the Theophages’ absence, the Devil’s Maw reverted to ruin. Fanciful tile mosaics depicting the Theophages’ war against divinity were soon cracked and covered in soot. Safeguards taken to abate the caves’ dangers fell bythe wayside. The burning caverns returned to silence and darkness, save for the intermittent spit and flare of elemental flame.
INTRODUCING NEW CHARACTERS
Beneath the Well of Brass is not combat-heavy, but there are ample opportunities for character loss.
Unlucky (or foolish) players need not go without PCs for long. The Black King and his men consider the villagers a resource to be expended, and do not hesitate to throw more villagers into the Maw.
These characters miraculously reach the party, bewildered and terrified but otherwise intact, and can begin play immediately, assumed by any player without PCs.
PLAYER START
Rough men in soiled leather armor and battered helms rouse you from your homes. They march you through the cold night air to the great hall.
The bandit calling himself the Black King has made the hall his home ever since he marched his warband into your village some three days ago. Village elders have done their best to appease the giant and his men, surrendering your hamlet’s finest meat and drink, in the hopes that the brigands grow bored and depart.
Those hopes seem fanciful now.
Your fellow villagers watch fearfully from behind shuttered windows and barred doors as you are marched across the empty square. Each is thankful that their own sons and daughters haven’t been chosen by the Black King, and yet each mourns your fate.
Inside the hall, the Black King broods atop a makeshift throne of furs. Shieldmen leer at you from either side, leaning heavily on their stout spears. A dozen more brigands and their camp wives lounge about the hall, drinking and laughing.
INTO THE DEVIL
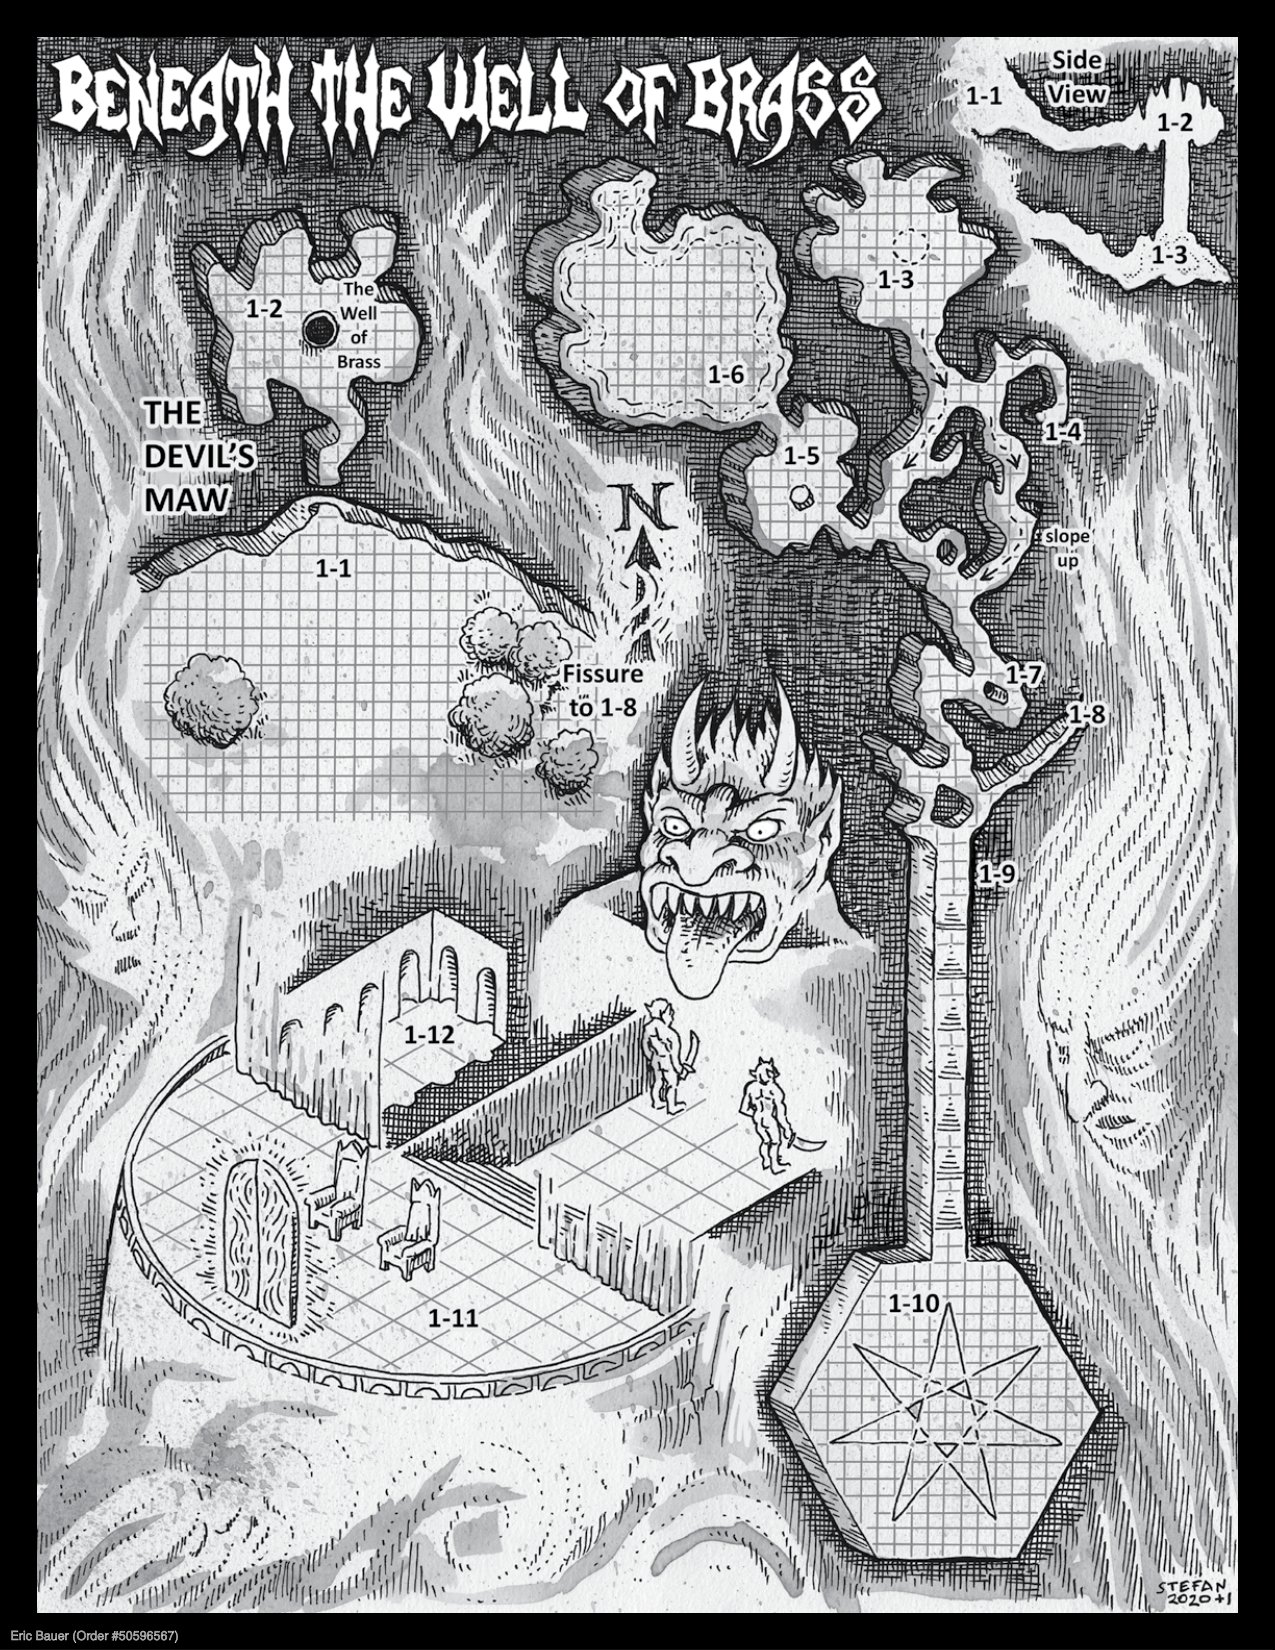
General Features: The cave is tucked against a rocky ridge. Inside the Maw, the walls, ceiling and floor are warm to the touch. A chalky coat of soot covers the ceiling and upper walls, and the sweltering air stinks of burnt oil and scorched stone. If the PCs stand perfectly silent, they can hear what sounds like a roaring forge somewhere in the caverns below.
Explorers pressing into the lower level discover that the walls weep an oily blue mist. The mist, heavier than air, is flammable when concentrated, and collects in area 1-3.
Areas 1-2 through 1-8 are natural caves, with uneven floors, walls, and ceilings, befitting their origins. The ceilings vary from 8’ to a mere 4’ in height, and the floors are worn by the tread of slaves.
Those same slaves worked the stone in areas 1-9 and 1-10, digging out the caverns and vaulting the ceiling.
The furthest reaches of the cave exist in a liminal space on the very edge of the Elemental Plane of Fire. Flames spontaneously appear on walls, the floor and the ceiling, flickering to life before dying just as quickly. The flames pose no threat of their own, but are more than sufficient to ignite gasses collecting in area 1-3.
The bandit chief runs a heavy thumb over the notched blade of his axe. He speaks slowly at first, as if through a fog of half-forgotten dreams.
“I am haunted. Doom stalks me, as it stalks every man.” The Black King downs a horn of wine and climbs to his feet. Towering above the other brigands, he could be mistaken for a bear in his ragged furs. “But I am not every man.”
“There is a cave. The Devil’s Maw, your people call it. I have dreamed of this place: the caverns twist with deathless flames. Secrets are hidden there – even the secret to eternal life, perhaps.”
The Black King beckons to his shieldmen. Ten of your fellow villagers are dragged into the hall, cinched together by a long rope. The brigands force them to their knees before the giant.
“Hie thee to the Devil’s Maw and fetch me the secret of eternal life. Fail me, and they die.” He raises the axe to strike then sits back drunkenly, his booming laughter filling the hall.
The other brigands and their women join in the laughter. The Black King’s eyes harden. He looks to each of you in turn, and then points his axe to the hamlet lights outside. “They all die.”
The characters are permitted to return to their homes to gird themselves as best they can with starting weapons and their 0-level trade goods. Then the Black King and 20 of his men escort the PCs and the hostages to the cave. The remainder of the band hangs back to keep watch on the village.
If the PCs opt to attack the Black King and his men, the bandit upholds his end of the brutal bargain, slaughtering the hostages before cutting the PCs down. See the Conclusion of the adventure for the stats of the Black King and his men.
’S MAW
Maps (6)
Bestiary (7)
Rooms (12)
Area 1-1 Cave Entrance p.3
Area 1-1 – Cave Entrance
The Black King’s men drag you to a low overhang at the base of a high, rocky ridge. The cave known as the Devil’s Maw stands at the back of the overhang, wafting oily clouds that stink of sulfur. As long as your village has known of this place, it has been forbidden. To venture inside is to court death.
The brigands fearfully cast torches inside the hole. In the flickering light you can see that the floor is littered with twigs and dry leaves, but that the ceiling is black with soot.
The brigands shove you towards the cave, then back away. Your fellow villagers, bound with rope, watch you with wide, plaintive eyes. Even the Black King is silent.
All is still save for the flickering flames of the torchlight beckoning you forward into the dread caves.
The brigands refuse to offer the PCs any additional aid. Stats for Black King and his men are listed at the end of the adventure if the PCs attempt to fight their way free.
Area 1-2 Well of Brass p.3
Area 1-2 – Well of Brass
A circular well sits in the center of the cave, circumscribed by a low wall of sooty brass. The chamber’s ceiling is scorched black. A simple iron ladder descends the side of the well, down into darkness.
THE PRISONER’S GAMBIT
Once out of sight, daring PCs might devise a ruse to lure a handful of the brigands inside the cave, hoping to surprise them and steal their gear.
Initially, the brigands are readily duped and send men into the Maw. Roll to determine the gear carried by each brigand: (1) studded leather armor, spear, dagger; (2) leather armor, short sword, dagger, torch, pouch with sp; (3) spear, pouch with cp; (4) leather armor, short sword, 3 hand axes, torch; (5) hide armor, spear, pouch with sp.
The ploy works exactly once. When the initial party of brigands doesn’t return, their former comrades roar with drunken laughter, choosing to wait the PCs out.
Brigand (): Init ; Atk as weapon melee; AC 13; HD ; hp 3 each; MV 30’; Act ; SV Fort , Ref , Will ; AL C.
As the PC consider their actions, read or paraphrase the following:
A roar erupts from the depths. A moment later the well is lit by a blistering ball of fire. Blue and orange flames shoot from the well, spilling along the blackened ceiling. The flames spin on one another, licking the chamber, and then die.
Something in the well begins to inhale, drawing cool night air into the cave.
Moments pass. The howling wind slows and dies.
The brass well is 45’ in length, ending in a 15’ drop to the floor of the chamber below. The ladder runs all 60’. The walls of the well are composed of sheets of hammered brass, black with soot. Both the ladder and the well are warm to the touch (or searing hot, following an eruption).
The Secret of the Well: A glowing blue gas seeps from the walls of the lower caverns, collecting in area 1-3, directly beneath the well. The gas quickly builds up enough to be ignited by any of the many extant flames, turning the lower level into a conflagration and belching a ball of rolling fire up the chimney. Immediately after the blast, fresh air rushes into the cave from outside, and the gasses begin to build up once more.
Every round there is a 1 in 5 chance that the gas ignites. An instant later a fireball rushes up the well, crashing against the ceiling and rolling out to the chamber walls. Any character caught in the chimney during an eruption suffers damage (Luck check to avoid) and risks falling at judge’s discretion. Unfortunate souls caught in the halls below suffer damage (Luck check to avoid). But those in area 1-2 (and not directly above the chimney) are safe – the fireball rolls out above their heads, spilling out along the ceiling.
Immediately following an explosion, a chill wind rushes into the chamber, rolling in from outside the cave. The wind
continues for rounds, and then the cycle begins anew.
While the hazard cannot be disarmed in any usual sense, it can be mitigated. A simple flame left burning on the floor of area 1-3 is sufficient to burn off the gas as it collects. These flames flare bright blue and green, and prevent the gas from growing to dangerous levels.
Oil lamps and torches accomplish this readily (burning for 3 hours or a single hour, respectively) but candles burn too hot and melt after a mere rounds. If the flame dies, the gas begins to collect once more and the cycle starts anew.
There is an excellent chance that the PCs accidentally solve the challenge by simply dropping a torch down the pit to see what they can find. The flaming brand lands amid the rubble of lamps in area 1-3, and burns brightly, spitting colored flames as it continuously consumes the gasses.
In this case, make careful note of whether or not the PCs then take the torch with them. This could potentially spell doom for the PCs if the gasses are allowed to collect, causing the explosive cycle to begin again. Characters reaching areas 1-8, 1-9, or 1-10 are safe from the flames, but all other areas are subject to the repeating flames.
Descending the Well: It is 60’ from the top of the well to the floor of area 1-3. Characters descending by rope or ladder can move 15’ per round with no risk to themselves. Attempting to move more quickly requires an Agility check; the DC increases 1:1 for every additional foot of movement.
Example: A PC attempting to climb 25’ in a single round – 10’ quicker than the base rate – must succeed on a DC 10 Agility check to descend safely.
Characters failing the check suffer a partial fall, taking damage for every 10’ to the chamber floor.
Area 1-3 Chamber of Lamps p.5
Area 1-3 – Chamber of Lamps
The floor of the cave is littered with scores of toppled lamps and lanterns. Scorched from heat and corroded with age, most have been reduced to mere shells, easily crushed underfoot.
The lamps and lanterns were used by the Theophages to ward off the flammable gasses. Characters searching the collection of lamps discover that several are bejeweled or plated with sliver and gold, and some still hold oil. All together there are x10 gp worth of semi-precious stones and metals, and roughly two flasks of oil. (In the context of the Devil’s Maw, oil is the more valuable by far. Make careful note if the PCs discard the oil to collect the gold, silver, and jewels.)
Area 1-4 The Master’s Tome p.5
Area 1-4 – The Master’s Tome
The cave gradually narrows until it reaches its end. A skeleton sits at the edge of your torchlight, garbed in rotted sackcloth, a blackened grimoire resting in its lap.
The skeleton is the corpse of a sage, who – nearing the end of his life – sought the depths of the caves to inter himself. The sage meditated until death overtook him and his corpse has remained here ever since.
The Key of Sezrekan, an infamous grimoire bound in demonflesh and inscribed on plates of hammered gold, has survived. The sheaves of chaos are rendered in Hyperborian and confer damning, caustic knowledge of the universe to any daring to study its pages. With a DC 15 Intelligence check a character is able to apprehend the first plate: a primer on mastering the uncaring powers of Chaos. Comprehension of this single plate is sufficient to allow a 0-level human (with sufficient XP) to advance as a wizard, acquiring their first spells.
Later plates build upon prior concepts, with subsequent sheaves requiring a cumulative +5 DC per page. Mystics, initiates, black magicians, and their ilk who devote time to study the plates can reduce the DC of any one plate by 1 point for each week of study.
The nature of the subsequent panels is left to the judge’s discretion. Perhaps the grimoire is seeded with the true names of diabolic powers, hints and clues for later quests, or even the means of reaching Lost Agharta or fabled Sagar-Matha.
Area 1-5 Altar of the Deathless Flame p.6
Area 1-5 – Altar of the Deathless Flame
Strange stalactites hang throughout the chamber, glistening with an oily sheen that collects in dozens of inky pools scattered about the gallery. Flames flit about the pools and die, only to spring back to life elsewhere.
In the center of the chamber is a great, broken stalagmite. A crude basin has been chiseled into the pillar and filled with ash and dead coals.
The pools of staid, brackish water are covered in a skim of oil, but not all the flames licking along the walls are natural. Eight are fulgurates – intelligent fire elementals, indistinguishable from large, dancing flames. The elementals move freely about the room, and are not confined to the pools.
As the PCs enter the chamber, the fulgurates move to surround the party. Cruel and mischievous in nature, they delight in “pinching” PCs with flame-tongues, and setting cloth alight with small flames.
The elementals are readily appeased by flammable offerings placed upon the makeshift altar, but their goodwill lasts only as long as the object burns. The elementals withhold their attacks so long as a tribute is burning at the altar.
If the PCs attempt to pass to the far side of the chamber without making an offering or if the party dawdles for more than three rounds, the fulgurates decide that the PCs are the offering.
Stats of combined fulgurates
2 combined Atk flame melee (); Act ; HD .
3 combined Atk flame melee (); Act ; HD .
4 combined Atk flame melee (); Act ; HD .
5 combined Atk flame melee (); Act ; HD .
6 combined Atk flame melee (); Act ; HD .
7 combined Atk flame melee (); Act ; HD .
8 combined Atk flame melee (); Act ; HD .
Use the following list of 0-level trade goods to help determine how long an object satisfies the elementals. Non-flammable and flame-resistant objects do nothing to appease the fulgurates.
1 round: parchment; 1 candle; pair of gloves
rounds: flask of oil; tarot deck; 1 lb. wood
rounds: sack; crutches; barrel; small chest
rounds: 1 yard of linen, fabric or sailcloth; a fine suit; deer pelt; quality cloak
rounds: black grimoire (hissing and spitting obscene incantations all the while)
Combat: Individually, the flame-like fulgurates are agile and fleeting – darting about the chamber – but posing little threat to the PCs. Angered, the flames can combine to form a roaring conflagration, searing flesh from bone.
An individual fulgurate attacks with a mere action die, dealing damage. However, two or more elementals can join together to form a single, larger flame, increasing their attacks, damage, and hit points, as in the table below.
Initially there are eight flames in all, that can join together in any combination (four flames composed of two fulgurates each; one single conflagration of all eight fulgurates, and so on). The fulgurates are reactive and chaotic in their tactics, combining a handful of flames to make an attack, before breaking up again. However, if a particular foe proves especially dangerous, the fulgurates combine to a towering coflagration and incinerate the threat.
Fighting the fulgurates is akin to a puzzle. Sharp blades pass directly through the elementals, inflicting only one quarter damage, and blunt weapons deal only half. The judge should adjudicate creative attacks by their effectiveness extinguishing a fire: e.g., a deer pelt or cloak soaked in water immediately slays a fulgurate.
Track the fulgurate’s effectiveness via their hit points. (Example: A 35 hp fulgurate composed of 7 flames is attacked and dropped to 29 hp. Its stats drop to a fulgurate composed of 6 flames.)
Base fulgurate (8 total): Init ; Atk flame melee (); AC 15; HD ; hp 5 each; MV 30’; Act ; SP immune to fire or heat attacks, quarter damage from bladed attacks, half damage from blunt weapons, double damage (or more) from water or cold attacks, combine to form larger flame; SV Fort , Ref , Will ; AL C.
hp 10
hp 15
hp 20
hp 25
hp 30
hp 35
hp 40
Area 1-6 Lake of Fire p.7
Area 1-6 – Lake of Fire
Rounded stone steps rise into a narrow fissure, scarcely 2 feet in width.
Through the fissure you can make out a black, oily lake. Intermittent flames flit across the surface, dancing up stalactites and spilling over the ceiling.
Something stirs in the lake. A slender, mailed hand emerges from the waters, holding aloft a soot-black sword wreathed in ebon flames.
If any PC reaches for the sword or kneels within the fissure, the armored hand gently taps the PC on both shoulders with the flaming blade. The PC is instantly wreathed in flames, and must succeed on a DC 15 Will save or be immolated. (Characters failing the save are instantly slain and cannot be recovered.)
On a successful save the character takes no damage and has been dubbed a Knight of Hell. A second mailed hand rises from the flames and proffers the sword to the PC. If the sword is refused, the hands and the blade slip back beneath the flaming waters, never to return.
The longsword cannot be broken, and grants an attack bonus equal to the PC’s level but no damage bonus. However, the wielder can elect to burn a point of Stamina, causing the blade to be wreathed in black flames: for a single round, character’s critical hit range with the sword is broadened by 3, and the blade deals an extra flame damage on a successful strike. Stamina spent this way can be regained at the rate of 1 point per day, or healed by a Duke of Hell (or a greater power), but never by a cleric.
If anyone other than the Knight of Hell attempts to take up the blade, the new wielder must attempt a Fort save (DC 15 + current knight’s class level) or be immolated. While multiple PCs can attempt (and possibly survive) the knighting ceremony, only one sword is ever gifted.
Knights of Hell receive regular commands from their infernal masters through the sword. Characters are left in freedom whether to take up the orders or not. Early in the campaign the commands are oblique, and it might not be immediately obvious just how a certain action results in advancing the devils’ plots. As the PC grows in power, the devils’ long game becomes terrifyingly clear.
Wicked PCs delighting in their role as diabolical agents are amply rewarded. Good-aligned PCs find themselves caught in a diabolical quandary: the cunning devils begin to invert their commands, so that possibly refusing an order works to further their goals – or does it? Worse, the devils make it apparent that if the PC surrenders or abandons the blade it will only be taken up by another, less willful soul. Once dubbed, it is difficult to escape the devils’ clutches.
Area 1-7 Wheel of Chaos p.7
Area 1-7 – Wheel of Chaos
Amidst the rough, natural cave is a strange pillar – almost alien in design and utterly out of place so far beneath the earth. The pillar stretches from floor to ceiling, and seems composed of gilt-copper plates. Each of the plates depicts a scene in bas relief.
A sickening dread hangs about the chamber, a shimmering doom, longing to be unleashed.
The pillar is actually a prayer wheel, used by the Theophages to purify themselves and their thoughts.
The prayer wheel has seven panels, each made from gilt copper, and taken together depict a story of death and rebirth. There is no discernable beginning or end to the cycle. Instead, the seven copper panels circle endlessly into death, rebirth, and back again:
• A powerful horned warrior, leading an army of robed ascetics into battle against a heavenly host.
• The same warrior alone, raging against hundreds of angels.
• The same warrior, laid atop a funerary pyre alongside a large egg.
• A horned priestess touches a torch to the egg.
• The egg gone, a great winged eagle or vulture erupting in flames consuming the pyre.
• The youthful warrior stands atop the ashes.
• The warrior on the peak of a high mountain, calling down a thin stream of chaos. Robed ascetics hail the warlord from all sides.
The prayer wheel can still be spun, even after centuries of disuse. Spinning the wheel causes a terrible, scream-like screeching that drowns out all other sounds as the wheel sends unholy prayers out into the cosmos.
Spinning the wheel causes a single random effect, until it is spun a total of seven times. The effect of the final turning depends on the character’s alignment: chaos-aligned characters are granted + Luck; lawful PCs are struck by a wash of corrupting chaos for damage (DC 10 Will save to avoid). Neutral PCs are unaffected. This blessing can be received just once.
A character spinning the wheel eight times or more is struck for damage (DC 10 Will save to avoid), regardless of alignment.
Prayer Wheel Effect
Roll (Modified by Luck)
0 or less Character is consumed with heretical thoughts and dedicates their life to the cause of dethroning all gods.
1-4 Character loses 1 point of Luck.
5-6 Character gains hp. 7 Character gains the ability to cast magic shield, as per the 1st-level wizard spell, cast with a +CL spell check. If the PC later gains the ability to cast magic sheild as a wizard or elf, this blessing improves their spell checks by +1d.
8+ Character grows a third eye in the center of their forehead and can spend a round to concentrate to see invisible creatures and objects with a successful DC 10 Will save. (Other powers, such as sighting creatures on the astral plane, are left up to the judge’s discretion.)
Area 1-10 Dais of Binding p.9
Area 1-10 – Dais of Binding
A short series of stone steps rise to a wide stone platform. The dais is scored by deep, intersecting lines chiseled into the stone. A handful of half-melted and toppled candles are set about the platform.
In the very center of the dais is a towering pair of great brass doors, supported between two black marble pillars. Cast in the likeness of howling devils pressing mortals on to their doom, each ominous portal rises nearly 20’ in height.
Characters pausing to count the steps to the dais are not surprised that they are seven in number.
If seen from above, or mapped by the PCs, the lines form the seven-pointed star of Sezrekan. The floor outside the carved sigil is dusty and tracked with dirt; inside the sigil, the stone has been blasted by heat and reduced to black glass. Candles are found at every tip of the seven-pointed star.
Until all seven candles are lit, PCs (and anything else) can enter and exit the magic sigil. Once all the candles are lit, it becomes impossible for any creature, object, or effect to enter or escape the sigil. The sigil remains in effect until the candles burn down (roughly an hour), are toppled, or otherwise extinguished.
Lighting the candles activates the massive brass portals, setting the doors aflame. Heat washes off the doors, and a crimson light blazes from the seams.
The doors remain locked even once the portal is activated. However, a brilliant brass key appears in the lock securing the twin doors. In order to open the portals, the key must be turned seven times, with dire consequences for those failing to heed the clues.
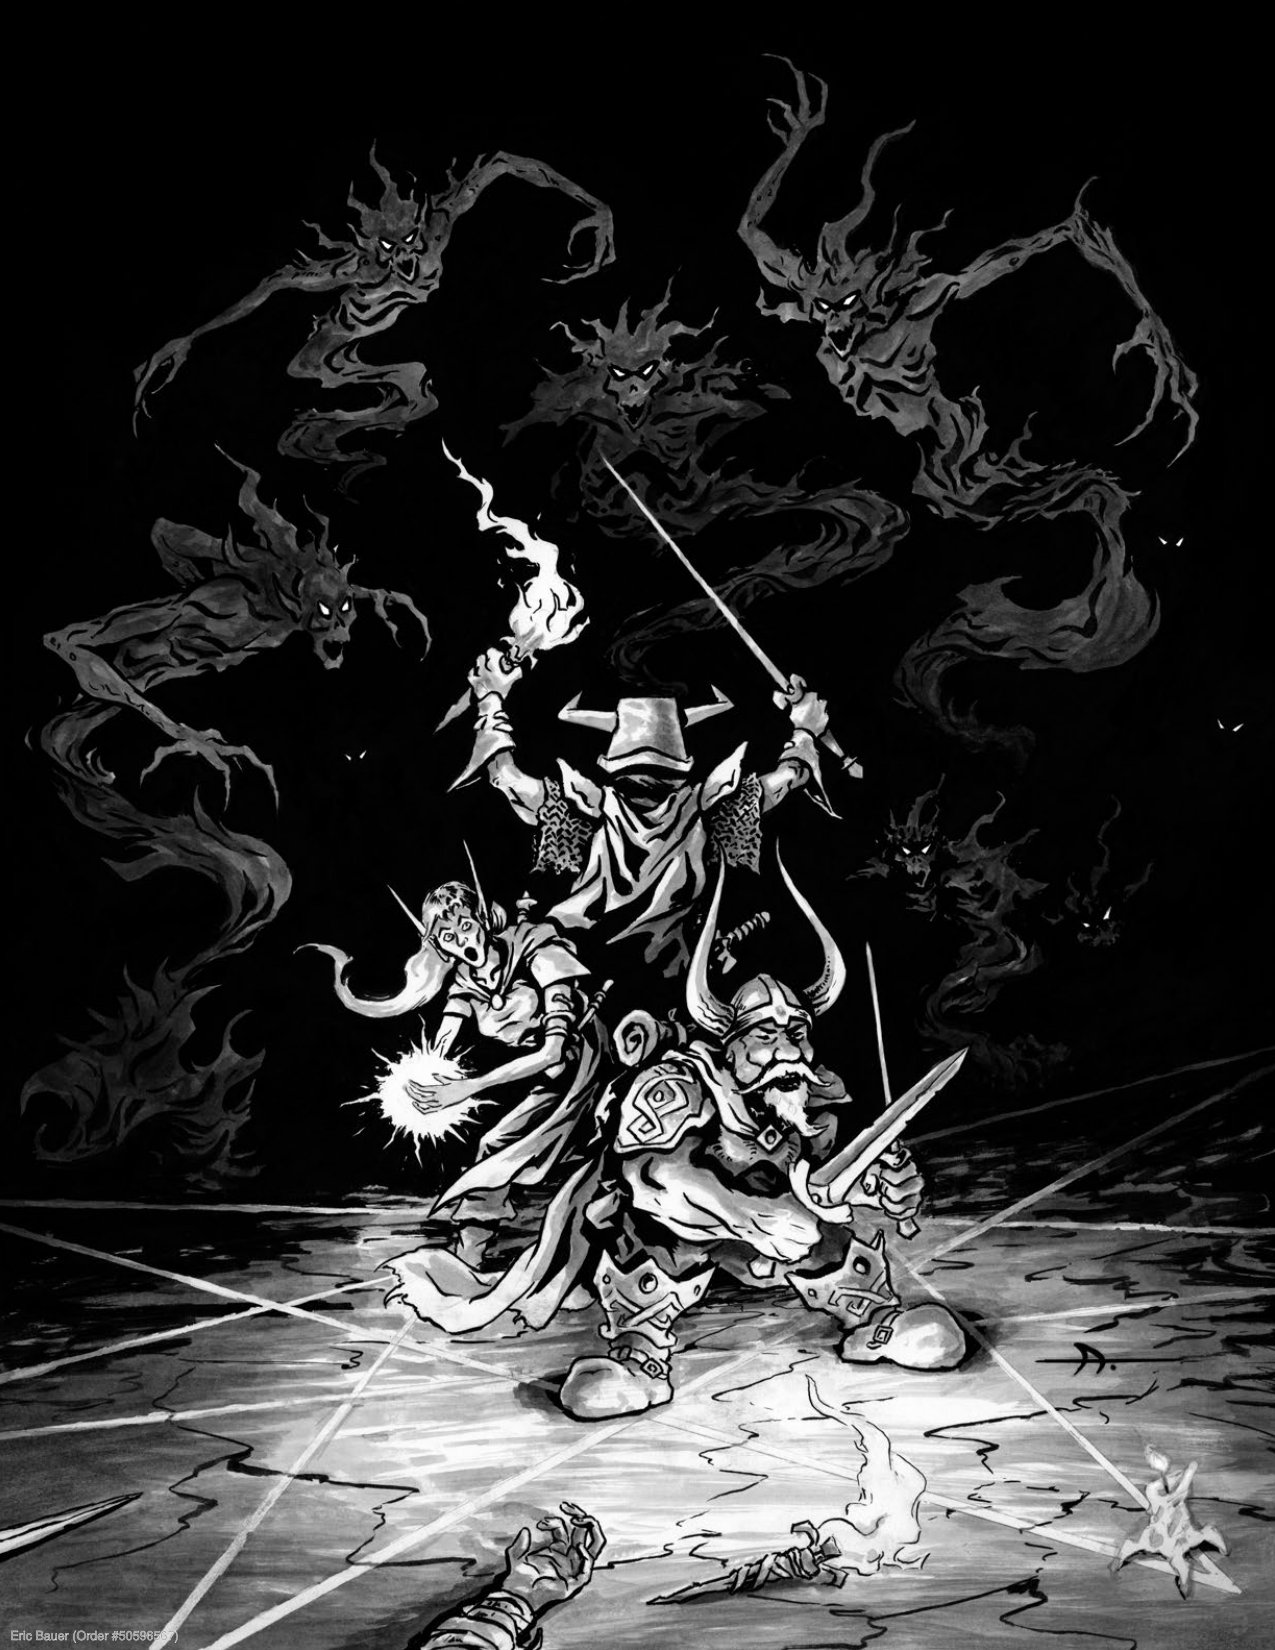
Each time the key is turned in the lock, shades of dead slaves appear outside the magic sigil. Easily mistaken for shadows in the sooty darkness, the shades immediately attack anyone outside the star of Sezrekan. Then the shades hover at the edge of the sigil, howling in hunger for the souls of the living, enraged that the PCs are re-enacting the rites of the wicked Theophages.
The number of shades increases with each turn of the key:
1 turn of the key: 2 shades
2 turns: 4 additional shades (totaling 6)
3 turns: 8 additional shades (totaling 14)
4 turns: 16 additional shades (totaling 30)
5 turns: 32 additional shades (totaling 62)
6 turns: 64 additional shades (totaling 126)
7 turns: 128 additional shades (totaling 254, which are dismissed when the door is opened)
8 turns: 256 additional shades (totaling 510), and so on ...
Attempting to open the doors on any selection other than seven instantly douses the candles, permitting the shades to enter the circle. The howling shades swarm the PCs from all sides, violently dragging their souls from their bodies.
Swift-acting characters can turn back the key from a count higher than seven. Upon reaching the count of seven, the candles reignite, permitting passage through the doorway if the PCs are brave enough to try it. This does not expel the shades from inside the sigil, though the horrors will not follow the PCs through the doorway. Upon the PCs’ return, the party finds that the shades – both inside and outside the sigil – have dispersed.
If the party succeeds in opening the lock, the brass doors swing wide to reveal area 1-11: an open-air throne room high atop a tower in the smoking City of Brass, on the Elemental Plane of Fire.
Battle with the shades: The mindless, howling shades are inefficient in their attacks. Only are able to attack a PC in a given round, and even fewer if the party closes ranks to ward off the horde. However, if the PCs panic, the hungry shades fall on them like spectral wolves.
The icy claws of the shades pass through armor, flesh, and bone to rend and pierce the soul. An attack deals temporary Stamina damage (regained at the rate of 1 point per hour). Any PC reduced to 1 or 2 Stamina collapses unconscious. Characters brought to 0 Stamina are irrevocably slain.
Judge’s note: Even if the PCs (or their players) rightly assume the correct number of turns of the key, judges are encouraged to draw out the counting – calling out the swarming shades and confirming players’ approval before they attempt to open the portal.
The ever-increasing number of shades gathered outside the magic sigil may give even the most confident reaver reason to pause, affording impulsive characters the opportunity to doom the entire party.
Finally, players acquainted with Middle Eastern folktales can be forgiven for assuming that the correct number of turns is 12. Gently remind the players that their PCs have not read One Thousand and One Nights, nor would they be expected to. If their characters still insist on turning the key twelve times and trying the door, the judge should have no qualms slaughtering the party with no less than 8,190 shades.
Shades (var.): Init ; Atk shadow claw melee ( Stamina); AC 10; HD ; hp 1; MV 30’; Act ; SV Fort , Ref , Will ; AL C.
Area 1-8 The Hidden Seam p.9
Area 1-8 – The Hidden Seam
At first glance, there is nothing to distinguish this side passage. However, with careful inspection, characters note a faint breeze rising through the passageway.
The air is escaping through a narrow chimney in the rock. With effort and hours of work, the seam can be widened to allow the passage of human-sized creatures. Characters clawing their way to the surface emerge in a dense copse of trees, south and east of the entrance to the Devil’s Maw, escaping the notice of the Black King’s forces.
Area 1-9 Hall of Ascension p.9
Area 1-9 – Hall of Ascension
The rough caves give way to a precisely worked stone passageway set with intermittent stairs. The walls are set with sooty mosaics depicting hooded cultists engaged in some obscene rite.
The hall once served as a testament to the Theophages’ devotion in their quest to shake free the shackles of mortality. The passage offers clues to activating the portal to the Elemental Plane of Fire in area 1-10.
Cautious characters investigating the seven stair sets discover that none of them are trapped. Each set is, in turn, seven in number, and the face of each seventh step is carved to mirror the adjacent panel. The steps are very low, each rising no more than 2” in height.
With 4 panels on the west side, and 3 on the east, the walls are not symmetrical. The tile mosaics are blackened with greasy soot and have cracked open in places, weeping greasy oils that instantly catch fire before flaring out.
In order, moving from north to south:
First pane (west wall): Seven Theophages processing in a row, bearing faint candles through the darkness. Oppressive gods threaten from all sides.
Second panel (east wall): The seven Theophages stand in a circle; their flames have combined to force back the darkness and the gods.
Third panel (west wall): The seven cultists anointing one another with soil, water, fire, and darkness.
Fourth panel (east wall): Seven Theophages gathered before an enormous golden egg, wreathed in blazing fire.
Fifth panel (west wall): The seven Theophages bear the flame to a mighty mountaintop, where their brethren await.
Sixth panel (east wall): Fire, stone, water, and darkness combining to form a four-headed dragon. Theophages encircle the dragon, their arms raised in triumph.
Seventh panel (west wall): The seven Theophages, suffused with light, lording over the universe.
Area 1-11 Black Thrones of the Ifrit p.10
Area 1-11 – Black Thrones of the Ifrit
The portal opens to a grand, open-air balcony, atop an impossibly high tower. A pair of soot-black thrones overlook a sprawling city below. Beyond the high brass walls a ring of volcanoes claw at the sky, vomiting clouds of black ash and a pyroclastic rain of fire. Streaks of lightning fork inside the roiling clouds and a constant tempo of thunder hammers down from the night sky.
Characters venturing through the portal find themselves atop a tower in the heart of the City of Brass:
Cautiously you slip through the smoky portal to the opulent throne room. Behind the thrones, a short series of steps descend to an open doorway. Two fiery giants, each twice as tall as a human and wreathed with dancing flames, stand guard – facing inside, away from the thrones.
Just behind the giants is a slim marble doorway set with gemstones. The door stands ajar; through the gap you can spy the flash of more jewels, and the brilliant gleam of silver and gold.
The throne room was once home to an ifrit prince and his consort. However, the powerful pair are now trapped in the Theophages’ vast alchemical alembic, helping to give physical form to chaos.
An honor guard has been stationed at the entrance to the throne room to await the prince’s return. Each of the ifrits stands 12’ in height, and is armed with an enormous, blazing saber. However, the constant roll of thunder drowns out lesser noises and long as the PCs are discreet, there is little chance of being discovered.
Slipping behind the ifrits through the door leading to the treasure hold in area 1-12, is easily and safely accomplished. But prying loose the gemstones from the doorway itself risks discovery.
There are 48 stones in all, each worth gp. Each time a stone is pried free of the archway, the PC must attempt a Luck check (roll under); on a failed check, the guards spin around, their sabers blazing with fire. (Thieves can attempt a DC 15 Disable Trap check in lieu of the Luck check.)
If the PCs reveal themselves – either through foolishness or some unfortunate mishap – the ifrit immediately cut them down and cast their bodies over the lip of the tower.
Ifrit Champions (2): Init ; Atk fist melee () or saber melee (); AC 15; HD ; hp 75 each; MV 35’; Act ; SP immune to fire, critical threat range 20-24 (/crit table G); SV Fort , Ref , Will ; AL C.
Area 1-12 Treasure Hold p.11
Area 1-12 – Treasure Hold
The narrow gallery overflows with riches beyond your imagination. Demonic statutes, cast in bright gold and set with jewels for their multifarious eyes, stand on either side. Gleaming scimitars and bright helms, sundered in the throes of battle, hang upon the wall. Heavy samite tapestries, threaded with silver and platinum, hang still in the sweltering air.
At the end of the chamber is a square marble pedestal, rising some 8 feet in height. Atop sits a nest of spun gold decorated with silver sticks and twigs. And in the center of the nest rests an enormous black egg. Even from afar you can feel the pent-up heat washing off the stony shell.
The trophy hall showcases a portion of the prince’s celebrated wealth. It has laid untouched since the ifrit was summoned and pressed into service by the Theophages. Despite the overwhelming riches, very little of it is of use to the PCs.
The six statues, depicting various archdukes of Hell, are worth 10,000 gp each, but are far too heavy to be carried and must be dragged back to the portal, alerting the sentries.
Similarly, the samite tapestries (three in all) might be valued at 2,500 gp each, but silently removing them from their hangers some 20’ above the floor, and bearing them home is a feat worthy of a master thief.
The mighty scimitars offer some promise, though they were forged for ifrits and their kin; the mere act of wielding the ponderous weapons requires Strength of 17 or greater (dealing damage and fetching 150 gp or more each).
The sole exception is the phoenix egg – the goal of the Black King. If cracked, the egg immediately bursts into searing flame. Corpses placed into the flame are returned to life, and broken objects are mended. Living creatures placed into the flame are quickly rendered infants and then motes that vanish from existence – the “destruction” of aging undone in an instant. The flames flare brightly for rounds, taking the form of a flaming bird, before vanishing in a searing gout of flame and black smoke.
Finally, the egg’s nest, while unwieldy, is a marvel of craftsmanship. The finely woven gold thread, and carefully hammered silver “twigs” are worth 150 gp for their base metals alone, but ten times more valuable as objects of art. (Finding a prince or emperor wealthy enough to afford the asking price will be an adventure in itself.)
The large phoenix egg can be safely carried by three or more PCs. If two or fewer characters attempt to carry the egg, the PC with the highest Luck must attempt a Luck check or slip as they pass the guards, dropping the egg. This does not threaten the egg, but certainly alerts the ifrits.
CONCLUSION
Characters emerging from the main entrance to the Devil’s Maw discover the Black King and his men still waiting for them. The brigands have set up a rude camp, where they hold ten villagers hostage. The Black King gives a roar of delight at the sight of the characters and demands that the PCs surrender the egg. So eager to escape his own doom, he fails to demand that the PCs surrender their weapons or any other treasure gleaned from dungeons.
The conclusion of the adventure can unfold in any number of ways. Judges are encouraged to embrace the unknown and honor the players’ choices. Whether the adventure ends in an easy triumph, a total party kill, or somewhere in-between should be decided by the PCs’ actions and the dice.
Here are some guidelines to help judges game out some of the more likely conclusions:
Surrendering the egg to the Black King: Ignoring warnings from his men, the bandit chief scrambles forward, wrenching the egg from the PCs. Eyes wide with hope and fear, he smashes open the egg.
The egg’s flames engulf the brigand, undoing a life of destruction and misdeeds. The Black King roars in elation as he is transformed back into a young reaver, but his triumph turns to terror as he is reduced to a teen, then a child, before finally vanishing from sight altogether.
The brigands, horrified at what they have witnessed, break ranks and flee.
The PCs have carried the day and any brigands they encounter flee, quaking at the sight of the Heroes of the Devil’s Maw.
Attacking the Black King: In order to have any chance at success, the PCs need to trick the Black King into coming close enough for a surprise attack. Even a simple ruse, performed well, has a good chance of success. Believing his salvation is at hand, the melancholic bandit chief is giddy with delight, and prone to missteps.
This printing of DCC RPG: DCC Day 2021 - Beneath the Well of The following text is the property of Wizards of the Coast, any other trademark or registered trademark clearly identiBrass is done under version 1.0 of the Open Gaming License, Inc. and is Copyright 2000 Wizards of the Coast, Inc (“Wizfied as Product identity by the owner of the Product Identity, and the System Reference Document by permission from ards”). All Rights Reserved. and which specifically excludes the Open Game Content; (f) Wizards of the Coast, Inc.Designation of Product Identity: 1. Definitions: (a)”Contributors” means the copyright and/or “Trademark” means the logos, names, mark, sign, motto, The following items are hereby designated as Product Identity trademark owners who have contributed Open Game Content; designs that are used by a Contributor to identify itself or in accordance with Section 1(e) of the Open Game License, (b)”Derivative Material” means copyrighted material includits products or the associated products contributed to the version 1.0: Dungeon Crawl Classics, DCC RPG, Mighty Deed ing derivative works and translations (including into other Open Game License by the Contributor (g) “Use”, “Used” or of Arms, spell check, Luck check, spellburn, mercurial magic, computer languages), potation, modification, correction, “Using” means to use, Distribute, copy, edit, format, modify, corruption, disapproval, all spell names, all proper nouns, addition, extension, upgrade, improvement, compilation, translate and otherwise create Derivative Material of Open capitalized terms, italicized terms, artwork, maps, symbols, abridgment or other form in which an existing work may be Game Content. (h) “You” or “Your” means the licensee in depictions, and illustrations, except such elements that alrecast, transformed or adapted; (c) “Distribute” means to reterms of this agreement. ready appear in the System Reference Document. produce, license, rent, lease, sell, broadcast, publicly display, 2. The License: This License applies to any Open Game ConDesignation of Open Content: Subject to the Product Identity transmit or otherwise distribute; (d)”Open Game Content” tent that contains a notice indicating that the Open Game designation above, such sections of Chapter One: Characters means the game mechanic and includes the methods, proContent may only be Used under and in terms of this License. and Chapter Four: Combat as derive from the SRD are desigcedures, processes and routines to the extent such content You must affix such a notice to any Open Game Content that nated as Open Gaming Content. does not embody the Product Identity and is an enhancement you Use. No terms may be added to or subtracted from this Some of the portions of this book which are delineated OGC over the prior art and any additional content clearly identiLicense except as described by the License itself. No other originate from the System Reference Document and are fied as Open Game Content by the Contributor, and means terms or conditions may be applied to any Open Game Concopyright © 1999, 2000 Wizards of the Coast, Inc. The any work covered by this License, including translations and tent distributed using this License. remainder of these OGC portions of these book are hereby derivative works under copyright law, but specifically excludes 3.Offer and Acceptance: By Using the Open Game Content added to Open Game Content and, if so used, should bear Product Identity. (e) “Product Identity” means product and You indicate Your acceptance of the terms of this License. the COPYRIGHT NOTICE “DCC RPG: DCC DAY 2021 - BENEATH product line names, logos and identifying marks including trade dress; artifacts; creatures characters; stories, storylines, 4. Grant and Consideration: In consideration for agreeing THE WELL OF BRASS”, copyright © 2021 Goodman Games LLC, all rights reserved, visit www.goodman-games.com or plots, thematic elements, dialogue, incidents, language, to use this License, the Contributors grant You a perpetual, contact info@goodman-games.com” artwork, symbols, designs, depictions, likenesses, formats, worldwide, royalty-free, non-exclusive license with the exact terms of this License to Use, the Open Game Content. DCC RPG: DCC Day 2021 - Beneath the Well of Brass is poses, concepts, themes and graphic, photographic and other visual or audio representations; names and descriptions 5.Representation of Authority to Contribute: If You are copyright © 2021 Goodman Games LLC. Open game conof characters, spells, enchantments, personalities, teams, contributing original material as Open Game Content, You tent may only be used under and in the terms of the Open personas, likenesses and special abilities; places, locations, represent that Your Contributions are Your original creation Game License. environments, creatures, equipment, magical or supernatural and/or You have sufficient rights to grant the rights conveyed OPEN GAME LICENSE Version 1.0a abilities or effects, logos, symbols, or graphic designs; and by this License.
If the PCs can slay the Black King in a few quick rounds, his men’s morale is shattered. However, if the bandit-lord is able to recover, he fights with a black rage, doing his best to ensure the PCs’ demise and follows with the slaughter of their village.
Evade the Brigands: Characters slipping free of the Devil’s Maw via area 1-8 are faced with a difficult choice: Do they risk their lives to save their fellow villagers, or cruelly abandon friends and family to their doom?
If the characters do elect to flee, fate is not kind to the village or its folk. After several days, when it becomes clear that the PCs will not emerge from the Maw triumphant, the Black King follows through on his promise to slaughter the hamlet. He spares 10 villagers and sends them back into the Maw in a final attempt to recover the egg.
The Black King: Init ; Atk battleaxe melee (); AC 15; HD ; hp 16; MV 30’; Act ; SV Fort , Ref , Will ; AL C.
Chainmail armor, battleaxe, dagger, bearskin cloak, belt pouch with sp, gp and gems (worth gp each).
Shieldmen (2): Init ; Atk spear melee (); AC 14; HD ; hp 5 each; MV 30’; Act ; SV Fort , Ref , Will ; AL C.
Studded leather armor, spear, shield, handaxe, dagger, belt pouch with sp.
Brigands (18): Init ; Atk shortsword melee (); AC 13; HD ; hp 3 each; MV 30’; Act ; SV Fort , Ref , Will ; AL C.
Leather armor, shortsword, shield, axe, dagger, belt pouch with cp.
6.Notice of License Copyright: You must update the COPYDistribute. RIGHT NOTICE portion of this License to include the exact text 11. Use of Contributor Credits: You may not market or of the COPYRIGHT NOTICE of any Open Game Content You advertise the Open Game Content using the name of any are copying, modifying or distributing, and You must add the Contributor unless You have written permission from the title, the copyright date, and the copyright holder’s name to Contributor to do so. the COPYRIGHT NOTICE of any original Open Game Content you Distribute. 12 Inability to Comply: If it is impossible for You to comply 7. Use of Product Identity: You agree not to Use any Product with any of the terms of this License with respect to some or all of the Open Game Content due to statute, judicial order, Identity, including as an indication as to compatibility, except or governmental regulation then You may not Use any Open as expressly licensed in another, independent Agreement with Game Material so affected. the owner of each element of that Product Identity. You agree not to indicate compatibility or co-adaptability with any Trade- 13 Termination: This License will terminate automatically if mark or Registered Trademark in conjunction with a work You fail to comply with all terms herein and fail to cure such containing Open Game Content except as expressly licensed breach within 30 days of becoming aware of the breach. All in another, independent Agreement with the owner of such sublicenses shall survive the termination of this License. Trademark or Registered Trademark. The use of any Product 14 Reformation: If any provision of this License is held to be Identity in Open Game Content does not constitute a chalunenforceable, such provision shall be reformed only to the lenge to the ownership of that Product Identity. The owner of extent necessary to make it enforceable. any Product Identity used in Open Game Content shall retain 15 COPYRIGHT NOTICE all rights, title and interest in and to that Product Identity. Open Game License v 1.0 Copyright 2000, Wizards of the 8. Identification: If you distribute Open Game Content You Coast, Inc. must clearly indicate which portions of the work that you are distributing are Open Game Content. System Rules Document Copyright 2000 Wizards of the 9. Updating the License: Wizards or its designated Agents Coast, Inc.; Authors Jonathan Tweet, Monte Cook, Skip Williams, based on original material by E. Gary Gygax and may publish updated versions of this License. You may use Dave Arneson. any authorized version of this License to copy, modify and distribute any Open Game Content originally distributed under DCC RPG: DCC Day 2021 - Beneath the Well of Brass, any version of this License. copyright © 2021 Goodman Games LLC, all rights reserved, 10 Copy of this License: You MUST include a copy of this visit www.goodman-games.com or contact info@goodman-games.com FIRST PRINTING License with every copy of the Open Game Content You
LANKHMAR ADVENTURES A 11 NEW
Enter the thrilling world of Fritz Leiber’s Nehwon, home to the legendary city of Lankhmar and the infamous heroes Fafhrd and the Gray Mouser! Prepare yourself to battle members of the city’s nefarious Thieves’ Guild in fog-shrouded alleys, to barter for cursed curios in the Plaza of Dark Delights, and to seek the wisdom of Ningauble of the Seven Eyes and Sheelba of the Eyeless Face! All this and more is possible with DCC Lankhmar.
Inside the Dungeon Crawl Classics Lankhmar boxed set: The Judge’s Guide to Nehwon • Compendium of Secret Knowledge Lankhmar: City of the Black Toga • A card stock 3-panel Judge’s Screen • No Small Crimes in Lankhmar adventure Beautifully detailed poster maps of Lankhmar and Nehwon
VAILABLE FOR DCC LAN KHMAR!
Available Now!