Abbot of the Woods
Lv 1-3DCC 107 · p.46
Open source p.46THE ABBOT OF THE WOODS
A level 1-3 DCC RPG adventure By Harley Stroh
INTRODUCTION
The Abbot’s Hoard is a tale known to all would-be treasure hunters: rebuking the decadent cities of man, a high priest led his followers into the wilderness to seek a life free of vice and sin. They bore with them a treasure train of priceless relics: holy fonts chased with silver and gold; gem-encrusted croziers; liturgical books bound in plates of platinum and sewn with golden wire; censers of carved gold; and five sacred reliquaries, proof against the dooms that stalk every mortal man.
The tales all end there. The Abbot and his congregation vanished, never to be seen nor heard from again. And to this day, no treasure hunter has been cunning or courageous enough to return with the secrets of the Abbot of the Woods.
The adventure is designed for 5 to 8 players with 1st to 3rdlevel characters. 1st-level PCs should be sure to travel with a retinue of hirelings. In playtests the hirelings served as a ready pool of potential 0-level PCs; as adventurers were slain by the horrors lurking within the abbey, courageous (or desperate) new PCs arose to take their place.
BACKGROUND
The lure of the abbey is primarily one of looting and plunder: when the Abbot and his followers vanished into the wilderness, they carried with them a god-hoard of silver and gold. Every boastful drunkard and wine-stained mercenary can recount at least one fanciful tale of the treasure’s fate, but no one has produced so much as a single silver candlestick. It stands to reason that the hoard remains undiscovered – or unclaimed.
Learned souls whisper of another, less terrestrial treasure hidden amidst the ruins. Alchemists, scholars of the occult, and their ilk, all affirm the belief that the Abbot had secured a means of immortality. Theories hold that he led his people into the wilds so that he could complete the esoteric rite far away from the prying eyes of the Overlord, confirming upon himself the mantle of godhood.
If the PCs consider themselves better than base reavers, consider seeding your campaign with hints at the Abbot’s hidden purpose. Wizards will certainly have cause to discover the Abbot’s key to eternal life, just as clerics and witchhunters will have reason to stamp out the Abbot’s heresy. Thieves and mercenary-minded warriors can expect the secrets to command a high price in the thronging Souk, for who among us doesn’t want to live forever?
It is a question, perhaps, that only the Abbot can answer.
THE ABBOT'S SECRET
For all its cosmological import, the story behind the abbey is tragically common. Approaching the end of his mortal coil, the Abbot turned his attentions to the question of eternal life. Scouring ancient texts of forbidden lore, he discovered what he believed he sought: a rite that would stave off each of the Five Dooms of Mankind.
But great magic requires great sacrifice. The Abbott led his people into the wilds, where he oversaw the construction of a chapel suited specifically to his purpose. Then, in the rock and stone beneath the abbey, the Abbot directed the construction of five reliquaries, each placed according to sacred ancient principles.
Finally, the Abbot commanded his people to complete the fell rite. His body was quartered; his four limbs and head were placed within the reliquaries and his torso – yet living – was set within the heart of the subterranean complex. His limbs and his head were each placed as an offering to a single doom. Captured by the individual offerings, none of the Five Dooms were able to reach the torso to claim the Abbot’s life.
In this way, the Abbot was able to secure immortality…after a fashion. He lives within the stones and mortar of the abbey. Undying, yet trapped without sight, sound, or sensation of touch, the Abbot’s soul has long since succumbed to insanity. Left alone, it will persist to the end of the universe, deathless and forever mad.
Of course, all this might change with the arrival of reavers bent on plunder. By removing parts of the Abbot’s body from its reliquaries, the PCs free the Abbot to both act and die. In a fit of frenzied madness, driven by the approach of death’s yawning gate, the Abbot will attempt to secure his life by reclaiming his relics, no matter who or what stands in his way.
For the judge’s reference, the reliquaries and their dooms are listed below. Frustrated at their inability to claim the Abbot’s life, each of the dooms has coalesced into a physical manifestation. These spirits are neither living nor dead, but rather the spirit realm made material.
• Madness – Area 2-1: A maelstrom of rotten wood and debris.
• Violence – Area 2-2: An enormous man-ape, with a protruding belly filled with the fruit of its sins.
• Disease – Area 2-3: A carpet of rats covered in weeping boils and surrounded by a miasma of rot.
• Hunger – Area 2-4: A mob of ghostly, hollow-eyed urchins.
• Age – 2-5: A withered crone, with leathern skin that hangs loosely from her old bones.
Animals are terrified of the spirits, doing everything possible to escape. Similarly, characters with 5 Intelligence or less are profoundly uneasy, suffering a -1d to all actions when in their presence.
THE ABBEY OF THE WOODS
The remains of the ruined abbey squat atop a low, rocky scar in the heart of the forest. Dark woods press in from every side, and coniferous pines loom over the dense undergrowth of ferns, moss, and rotting deadwood. The air is preternaturally quiet and heavy with foreboding, as if even animals and insects eschew the forlorn ruins.
The abbey roof collapsed long ago. The few remaining rafters span the walls like a shattered ribcage. The abbey’s moss-covered stone walls are mostly intact, rising 16’ to 20’ in height. The stones composing the walls are carved in the semblance of horrified, screaming faces. Stacked atop one another, they form a wall of wailing, weeping souls caught in eternal torment. All the stones are covered in a fine, wet moss.
Adventurers readily note that eyes and mouths of the stones can be used as handholds, making the wall an easy climb (DC 7 Climb or Agility checks). On a fumbled check (any natural 1), a stone atop the wall rolls free beneath the climber’s weight, crushing the unlucky soul (DC 10 Ref save or damage). Characters inspecting the stones note that, in the place of mortar, the stones are growing connective tissue akin to tendons or muscle.
Climbing the walls invariably places weight on the wet moss; crushing or wringing out the moss releases not water, but blood, which dribbles down the tormented stone faces and soaks the climbers.
The abbey floor is overrun with a thick carpet of moss, punctuated by thin, scraggly grasses. As on the walls, blood pools wherever the moss is crushed or compressed. If tested by whatever terrible means the PCs conceive, the blood is revealed to be human. (Specifically, the undying blood of the Abbot’s devotees.)
The tunnels beneath the abbey were all carved by hand, displaying nothing in the way of craftsmanship or skill. Cut through solid stone and earth, the tunnels are shored up by wooden beams only where necessary. The walls of the tunnels are slick with what appears to common slime. However, upon closer investigation, the slime is revealed to be congealed blood.
PLAYER START
You emerge from the woods at the base of a rocky ridge. The forest rises behind you like a verdant green wave, threatening to crash over you and your companions. Before you – atop the rocky ridge – squat the stone walls of the ruined abbey.
The ridge is scoured of all vegetation save a single twisted oak, hung with dozens of blackened goat skulls. A chill wind whistles through the forest, causing the hanging heads to rattle against the boughs.
The tree’s barren limbs arch 20’ out in every direction; in order to inspect or remove the heads, PCs must climb out onto one of the long limbs. At the first hint of the PCs’ curiosity, dozens of vultures flock to the tree, darkening the sky and croaking at the climbers with violent intent.
Characters removing skulls from the tree draws the ire of the vultures. Would-be thieves are attacked by vultures each; the avians present little threat to armored characters, and are quickly driven away by showy magic, fire, or physical attacks. However, characters in the tree must make DC 7 Ref saves or slip from their perch, taking damage in the resulting fall.
The skin of each skull is black with grease and polished by the elements. The forehead of each goat skull has been branded with a crude approximation of a pentagram.
Broken open, each skull spills out a pair of crooked fingers, two toes, and a congealed mass of dried muscle (readily identified by clerics, surgeons and barbers as heart tissue). Clerics, wizards, and their ilk recognize the primitive offerings as akin to an immortality ritual.
The skull rattles belong to the abbey’s adherents, who gave up their own flesh in imitation of their master. Their sacrifices were not entirely in vain: the un-dying blood of the devotees now saturates the moss in and around the abbey.
AREAS OF THE MAP
Maps (1)
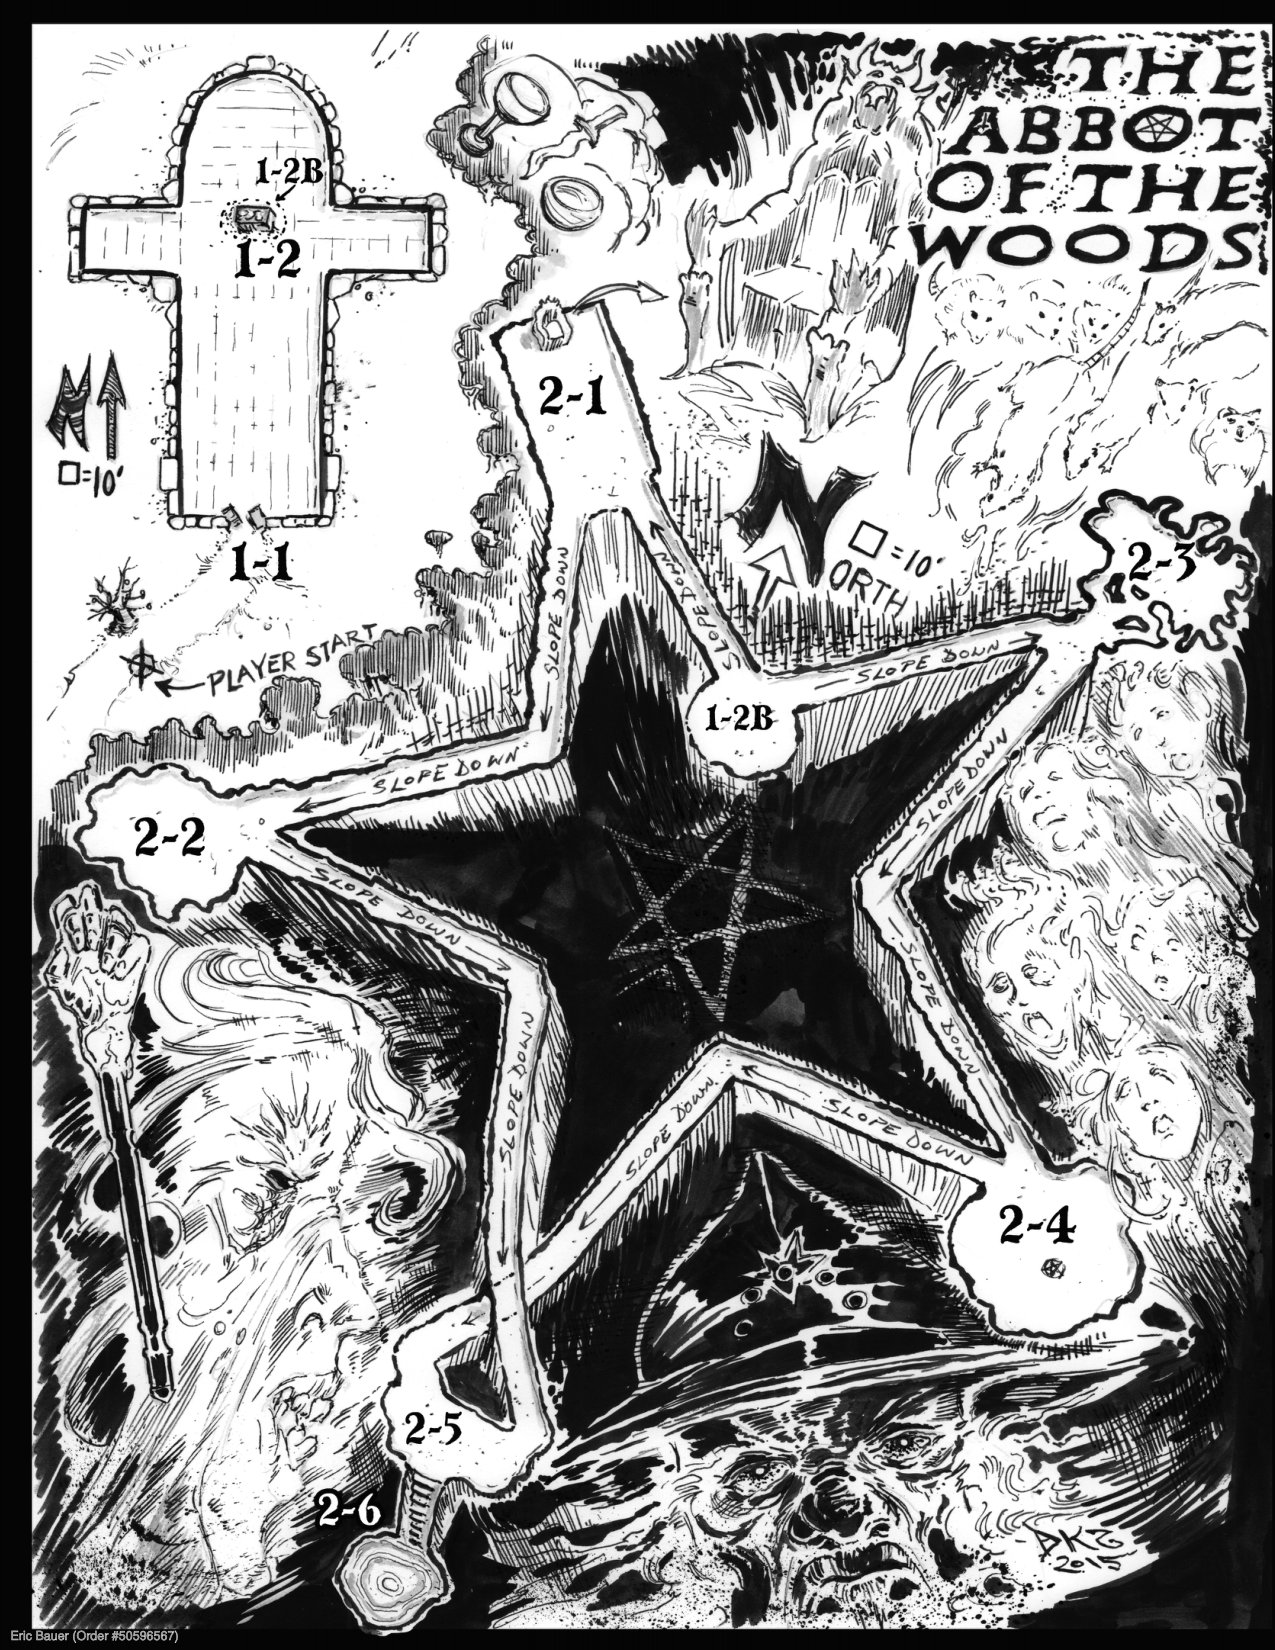
Bestiary (51)
Rooms (9)
Area 1-1 The Sundered Gate p.48
Area 1-1 – The Sundered Gate
A pair of great doors, built of thick slabs of oak and banded in rusting iron, hang weakly from scorched hinges. Once the double doors were barred from the outside. Now the iron bar lies bent and warped on mossy ground.
Close inspection of the doors confirms initial impressions; the wood is blackened and singed, and the iron deformed from intense heat. Inspection of the bent, half-melted iron bar confirms suspicions that the doors were forced open from the inside.
A disc of hammered copper, roughly 1’ across, is set into the center of each door and secured with five silver nails. Beneath each disc is a crude brand, burned into the wooden beams. The brand depicts the runes of Madness, Disease, Age, Hunger, and Violence.
Removing either of the discs causes an icy wind to blow out from over the treetops, setting any remaining skull rattles (from Player Start) clacking. Foreboding clouds begin to gather overhead, blotting out the sun (or stars).
Characters dragging open the gates immediately spy a pair of blue apparitions, watching silently from the end of the nave (area 1-2): a tall, thin male in priest’s robes, and a lithe female in a long cloak and veil. Both make signs against evil, as if to ward off the PCs. The pair part and then vanish as the characters move into the nave.
Area 1-2 The False Altar p.49
Area 1-2 – The False Altar
The nave rises to a low stone dais, topped by great mound of stones. Resting atop the stones are a serpentine dagger, a wooden chalice, and a blackened clay pot.
The mound of stones resembles an altar, but is actually an effort by the surviving acolytes to seal the entrance to the passages beneath the chapel. Careful investigators will note a draft of cool air whistling from within the stones.
The relics have sat untouched for years; the dagger is marred with dried blood, the wooden chalice is cracked and dusty, and the blackened clay pot is collecting moldering leaves.
The serpentine dagger inflicts damage but carries a foul taint from the hundreds of lives sacrificed in the name of the Abbot; every time its wielder misses an attack, the blade’s fumble range increases by 1. (If a character wielding the blade misses three times in a row, he would fumble on his next attack roll of 1 through 4.) On any fumble, the character also inflicts maximum damage upon himself.
The clay pot contains the black, fatty grease used to anoint the heads of the skull rattles. It causes any skin to shrink and harden like leather. Applied to a living creature, the grease permanently stains the skin charcoal black and grants the character a bonus to AC. There is sufficient grease to anoint two human-sized creatures.
The well is guarded by a pair of ghosts: acolytes who refused to abide the Abbot’s madness. The invisible spirits fight to prevent the PCs entering the well, animating the serpentine dagger along with any other weapons or objects not wielded or restrained by the PCs – a quarrel of bolts, for instance, provides a ready supply of weapons. Each ghost can animate up to 4 weapons at a time, attacking targets up to 10’ away; the ghosts will not pursue the PCs out of the altar room.
The ghosts can be turned, as per normal, or appeased by cautious PCs who aren’t too quick to resort to violence. If the characters attempt to parlay, the ghosts materialize in the forms of a translucent priest and nun. The pair pleads with the PCs to not free the Abbot. If the PCs can convince the ghosts of their intentions (left up to the judge’s discernment), the ghosts offer one bit of wisdom – the Abbot has sought immortality at the price of his own flesh, and so his flesh must be turned against him – before fading from sight.
If the PCs succeed in treating with the ghosts, the spirits return at the conclusion of the adventure to aid the party.
The Priest and Nun (2 ghosts): Init ; Atk animate object (dmg by weapon type); AC 10; HD ; hp 12, 14; MV fly 40’; Act ; SP un-dead traits, immune to non-magical weapons, invisible at will, animate object; SV Fort , Ref , Will ; AL N.
Area 1-2b The Well p.49
Area 1-2b – The Well
The well is covered with a makeshift lattice of branches and wooden beams, topped by a mound of stones. The well itself is 7’ across and descends 20’ to a sandy, stone floor. Twin passageways are cut into the walls of the well. Both passageways slope down steeply into darkness. The rune of Madness is cut into the west passage; the rune of Disease is carved above the east passage.
Area 2-1 Seat of Unreason p.49
Area 2-1 – Seat of Unreason
The broad passage is strewn with toppled, rotting pews and bits of fallen plaster. An elaborate stone throne, carved in the likeness of an enormous reclining demon, stands atop a low dais.
The throne serves as the reliquary for the severed head of the Abbot, the source of power for the spirit of Madness. The head rests within a locked funerary coffer built into the trapped maw of the throne. Meanwhile, the spirit of Madness and Unreason lurks within the nave, amid the rotting pews and fallen plaster.
At one time the ceiling of the chamber was plastered with a mosaic depicting a swirling maelstrom. Now much of the mosaic litters the floor, but a casual inspection of the ceiling reveals old bits of colored glass tiles.
Madness and Unreason: The spirit stirs as characters enter the nave, causing debris to rustle and spin about PCs’ ankles. Investigating the throne invites a cold wind to whistle down the nave; whispers can be heard on the wind, alternately warning the PCs to flee for their lives, and begging them to stay for all eternity.
The manifestations grow in intensity as the PCs investigate the throne, until debris swirls about the entire chamber. If the PCs sit upon the throne, or try to free the Head, a howl-
ing whirlwind fills the chamber (-1d to all actions; -2d to all ranged weapons), and takes the form of a towering humanoid composed of swirling plaster, rotting wood, and mud. These penalties persist until the spirit is defeated, the PCs leave the area, or the PCs succeed in capturing the Abbot’s Head.
An unholy being of Chaos, the spirit can be turned by clerics of Law. While the spirit cannot be destroyed, a successful turn attempt prevents it from attacking for 1 round.
Blows from the spirit of Madness engulf targets with flying debris. On a successful strike, the target suffers damage and must make a DC 13 Will save or find their mind “swept” into another PC, determined at random. The original PC’s body collapses, inert. The new, combined character has all the class abilities of both PCs, but can only use one set in any given round. (Essentially, two players must share one character; if there is a dispute as to what actions to take, the players must dice off as the competing voices rage inside the PC’s mind.) Any number of characters can be combined in this manner.
The spirit of Madness’s sole motivation is to cause disquiet amongst the PCs. Once the PCs win the prize free of the devil’s maw, the spirit’s strength is shattered. The maelstrom quickly disperses, leaving the air quiet and still. Any combined characters return to their original bodies, but will forever know the other’s innermost secrets.
Judge’s Note: To prevent boredom on the part of either mind-swept player, it is encouraged that whenever one player is deciding an action, the other player makes the associated rolls. Consider awarding a Luck bonus for PCs surviving, especially well-played madness.
The Throne: The stone throne resembles a mighty porcine devil in repose, its arms thrown wide. The devil is disemboweled; to properly occupy the throne, a character must sit on the devil’s lap, within its empty ribcage.
The Abbot’s severed head is locked within the devil’s maw. The statue’s jaw is hinged and locked, with a large keyhole set in the devil’s grinning fangs. A DC 5 Find Trap check confirms what the PCs must already suspect: the statue is trapped so that the massive arms snap in towards the chest cavity. A second Find Trap check (DC 15) reveals that the devil’s mouth is also trapped. Neither of the traps can be disabled, but they can be avoided:
The maw can be safely opened with a DC 20 Pick Lock check. On a failed Pick Lock check, the maw still opens – but in the same instant, the statue’s arms enfold any character standing on the dais (DC 15 Ref save to avoid; characters seated within the chest cavity cannot escape). The following round, the arms hoist any captured characters into the open maw, which slowly closes, crushing metal, flesh, and bone. Captured characters have but one round to slip their bonds with a DC 15 Strength check; those failing to escape suffer damage and must make a DC 20 Fort save or be crushed to death.
Allies can aid their comrades by attempting to forestall the crushing jaws. Pinning the jaws open with spikes, weapons, jo
staves, and the like merely delay the crushing jaws for a single round, granting trapped PCs an additional chance to escape.
The Abbot’s Head rests at the back of the maw. Exceptionally daring characters can try to snatch the head free, even on a failed Pick Lock check, with a DC 15 Agility or Pick Pocket check; on a failed check the PC is crushed in the maw as above.
The Head: Plated with hammered gold and encrusted with jewels, the Head is worth 500 gp for its raw materials alone. For those aware of its occult history, the Head is either beyond all monetary value or a thing of horror to be dreaded.
See area 2-6 for details on how the PCs can turn the relic against its master.
Spirit of Madness and Unreason: Init ; Atk fist melee ( plus mind-sweep); AC 13; HD ; hp 23; MV 30’; Act ; SP mind-sweep (DC 13 Will save to avoid); SV Fort , Ref , Will ; AL C.
Area 2-2 Reliquary of the Ape p.50
Area 2-2 – Reliquary of the Ape
The archway leading into the chamber is set with the runes for Violence and Revenge, which are readily deciphered by wizards and priests, and thieves succeeding on a DC 10 Read Languages check.
Broken flagstones and toppled pillars litter the roughhewn chamber. The air is choked with hanging dust and the tang of blood and sweat. The source of the destruction is clear: an enormous manape, slumbering against the far wall, its massive wrists and neck shackled by thick iron bands. Resting on the ape’s corpulent belly is a golden hand, set atop a rod of polished black stone. The deep rumble of the ape’s rhythmic breathing shakes the very stones beneath your feet.
The giant man-ape is the doom of Violence; the goldentipped rod is the reliquary of the Abbot’s Hand. It is left to the judge’s discernment whether the ape is truly asleep or merely feigning slumber. As a guideline, if the PCs have taken pains to explore the tunnels with caution and stealth, there is a 60% chance that the ape-demon is asleep. However, if the PCs haven’t explicitly taken steps to silence their actions, the man-ape is awake and hoping to lure foolish adventurers into its grasp.
If the ape is asleep, a thief can slip into the chamber and steal the Abbot’s Wand with a DC 15 Sneak Silently check and a DC 10 Pick Pocket check. If successful, the character succeeds in stealing the wand, causing the ape to awaken at the end of the round. If either check fails, the ape awakens and may take a surprise action before both sides roll for initiative.
Though shackled to the wall, the ape-man has enormous reach, able to snatch anything within 15’. On a successful attack, in lieu of inflicting damage, the beast can instead elect to seize the target (DC 15 Strength check to escape). A captured target is automatically hit in subsequent rounds.
The ape-man can also hurl stones at ranged targets. In the debris-strewn room there is effectively an unlimited amount of potential missiles, but magic or creative actions by the PCs could potentially sweep the area clean.
(The ape-man’s stats account for its bonds and inability to move about the chamber. If the spirit is somehow freed, use the improved bracketed stats.)
The beast’s belly breaks open when it is slain, spilling out small, bloodied ape-things. The size of halflings, with lanky arms that hang to the ground and covered in gore-drenched fur, they scatter through the chamber, fleeing for the exits and savagely attacking anything blocking their flight. Roughly half flee through each exit. Those that flee to area 2-3 are later found dead, picked to naught but bones.
Those that escape to the north rally after rounds, and begin stalking the PCs. They creep along the walls and cling to the ceilings, hungrily stalking the PCs. Given the opportunity, they swarm a single PC, dragging the unfortunate soul to his doom.
The Abbot’s Wand: The Abbot’s severed hand was dipped in molten gold and set upon the tip of a polished granite rod. The relic is worth 250 gp, but students of the occult will pay a far greater amount. See area 2-6 for mechanics on using the Wand against the Abbot.
Spirit of Violence (giant man-ape): Init ; Atk slam melee (), bite melee (), or stone ranged (); AC 10 [15]; HD ; hp 43; MV 0’ [40’]; Act []; SP grab; SV Fort , Ref [], Will ; AL C.
Gore Spawn (): Init ; Atk bite melee (); AC 10; HD ; hp 4; MV 40’ or climb 30’; Act; SV Fort , Ref , Will ; AL C.
Area 2-3 Reliquary of the Rat p.51
Area 2-3 – Reliquary of the Rat
The stench of rotting flesh hangs in the greasy air, like a foul miasma that coats your skin, tongue, and lungs. The rough-hewn chamber is awash in a sea of rats. They swarm in and out of the chamber through hundreds of holes burrowed in the walls and floor. The rats cluster around a single severed foot, ornamented with jewels and platinum bands, feasting on the flesh like supplicants, before vanishing back into the swarm.
The rats are the spirit of Disease. The decorated foot is another of the Abbot’s reliquaries. If any of the gore spawn (from area 2-2) fled here, all that remains are freshly gnawed bones.
Upon closer inspection it is apparent that all of the rats are diseased: Open sores, puckering abscesses, oozing scabs, patches of bare flesh, stunted limbs, pus-filled eyes, and literally thousands of fleas. The flesh of the Abbot’s Foot is endless, regenerating as quickly as the rats devour the rancid meat.
So long as the PCs do not approach or disturb the Foot, the rats pay them no heed. However, when provoked, the rats are a ravening wave, eager to rend flesh from bone. Characters caught in the tide must make a DC 15 Ref save or take damage as they are swarmed by rats; further, anyone bit by rats must make a DC 10 Fort save or contract a divine wasting disease, suffering points of Stamina damage every day until magically healed.
The rats fear open flame; the Reflex DC to avoid being bitten can be reduced by 5 if the PC spends his attack fighting off
the rats with a torch. Others can aid allies by hurling their torches or flasks of oil, or taking similar steps to ward off the rats.
The floor of the chamber is riddled with tunnels, and can no longer support the weight of human-sized creatures (even more so when laden with armor, weapons, and gear). Each round a character spends in the chamber, the PC must succeed on a DC 10 Luck check. On a failed check, the PC falls through the floor, sliding 15’ down into a hollow abscess beneath the chamber; moments later a flood of angry rats comes sliding after.
Knee-deep in diseased rats, showered by more rodents from above, in an ink-black pit with crumbling walls, the PCs are almost certainly doomed. It requires quick thinking and courage on the part of the character if they hope to escape with their lives:
• Rats! Each round, characters in the pits must succeed on DC 20 Ref saves to avoid being bitten; as above, open flame reduces the DC by 5, per source. (Standing amid four burning torches would nearly ensure a PC’s safety, though a natural 1 is still a failure.)
• Climbing: Attempting to ascend the crumbling walls without aid is nearly impossible. Characters must either succeed on a DC 25 Climb or Agility check, or catch a rope lowered from above.
• When in Doubt, Aim Lower: Exceedingly desperate PCs might attempt to collapse the entire chamber – a feat readily accomplished by cutting and hacking at the undermined foundation. The collapse triggers a second cave-in as the floor of the pit gives way, dropping PCs and rats alike down a long, rotten chute to area 2-5. The characters arrive in a shower of stone and fleeing rats, but otherwise unharmed. The spirit of Disease, displaced from its reliquary, withdraws.
The Hoof: The Abbot’s Foot is looped with platinum bands and set with precious stones. See area 2-6 for mechanics on using the Hoof against the immortal Abbot.
Spirit of Disease (Rat Swarm): Init ; Atk see above; AC 5; HD ; hp 100; MV 30’ or climb 30’; Act -; SP wasting disease (DC 15 Ref save or hp + Sta damage); SV Fort , Ref , Will immune; AL C.
Area 2-4 The Barren Fane p.51
Area 2-4 – The Barren Fane
The low hall is suspiciously empty, save for a humble wooden pedestal set with a simple wooden bowl. The pedestal is carved in the semblance of four gaunt men and women, reaching to the sky in desperate supplication.
The Arm of the Abbot is concealed within the pedestal; the door to the reliquary is cunningly carved and only discovered after a close inspection. The wooden begging bowl is of no significance.
The pedestal is secured with a simple tumbler (DC 10 Pick Lock check) that readily yields to a talented thief. Within the pedestal is a broken humerus encased in poured glass and then wrapped in tattered homespun cloth. Unwieldy and awkward to carry, the glass shatters with even a slight blow, destroying the relic.
Removing the relic from the pedestal causes a frigid wind to sweep through the hall, leaving scores of gaunt, blue beggar children in its wake. The ghost beggars turn to the PC as one, their hollow eyes wide with desperation. The ghostly forms are emaciated and gaunt, dressed in tattered rags.
Escape is as easy as destroying the relic. Shattering the glass sends a blast of icy air through the chamber; characters within the chamber must succeed on DC 15 Fort saves or suffer damage as they are blasted with ice.
Escaping with the relic is far more challenging:
The crowd of ghost-beggars refuses to let the PC pass. They cry out for alms, specifically food. Coins or other items have no worth to the beggars – they need food. A day’s worth of rations satisfies enough beggar-ghosts to move the PC a few steps towards the exit; it requires 20 days’ worth to exit the chamber. Other PCs can enter the fane, passing the through the crowd without incident, but when they attempt to leave, each PC must buy his way free with food.
Judge’s Note: It is likely that the player’s character sheets have little or no record of their supplies. There is no shame in this: the PCs are reavers and heathen slayers, not accountants! If a character record sheet has no accurate tally of rations, roll to determine the PC’s true number of food stores. Increase or decrease the die according to the PC’s Luck modifier, so that a PC with a Luck would roll , and a PC with Luck would roll .
If the PCs will not (or cannot) appease the beggars, they must fight their way free. The beggars swarm any PCs within the fane; any successful attack drains a PC of points of Stamina, causing the PC to become more gaunt and emaciated with each blow. A character reduced to 0 Stamina falls into a deathless slumber and can only be roused by the destruction of the relic (or a suitable quest of the judge’s devising).
It takes five rounds for a PC to cut his way free of the fane. Any successful turn attempt, or appropriate mighty deeds, reduces this by one round. Up to 6 ghosts can attack a PC at a time, but multiple characters fighting back to back dramatically reduce this number.
If the PCs manage to escape with the relic, see area 2-6 for details on how the characters can turn its powers against the Abbot.
Spirit of Hunger (hundreds of ghost beggars): Init ; Atk touch melee ( Sta damage); AC 10; HD ; hp 5; MV 30’; Act ; SV Fort , Ref , Will ; AL C.
Area 2-5 Reliquary of Time p.52
Area 2-5 – Reliquary of Time
The air in this chamber is still and stagnant, stinging your lungs with every breath and causing your torches and lanterns to sputter and spit. The walls and ceiling of the chamber collapsed long ago, littering the shattered floor with mounds of rubble, massive boulders, and uneven rock shelves.
Cautious PCs looking for an entrance rune will spy a tumbled arch cut with the sigil for Age.
The Abbot’s reliquary is buried beneath several tons of fallen stone. While there is no way to retrieve the relic, the lurking spirit is no less deadly. The chamber is saturated with the doom of Age; characters entering the place are immediately beset by its effects:
Round 1: Lungs sting and breathing is labored with chamber’s dead air. Characters’ upper epidermis and hair begins to flake and die, leaving an ashen coating on the skin. Food and drink spoil and are ruined.
Round 2: Organic materials begin to age. Cloth tears and frays, leather is quickly worn down, wood dries and splinters. Characters must make DC 5 Fort saves or age years.
Round 3: Non-organic materials begin to age. Metal rusts, blades become nicked and dull, armor looses its sheen, chain links weaken and bend. Characters must make DC 10 Fort saves or age years.
Round 4: Non-living, organic materials are reduced to dust. Metal objects grow weaker (weapons fail in combat on an attack roll of 1-5; armor fails when hit by an attack roll of 15+). Characters must make DC 16 Fort saves or age years.
Round 5: Non-organic materials are reduced to dust. Characters must make DC 20 Fort saves or age years.
Round 6+: Characters must make DC 25 Fort saves or be reduced to dust. Characters succeeding on the save age years.
Stepping out of the chamber stops the progression but does not relieve any of the effects. Returning to the chamber starts the cycle anew at round 1.
It is a short distance across the chamber, but the fallen rubble complicates the traverse. Unimpeded, it takes 2 rounds to cross the chamber. However, each round a character must succeed on a DC 10 Agility check or slip amid the rubble, sliding towards one of a dozen crevices and pits. Immediately call for a DC 13 Ref save; on a failed check, the character scrambles free of danger, but loses a round.
If either the Agility check or the Reflex save are fumbled with a natural 1 through 3, the character slips, pinned beneath the rubble. To escape, the PC must succeed on a DC 20 Strength check or receive aid in the form of an ally lifting the stone free.
Trapped characters see a translucent blue crone creeping towards them on all fours, moving like a spider along the ceiling and walls.
The crone – the doom of Age – only exists to the trapped PC. Other PCs are unable to perceive or act against the doom. There is little chance of a lone character fighting off the doom, but characters are nothing if not miraculous. If a character does succeed in defeating the crone, the aging effects of the hall are immediately reversed, and the triumphant PC ceases forevermore to age. (The character is not immortal, and may even die of old age, but will look like his or her current age when the end comes.)
Spirit of Age (ghost crone): Init ; Atk bite melee () or claw melee (); AC 15; HD ; hp 25; MV 30’ or climb 30’; Act ; SV Fort , Ref , Will ; AL C.
Area 2-6 The Abbot p.53
Area 2-6 – The Abbot
The stone steps come to an end at the shore of an inky pool some 20’ across. The pool is fed by dark rivulets streaming down the walls, ceiling, and steps. It is difficult to guess how deep the pool is, or even if the submerged steps continue on.
Set in the center of the pool is a stone bier. A torso, bereft of arms, legs, or a head, rests upon a treasure mound atop the platform amid the lapping waves.
As the PCs have likely come to expect, the pool and rivulets is the un-dying blood of the Abbot’s acolytes. The pool is 50’ deep, the torso of the Abbot resting atop a carved monolith of stone.
If none of the relics have been removed from their places of rest, the torso is inert, trapped within its immortal coil. The characters – be they hesitant, fortunate, or just simply lucky – are rewarded for their exceeding caution. If the characters can gain the top of the bier, they are free to loot the remaining treasures of the Abbot without fear of reprisal. (See Hoard of the Abbot, below.)
However, in the likely case that the PCs have disturbed at least one of the relics, the Abbot has been freed from his selfimprisonment. His freedom comes at a cost of his immortality, but the PCs might not live long enough to know the difference. The PCs’ arrival sets into motion the following series of events:
A tremor shakes the chamber from above, causing the waves of blood to wash up over the torso and the treasure mound.
Call for actions from the PCs. Moments later, a second tremor sends stones crashing down from above, collapsing the exit, and spilling an avalanche of rubble down the stone steps. Any PCs still on the steps must make DC 10 Ref saves or be knocked into the pool of blood.
At the start of the next round, waves wash over the platform, spilling the torso and all its treasures into the pool. Any characters atop the bier must make DC 10 Ref saves or be washed into the pool. A deep groaning fills the air, and the walls, floor, and ceilings tremble as a giant of the earth shakes free its surly bonds.
The Abbot has arisen. Bereft of a body, its spirit inhabits the abbey and its dungeons. With a final, stone-shattering quake, the Abbot sits free of the earth, a towering high god-thing composed of stone, earth, and the blood of its disciples.
All characters must attempt DC 10 Reflex saves. On a successful check, the PC is borne to the surface, riding astride the titan. On a failed check the character is also carried to the surface, but is pinned beneath crushing stones. To escape, the PC must succeed on a DC 20 Strength check or receive the aid of an ally.
The Abbot’s foremost goal is to regain its lost relics. On a successful attack it can elect not to inflict damage, but instead to seize hold of the PC. After cruelly examining its victim, it devours the character on the following round, casting PCs down its stone gullet to their doom.
Apart from flight, or incredible creativity, the PCs’ sole hope lies in the turning the relics against the Abbot. Each of the relics has the capacity to weaken the Abbot; together, they can render the god-thing helpless. Activating any one of the relics requires an action, and no single PC can activate more than one relic in a round.
The Head: A character bearing the Head may attempt a DC 15 Will save once per round. On a successful check, the character succeeds in dominating the spirit of the Abbot, impairing its actions by -1d for each point of the save equal or above 15. (A 15 save would result in a -1d and a 17 would result in -3d.) If the Abbot is defeated, the relic bestows its magic upon the bearer in the form of to his Intelligence and Personality scores.
The Abbot’s Wand: A character wielding the Abbot’s severed hand can attempt to direct the god-thing’s attacks. Any time the Abbot attacks, the character with the Wand may attempt to beat the roll with an opposing attack roll. (If the Abbot rolls a 14 to hit, and the PC with the Wand rolls a 15, the character wins.) If successful, the wand-bearer succeeds in altering the course of the attack, causing it to miss. If the Abbot is defeated, the relic bestows its magic upon the bearer in the form of to his Strength and Agility scores.
The Hoof: A character bearing the foul foot may elect to attempt a DC 15 Will save once per round. On a successful check, the character succeeds in reducing the Abbot’s speed by 5’ for each point of the save equal to or above 15. (A save of 15 would result in a speed of 25’ per round and a 17 would result in 15’ per round. If the bearer succeeds
with a natural 20, the Abbot is rendered immobile, rooted in place for all time.) If the Abbot is defeated, the relic bestows its magic upon the bearer in the form of to his Luck and Stamina scores.
The Humerus: Once per round, the bearer of the relic can swing the bone in a wide arc. The god-thing responds in kind, stumbling through its motions, and dramatically increasing the chances of PCs scoring critical hits. If the wielder succeeds on a DC 15 Reflex save, all attacks against the Abbot that round are critical hits on a roll of 15 or better. If the Abbot is defeated, the relic bestows its magic upon the bearer in the form of to all to hit and damage rolls.
The god-thing has ten rounds to regain any of its lost relics. If the Abbot succeeds, its immortality is assured. However, if the PCs manage to survive 10 rounds, the forestalled dooms catch up to the Abbot. Each of the freed dooms strikes at once, collapsing the would-be god in a shower of stone, blood and gore.
The Ghosts: If the PCs came to peace with the ghosts in area 1-2, the ghosts now return to intercede on their behalf. Each may take one action, at the judge’s discretion, to aid the PCs. This can be as simple as lifting free a stone so that a PC can escape, or taking a blow from the Abbot so the PC remains unharmed. Each ghost may perform but a single action before vanishing, never to return.
Hoard of the Abbot: The hoard remaining atop the platform is but a fraction of the Abbot’s original treasure, yet characters managing to secure the treasure can come away rich men. (Note: the treasure is loose, with coins and gems spilling every direction. How the PCs attempt to scoop up the loot may the final arbiter of how much they walk away with.)
The hoard is composed of x10 sp, x10 gp, religious items worth gp each (candlesticks, censers, and the like), and pieces of jewelry worth gp each.
Obviously, if the Abbot arises, the remaining loose treasure is lost, buried somewhere deep beneath the earth.
The Abbot of the Woods: Init ; Atk slam melee (); AC 10; HD ; hp 50; MV 60’; Act ; SP seize and devour; SV Fort , Ref , Will ; AL C.