Against the Thieves Guild
Lv 2DCC ATG · p.1
Open source p.1INTRODUCTION
Against the Thieves Guild is a Dungeon Crawl Classics RPG adventure intended for four to six 2nd-level characters and can be completed in two or more sessions. The adventure starts with the characters delving into the Labyrinth of Oathsworn Silence in pursuit of a valuable religious object. During the adventure, the characters will be forced to navigate past traps that reflect a bitter rivalry between two infamous thieves belonging to the Gravelight Sorority. Due to the prevalence of traps in the dungeon environment, it is recommended that the party include at least one thief, although this is not mandatory.
BACKGROUND
United by mutual ambition and friendship, Lyria and Dara rose to prominence as notorious thieves within the twisted alleys of the city of Nighthaven. Their combined ingenuity and cunning catapulted them up the ranks of the Gravelight Sorority. Every coin and treasure pilfered not only fortified the guild’s coffers, but also their reputation. Most notable among their escapades was the theft of a religious artifact from a sect of monastics devoted to Amun Tor, an elusive god of mysteries and secrets. As the story was shared and retold, Lyria emerged as its main character and was heralded as a mastermind, earning her the title of the criminal syndicate’s guildmaster.
Dara’s initial support for her friend soon turned to a burning envy, setting her calculating mind toward dark conspiracies. Over the years, their bond slowly cracked until it finally shattered. Dara felt overshadowed and underappreciated, believing her contributions to Lyria’s success had gone unrecognized. Whispers of dissent made their way through the ranks, and Dara initiated a coup to challenge her friend’s stewardship. The subsequent power struggle consumed the Gravelight Sorority, continuing until Lyria’s grip on power ultimately slipped away.
Lyria was dethroned and exiled but not broken. She disappeared from Nighthaven, seeking refuge among the very monastics she and Dara had robbed early in their roguish careers. She vowed to reclaim their most sacred treasure—the Reliquary of the Silent Sisters—and restore it to its rightful owners. Through manipulation, she convinced the monastics she would right her wrongs by fortifying their sanctuary against future theft by installing traps and magical wards. With their compliance, she meticulously rigged the sanctum with devious mechanisms designed specifically for one victim. Her preparations complete, only one task remained: setting the stage for her ultimate revenge.
After infiltrating the Gravelight Sorority’s vaults, Lyria reclaimed the Reliquary of Silent Sisters and left clues to lead Dara and the other traitorous rogues to where she had hidden the object. Fearing that the loss of the Reliquary would threaten the guild’s reputation, Dara sent numerous agents from the Gravelight Sorority to recapture the relic. Through repeated attempts by the thieves’ guild, the dungeon claimed many lives and eventually the very existence of the Gravelight Sorority.
As years have drifted by, memory of the labyrinth has faded into antiquity. The monastics have all perished, leaving nothing behind but the remains of their ruined convent. Yet remnants of Lyria’s taunting messages to her former allies still occasionally surface, ensnaring the curiosity of daring adventurers who are lured to the dark corners of Lyria’s maze in pursuit of the lost treasure.
ADVENTURE HOOKS
Here are a few suggestions to bring the characters into the adventure:
• A follower of Amun Tor approaches the adventurers about traveling to the Labyrinth of Oathsworn Silence. The follower has heard the whispers of her god who wishes for the Reliquary of Silent Sisters to be reclaimed and sanctified. The location of the labyrinth is shared with the party and a reward is offered for assisting with its retrieval.
• An elderly former member of the now-defunct Gravelight Sorority approaches the adventurers with a map for sale. It charts a path into the mountains to a place said to hold a worthy treasure. Age precludes them from venturing to the map’s destination, and they are down on their luck, willing to sell the map for a mere 50 gp. Scrawled upon the parchment is a personal note: “Dara, to reclaim what I have stolen from you requires following in my shadow once more. Beware…by the end of your search, the Reliquary of Secret Sisters may be only the second-most precious thing you have lost. -L.”
AMUN TOR, GOD OF MYSTERIES AND RIDDLES
Amun Tor is a god of riddles, secrets, and discretion. His followers are few, although spies and guardians of forbidden knowledge turn to his worship in hopes of being bestowed with his unique blessings. The Labyrinth of Oathsworn Silence represents one of the few formal sites where followers would congregate in knowing recognition of one another. Under the watchful eyes of a devout order of monastics, the labyrinth was designed to be a place of meditation where one could unburden themselves of their coveted secrets and be granted divine protection. The labyrinth’s walls act as a conduit to Amun Tor who safeguards such information from others, including their keepers.
Certain secrets entrusted to the god were deemed worthy of reward. A gemstone, sum of coin, or other treasure was granted to those who made an offering of distinction. The monastics who served as custodians for the labyrinth safeguarded both the Reliquary and Amun Tor’s treasury. As legends often do, the revered Reliquary and the vaults where it was kept spiraled into the world of myth and speculation.
• The judge can use any object relevant to their campaign world to motivate the characters to seek adventure within the Labyrinth of Oathsworn Silence. The Reliquary of Silent Sisters is easily substituted for a different item prized by the Gravelight Sorority that would have lure dthe thieves guild to enter Lyria’s dungeon. Under this scenario, Lyria’s curse is derived not from the Reliquary but as a divine curse Amun Tor exerts upon her as punishment for defiling his sacred halls and killing his worshippers. Lyria is thus found in area 2-9 stricken with paranoia, obsessively guarding over the prized possession.
BEGINNING THE ADVENTURE
Against the Thieves Guild begins with the party traveling to a remote location along the slopes of a craggy region. This unforgiving landscape is marked by twisting ravines and narrow canyons. The party arrives after having made an exhausting journey through harsh conditions.
A winding path through a narrow chasm leads to an abandoned edifice, formerly a convent that housed Amun Tor’s devoted servants. Read the following as the party ascends the path:
After days of relentless travel across an unyielding expanse of rocky terrain, your party has navigated a treacherous path threaded through twisting ravines and unstable footpaths. Throughout the journey, the landscape has remained a bleak canvas utterly
LEVEL 1: THE LABYRINTH OF OATHSWORN SILENCE
Beneath the ruins of the monastery lies a network of halls that was originally a maze designed for meditation before Lyria claimed it for her own purposes. Many of the traps on this first level were constructed by Lyria to taunt her former partner-in-crime.
GENERAL FEATURES
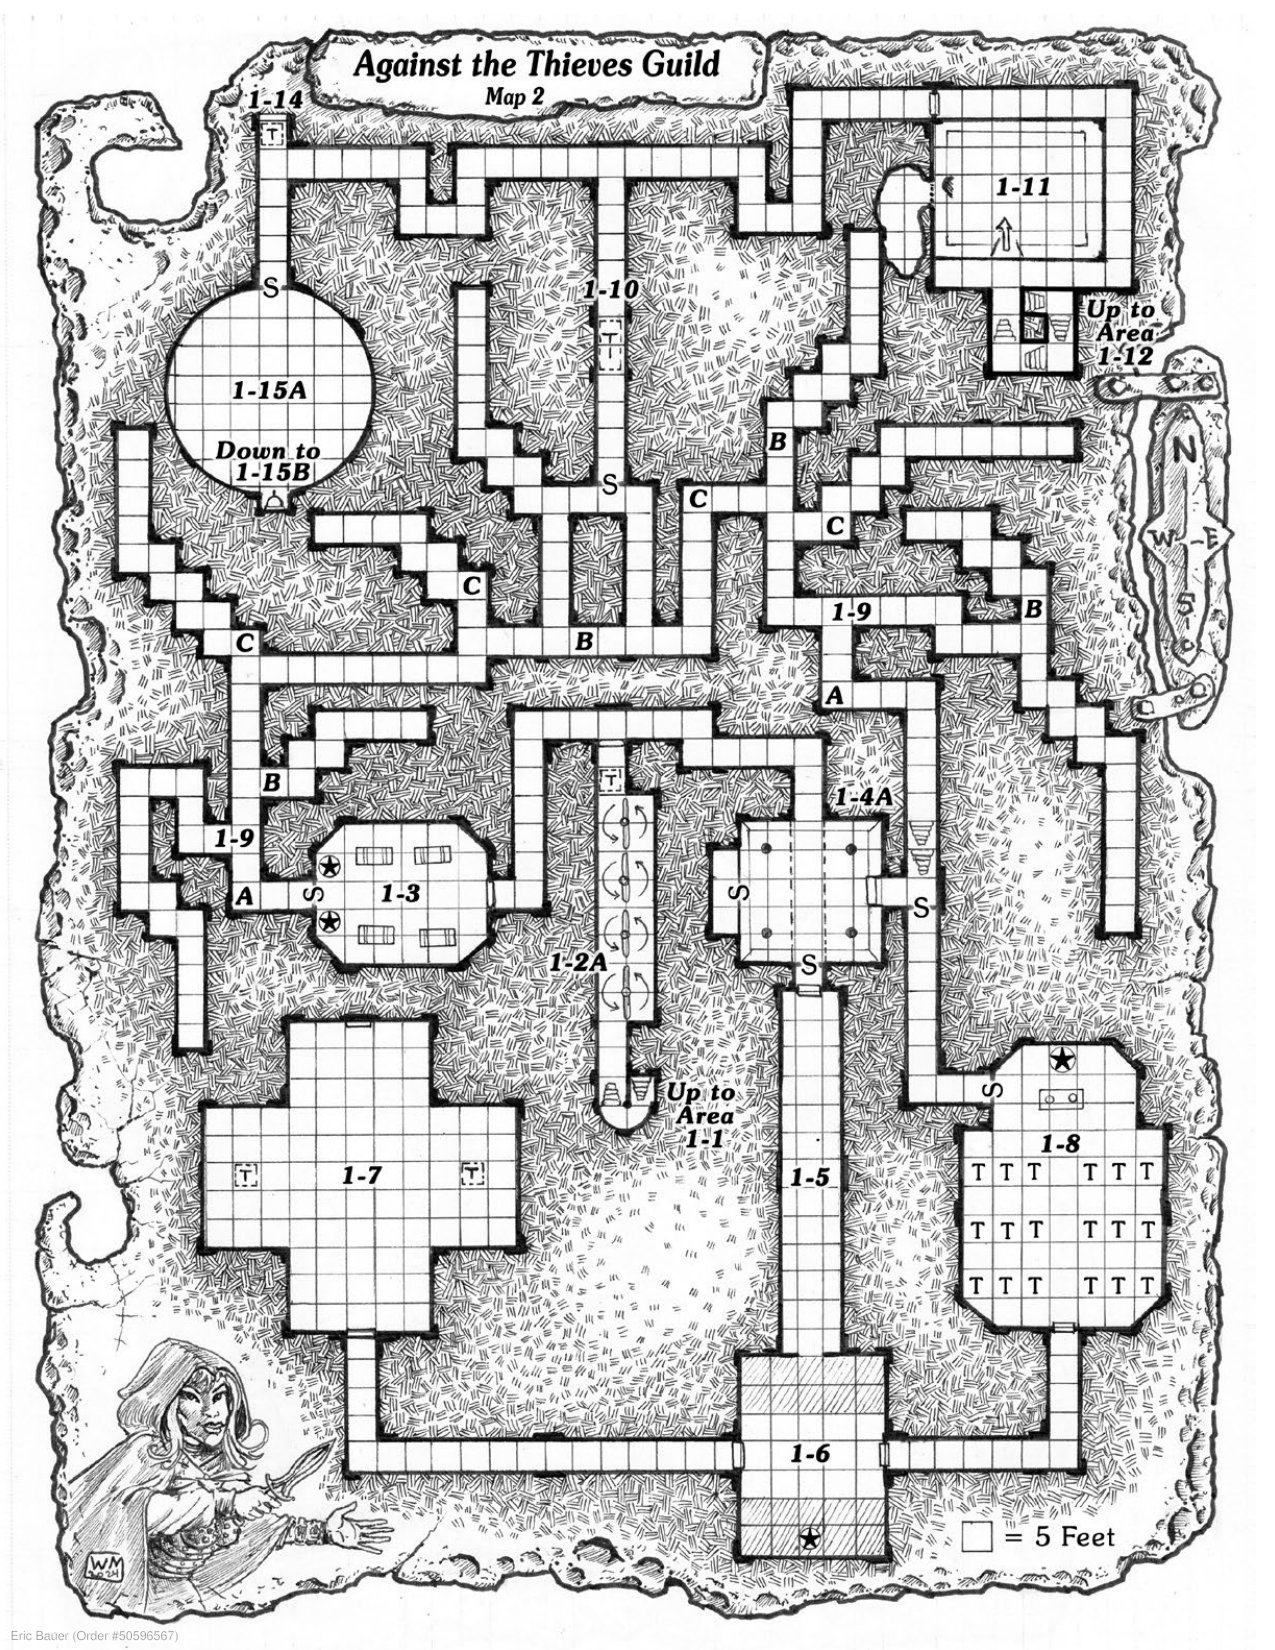
Dungeon Level 1 is depicted on Maps 1 and 2. The dungeon and its chambers are assembled from worked granite stone. Ceilings in hallways are 8’ high and most chamber rooms are 12’ high. The entirety of the labyrinth is unlit unless otherwise noted.
Typical stone doors are 4” thick, and have an AC 18 and 22 hit points. Secret doors can be detected with a DC 12 Intelligence check. Identifying how one opens requires 10 minutes of inspection followed by a separate DC 15 Intelligence check.
Bas Reliefs: Persistent bas relief sculptures within the labyrinth form an intricate pattern of grooves meant to embody a spiritual map for Amun Tor’s servants. Monks would focus on these markings during their meditative walks. At times, the walls depict divine beings and messengers carrying scrolls, books, or whispering into one another’s ears.
Maps (5)
Bestiary (11)
Rooms (26)
Area 1-1 Bridge Over Oblivion p.3
Area 1-1 – Bridge Over Oblivion
The cavern stretches upward to a 30-foot-high ceiling marked by stalactites, its width
devoid of any color of life. Only a monotonous spectrum of grays and browns from the jagged earth that dominates the terrain yields any attempt at challenging the imagination.
Respite from the unchanging conditions arrives as you ascend a weathered trail to the sight of an ancient, dilapidated village. A solemn silence hangs over the crumbling structures interrupted only by the occasional gust of wind. Amidst the surrounding ruins, only a modest temple at the center stands out as having survived the ravages of time.
Adjacent to the village, the yawning entrance to a cavern beckons. Flanking the cavern entrance, two imposing statues stand sentinel, each carved meticulously from marble. Both statues depict female priests donned in humble headscarves. While their features are exquisitely rendered, the intentional absence of their mouths evokes a profound sense of awe tinged with unease.
The characters may decide to search the village for information. There is little here that hasn’t already been looted or deteriorated with time. However, a character searching the chapel who succeeds a Luck check will find a leatherbound tome with a symbol embossed in its cover underneath some rubble. The symbol is three interlaced circles surrounding a pair of closed lips. All the pages are blank, although a candle held beneath reveals its text. A character who succeeds a DC 14 Intelligence check can identify this as a ritual book for worshippers of a god devoted to silence and secrets, and the judge can summarize the information in the sidebar regarding Amun Tor for the players.
reaching a span of forty feet. A one hundred-foot-long chasm cleaves the space in two. Suspended by sturdy wires anchored to the ceiling, an iron bridge offers a pathway across the gaping divide. Gazing into the chasm below, a bottomless void of darkness looms.
Lyria placed this first challenge to tease her former friend, although it was easily bypassed by Dara when she first arrived decades ago. Characters inspecting the cavern walls who succeed a DC 12 Intelligence check discover small indentations on the cavern’s northern wall. These marks were made by pitons Dara used to scale the cavern wall to cross the chasm, bypassing the bridge. A character using similar gear may attempt to scale the wall. Doing so requires three successful DC 14 Strength checks. Characters who discover and intentionally use the already present piton holes gain a bonus on these checks. Failing a check by less than 5 results in no forward progress; a failure of more than 5 causes the character to seemingly plummet into the depths of the darkness below. In truth, they are teleported behind the shifting walls in area 1-2.
A character searching the cavernous ground near the bridge will spot a symbol of an upside-down triangle with two X’s intersecting it. A character who understands thieves’ cant deciphers it as a warning that the area ahead is trapped. The second X implies it is advised to turn away.
Detection: A thief searching for traps at the edge of the bridge can easily see that it is not actually connected to the floor on their side of the chasm (no check required). A thief checking for traps near the middle of the bridge and succeeding on a DC 15 find trap check spots the pressure plate in the middle of the bridge. Dwarves, thieves, or characters with appropriate occupations (such as blacksmiths and trap-
“I CHECK FOR TRAPS”
As adventurers navigate the Labyrinth of Oathsworn Silence, searching for traps is an essential task for survival. The following guidelines will assist the judge in managing a trap-laden environment and help clarify the process for players as they search for traps.
Time to Check for Traps
Checking for traps is a methodical and time-consuming process. As a rule of thumb, inspecting a 10’ section of a hallway, room, or single object (such as a chest or door) should take about 1 minute of in-game time. This time increases with the complexity and size of the area or object being inspected. If players wish to check an entire room, use the room’s size to determine how long it takes (e.g., a 20’ x 20’ room would take approximately 4 minutes).
Disarming Traps
Disarming traps is a method of removing a threat but comes at a risk of triggering the trap. Unless otherwise noted, disarming traps require thieves’ tools. A failure on a disable trap check of 5 or more below the DC triggers the trap in question.
Unskilled Checks
While thieves have specific skills for finding and disabling traps, other classes may be at a disadvantage when attempting these same tasks. Whenever a skill such as find trap or disable trap is attempted by a nonthief, the roll is made using a rather than a to account for this lack of proficiency.
pers) who examine it and succeed on a DC 12 Intelligence check will realize that the bridge can fold up.
Trigger: The trap is triggered when a character crossing the bridge fails a Luck check. On a failure, they step on the pressure plate at the center of the bridge. Once triggered, roll for initiative.
Effect (Init ): The bridge folds at its joints, fully forming a solid cage on its turn in the initiative order. Any characters on the bridge before this occurs can attempt to jump off it (if near the edge) or scramble to the outside of the forming cage with a successful DC 13 Strength or Agility check (player’s choice). Failing this, the character is trapped within the suspended cage.
After the pressure plate has been stepped upon, a permanent magic mouth spell triggers and appears upon the pressure plate, saying in Lyria’s voice: “You aren’t Dara. The trials ahead are beyond your capabilities. Sadly, your fate is to wither in this cage, forgotten and alone.”
The cables holding the suspension bridge draw together as they form a cage around the center section containing the
pressure plate. The motion of the bridge’s reconfiguration aggravates 15 stirges quietly roosting within small crevices in the ceiling. They are instinctually drawn to whatever prey is stuck within the cage. The stirges are small enough to easily squeeze through the cage bars.
Stirges (15): Init ; Atk latch (attach to victim, DC 12 Strength check to remove), blood drain (see below); Crit M/ ; AC 9; HD (hp 4); hp 4; MV fly 30’; Act ; SP infravision 60’; SV Fort , Ref , Will ; AL N.
Blood drain: A stirge that has latched onto a target automatically succeeds on an attack with its blood drain, dealing points of damage. A stirge that has drained a total of 12 points of damage becomes bloated; it detaches from its victim and flies off.
Countermeasures: After the trap has been sprung and trapped any of the characters who were standing on the bridge, it’s possible to break out of the cage. The metal bars have an AC 19 and 20 hit points. A character succeeding two DC 20 Strength checks may be able to bend the bars enough to allow a character to slip through.
Characters who have freed themselves can shift their weight and attempt to swing the cage to one of the ledges on either side of the chasm. A character choosing to time their leap and safely land on the other side must succeed in a DC 13 Agility check. On a success, they safely leap to the landing where the bridge originated. On a failure, they plummet into the void below and are teleported inside one of the sectioning chambers in area 1-2.
Reset: A lever on the opposite side of the chasm can be pulled to reset the pulley system that allows the bridge to spread and retract.
Area 1-2 Sectioning Corridor p.5
Area 1-2 – Sectioning Corridor
The stairs lead down to a stretch of corridor, sixty feet long and five feet wide. A stone door at the end of the hall bears a symbol with three interlocking rings surrounding a pair of closed lips.
Judge’s Note: Refer to Map 2 for area 1-2A before the trap is activated and to Map 1B for area 1-2B after the trap is activated.
Detection: Characters inspecting the corridor who succeed a DC 13 Intelligence check spot seams along the walls, indicating they are designed to move. A dwarf will notice these details innately with their underground skills ability. A DC 16 find trap check reveals the pressure plate, which is marked “T” on the map.
Trigger: A character stepping on the pressure plate triggers the trap.
Effect (Init ): The shifting walls turn to become perpendicular with the corridor, dividing the hallway into three 10’ x 10’ chambers. As the trap is sprung, those with a higher initiative may declare which chamber they want to be trapped in. Those acting after the trap may still try to move to a different section but risk injury or death as the walls move into position (DC 13 Reflex save or suffer damage).
Four crawling claws (12 in total) await any characters trapped within a sectioning corridor. These reanimated hands belonged to members of the Gravelight Sorority who perished to the dungeon’s traps. They behave with impudence initially, patting the trapped character sympathetically on the head, making crude gestures, attempting to tickle the victim, etc. After they have had a bit of fun humiliating the trapped character, they attack.
Crawling claws (12): Init ; Atk claw melee (); Crit M/; AC 10; HD (hp 2); hp 2; MV 20’, climb 20’; Act ; SP un-dead traits; SV Fort , Ref , Will ; AL N.
Un-dead traits: As un-dead, a crawling claw can be turned by a cleric and is immune to sleep, charm, and paralysis spells, as well as other mental effects, poison, and cold damage.
Countermeasures: The pressure plates can be disabled by removal or being jammed with an object by a character succeeding a DC 14 disable trap check. The swiveling walls can be pushed open or shut with a DC 16 Strength check.
Reset: The pressure plate takes 30 seconds to reset, after which stepping on it again allows the walls to shift 90 degrees and become parallel with the hall.
When a character reaches the stone door at the northern end of the hallway, a permanent magic mouth spell triggers and the lips within the door’s symbol animates and speaks: “Steal my pride, Dara? You merely borrowed delusion. To the right, fall victim to what you are. To the left, face your deepest fear.”
Treasure: A character searching the middle sectioning chamber who succeeds a DC 15 Intelligence check notices a treasure tucked away amongst the remnants of bones belonging to a previous delver. This polished sphere, unblemished by
time, is made from glassy obsidian and allows its wielder to gain a bonus to Luck checks.
Area 1-3 Gallery of Mimics p.6
Area 1-3 – Gallery of Mimics
This chamber, hewn from dark, smooth stone, is dimly lit by ghostly flames flickering in wall sconces. Standing on upraised plinths around the room are four treasure chests, each artfully crafted to resemble monstrous visages with toothy maws and eyes. The lid to each treasure chest is open, each bearing a simple platinum key. At the western side of the chamber, two statues of robed monastic figures stand on pedestals in solemn prayer.
This chamber reflects Lyria’s desire to psychologically torment Dara, who held a deep fear of mimics. While none of the treasure chests in the room are truly mimics, they are all trapped.
Secret Door: A DC 12 Intelligence check spots a concealed keyhole in the stonework of the wall between the two statues. Opening the door without the key takes 10 minutes and a successful DC 20 pick lock check with thieves’ tools. Attempting to open the door without the key triggers an attack from two mimics who have disguised themselves as statues.
Mimics (2): Init ; Atk pseudopod melee (); Crit M/ ; AC 13; HD (hp 24); hp 24; MV 10’; Act ; SP shapechanger (transforms into inanimate object of similar size), adhesive flesh, immune to acid; SV Fort , Ref , Will ; AL N.
Adhesive flesh: Anyone who touches the mimic becomes automatically grappled as they become stuck by the adhesive coating it exudes from its pores. A character who becomes stuck to the mimic may free themselves with a successful DC 12 Strength check. Additionally, any weapon that strikes the mimic becomes glued to its body. Immediately after a successful melee weapon attack, a character may attempt a DC 12 Strength check to pull the weapon free. Subsequent attempts to pull the weapon free require a full round of effort.
Keys: Each key fits the lock of the chest it is found in, allowing them to be locked or unlocked. An inspection of the keys, with a successful DC 9 Intelligence check, reveals they can be combined to create a master key, capable of opening the secret door.
Trapped Chests: A successful DC 12 find trap check discerns the razor-sharp lid of each treasure chest is rigged to snap shut if the key it contains is not lifted out carefully. The key can be swapped with a similar-sized object by a character succeeding in a DC 14 Agility check. On a success, they remove the key without activating this trap. A successful DC 16 disable trap check using thieves’ tools disarms the trap. An unsuccessful attempt at disarming this trap triggers its effect. The treasure chest makes a melee attack with a bonus against the character attempting to remove the key. If struck, they take damage and become grappled by the trapped chest. A character can attempt a DC 13 Strength check, freeing themself or another character on a success. Each failed check deals additional damage to the trapped character.
Second Trap: Each chest is equipped with a secondary trap. A character inspecting the inside of a trapped chest who suc-
ceeds a DC 15 find trap check discovers that a secret compartment within the treasure chest’s lid is filled with liquid designed to spray via a concealed mechanism. This trap does not function if the chest is locked, either by the key taken from inside it or by a character using thieves’ tools who succeeds a DC 17 pick lock check. The trap triggers when the secret door is opened. When triggered, anyone within a 10’ radius of any trapped chest must make a DC 13 Reflex save or be doused in an incandescent, magical substance. Any weapons, armor, or items being carried by a character who fails this save begins to radiate a rose-colored light that illuminates them in darkness and imbues them with a semi-magnetic effect. As a result, attacks against a character wearing or wielding items coated in this substance gain a bonus to hit. The effect lasts indefinitely but can be canceled via a dispel magic spell with a spell check of 16 or higher. Cleaning the items of the substance does not eliminate the effect.
Area 1-4 Rat Trap p.6
Area 1-4 – Rat Trap
A rank stench of sewage and animal filth pervades this area. The corridor opens into a larger chamber that recesses into a twenty-foot pit. On the ceiling, a leaky, fivefoot-wide sewage pipe runs from above the room to the opposite side of the chamber. At the bottom of the pit, a greasy black muck covers the floor. Rising from the accumulation of waste are four simple granite pillars ascending to the ceiling. On the eastern side of the pit stands an iron door etched with a symbol of rings closed around shut lips.
Judge’s Note: Refer to Map 2 for area 1-4A before the trap is activated and to Map 1B for area 1-4B after the trap is activated.
This chamber reflects Lyria and Dara’s time spent within city sewers during their tenure as footpads for the Gravelight Sorority before they rose up the ranks. Lyria transformed this chamber into a complex trap to communicate her disdain for Dara as nothing more than a treacherous rat. The floor and ceiling of this pit chamber are designed to depress like a large dumbwaiter when the weight of a delver reaches the bottom.
Detection: A character examining the stone pillars in the room who succeeds a DC 15 Intelligence check notices they don’t support the ceiling. Instead, they appear to act as guide rails, extending upward through narrow openings in the ceiling.
Trigger: A weight of 100 lbs. or more on the floor of the pit causes the room’s traps to be set into motion.
Effect: Weight upon the pit chamber’s floor causes the floor and ceiling to descend 10’. The walls of the chamber do not move, although the depression of the floor reveals a hidden chamber that contains a hell cat. It takes 1 round for the chamber to complete its descent. This may result in a split party in which some characters are trapped within the chamber while others are still in the corridor above. The implications for the delvers within the pit chamber are as follows:
Hell Cat Released: The subsiding floor reveals a chamber (5’ x 10’) along the west wall that releases a vicious hell cat that attacks any intruders within the pit chamber. When brought to 0 hit points, the hell cat disintegrates into a pile of ash.
Hell cat: Init , Atk bite melee () or breath weapon; Crit M/; AC 12; HD (hp 13); hp 13; MV 40’; Act ; SP immune to damage from fire or heat; SV Fort , Ref , Will ; AL C.
Breath weapon: The breath weapon is a cone of flame 10’ wide and 30’ long. All within the area of effect must make a DC 12 Reflex save or take fire damage.
Flammable Sewage: The black slimy sludge at the bottom of the chamber is about 1’ deep and flammable; if the floor of the pit chamber comes into contact with flame (such as the hell cat’s fire breath), it will ignite, burn for 2 rounds, and deal fire damage to any character starting their turn in the area.
The Mouse Trap Door: The iron door set in the eastern wall is now more difficult to reach as it is now 10’ from the bottom of the chamber. A character wishing to climb the wall to reach the door must succeed a DC 12 climb sheer surfaces check. The door is trapped, which can be discerned with a successful DC 12 find trap check. Disarming the trap can be accomplished with adequate tools by jamming the mechanism in the keyhole that releases the spring with a successful DC 15 disable trap check. The trap activates upon an attempt to open the door, causing it to swing down from concealed hinges at its base to crush the opener against the wall. A DC 12 Reflex save is required to avoid damage from being pressed against the now-inverted door and the wall under its original position.
Delvers who are not within the pit chamber when it descends find a secret passage:
• Secret Passage: The pipe within the ceiling drops to form a 5’-wide corridor between the northern passageway and a secret passage revealed to the south.
• Rat’s Nest: Within the pipe is a nest of diseased rats that scurry forth and attack.
Swarm of diseased rats: Init ; Atk swarming bite melee (1 hp plus disease); Crit M/; AC 9; HD (hp 24); hp 19; MV 40’ or climb 20’; Act special; SP bite all targets within 20’ x 20’ space, half damage from non-area attacks, disease (DC 11 Fortitude save or afflicted with rattlebane; see sidebar); SV Fort , Ref , Will ; AL N.
Countermeasures: Adventurers can attempt to scale the walls horizontally without touching the floor. Doing so requires a DC 12 climb sheer surfaces check. The threat of the hell cat could be diminished by burning away the flammable waste by dropping a torch or other source of flame. Another option for bypassing this room would be to drop 100 lbs. of objects into the chamber to cause it to descend and gain access to the secret corridor.
Reset: A concealed button disguised as a part of the stone wall can be found by a succeeding a DC 15 Intelligence check while searching the northern passageway leading to the chamber. Pressing the button resets the chamber to its starting position if the floor holds less than 100 lbs. of weight.
Area 1-5 The Rolling Stone p.8
Area 1-5 – The Rolling Stone
This dark hallway is choked with cobwebs and dust. Bas reliefs along the walls depict silent figures shrouded in cloaks carrying candles. As you progress forward, you spot an enormous stone boulder rolling down the corridor in your direction.
This trap relies on a magical illusion designed to trick the characters to expose themselves to the very real harm of the poison needles sticking out of the walls.
Detection: A successful DC 10 Intelligence check reveals the boulder is rolling through the center of the hall and has enough clearance on the sides for characters standing flat against the walls to avoid impact. A successful DC 8 find trap check reveals the walls are covered in half-inch needles. An actively searching PC may attempt a DC 11 Intelligence check to make the same discovery. Any successful casting of detect magic or similar spells will reveal the boulder as an illusion.
Trigger: The magical illusion of the boulder is triggered by walking 20’ into the corridor.
Effect: Anyone choosing to press themselves flat against the wall to avoid the boulder is subject to an attack roll from the poisoned spikes at to hit dealing damage plus the character must make a DC 14 Fortitude save. On a failed save, the character permanently suffers Stamina damage. A character standing in the path of the boulder takes no damage as the illusory stone vanishes upon contact.
Countermeasures: A character who notices the spikes and declares they are using an item such as a thick blanket or bedroll to create a buffer between their body and the spikes may avoid the attack roll. Characters who notice the illusory nature of the boulder can simply allow the stone to pass through them suffering no ill effect.
Reset: After the illusion has been activated, it is unable to do so again until 10 minutes have passed.
Area 1-6 The Ceiling Trap p.8
Area 1-6 – The Ceiling Trap
The corridor opens into a chamber that is twenty-five feet by thirty-five feet. On the east and west walls are sturdy wooden doors reinforced with iron bands. Near the southern end of the room stands a life-sized statue carved
RATTLEBANE
This disease is often carried among vermin and is a feared affliction by many professional thieves. Rattlebane causes the plagued victim to experience intermittent muscle spasms and uncontrollable shaking, primarily in the extremities. When someone contacts a source of contamination, they must make a DC 11 Fortitude save or become infected.
Symptoms are rapid and manifest within 10 minutes of infection. The infected character rolls one die less on the dice chain when attempting thief skills. After a full day of bed rest, an infected victim can make a DC 13 Fortitude save to recover from the disease. The effect can also be removed by a cleric using lay on hands.
from dark marble. The statue depicts a robed monastic figure, its face serene yet featureless. In its outstretched hands, it holds a gleaming rapier.
Both doors open outward and are trapped. Inspecting the doors with a successful DC 15 find trap check reveals that opening them triggers a trap. Disabling the trap requires wedging the ceiling with something sturdy enough to hold it from dropping and a successful DC 13 disable trap check. Failure by 5 or more causes the ceiling to fall as if the door had been opened.
East Door: When the east door is opened, the ceiling area between the doors in the middle of the room slams down to the floor (the unshaded area on the map). Characters in the space when this occurs must make a DC 13 Reflex save. On a failure, they take damage. On a success, they take half damage. The ceiling retracts to its original position after 2 rounds.
West Door: When the west door is opened, the ceiling area on the north and south sides of the room slam down to the floor (the shaded area on the map). Any characters in the area suffer the same effect as the east door. The statue at the southern end of the room is crushed into a pile of rubble, although the magical sword is unharmed.
Sword of the Silent Sentinel: The sword is a short sword that belonged to Dara and has been rigged with a trap. Characters closely examining the sword who succeed a DC 15 Intelligence check discover a hidden hinge in the hilt. Disabling this trap requires thieves’ tools and a DC 17 disable trap check. Once disarmed, it functions as a normal weapon.
If the trap is active and the sword is used in combat, the spring-loaded hinge activates and the blade swings forward on its hinge, cutting through the guard and slicing the wielder’s hand. The wielding character must make a DC 18 Reflex save. On a failure, they take points of damage that renders their hand useless until healed and they must make a successful Luck check or lose fingers.
Treasure: If the statue is crushed by the ceiling trap, a treasure previously concealed within the monument is revealed. Among the stone debris is a small iron box holding an emerald carved in the likeness of an eye. Replacing one’s eye with this gemstone grants the ability to perceive all invisible objects and creatures within 60’.
Area 1-7 The Black Parlor p.9
Area 1-7 – The Black Parlor
The door to this chamber is trapped. A DC 15 find trap check will identify that the door is spring loaded to close automatically, although this mechanism is built behind the stonework of the adjoining wall. The door could be held open with the use of iron spikes.
Four ghastly purple orbs drift through this chamber, bathing it in a dim, somber radiance. The room is carved entirely from dark, polished marble. To the east and west, meticulously arranged pyramids of skulls fill two open ornate treasure chests. A stately mirror rests against the northern wall, its frame crafted in elegant detail with a repeating pattern of roses.
This room was a reading room, but after Lyria’s occupation of the labyrinth it became an oubliette where she keeps her victims, both alive and deceased.
Holes in the Walls: Concealed holes in the walls can be discovered by a character searching the walls who succeeds a DC 13 Intelligence check.
Piles of Skulls: These skulls are the remains of Lyria’s victims, serving as her trophies.
Balanced Treasure Chest Trap: Both treasure chests are filled to the top with an equal weight of skulls. An observant character succeeding a DC 9 Intelligence check notices the glint of metal at the bottom of the chest, hinting at treasures beneath.
Both chests are perfectly weighed to the other and affixed upon fully concealed pressure plates, secured via hidden bolts to prevent shifting when the floor tilts. The trap is activated when the weight difference between the two chests is more than 5 lbs. A character succeeding in a DC 15 find trap check identifies the presence of the pressure plates. On a failure of 5 or more, they set off the trap.
When triggered, the door to the chamber slams shut and the floor pivots sharply from its center up to 45 degrees toward the heaviest point in the room, which depending on where characters are standing could be north, east, south, or west. Any character standing in the room when the trap is triggered must make a DC 13 Reflex save or fall prone and slide down the incline. The section of chamber at the bottom of the incline descends 5’ into a pool of green slime below the room that filters in via the holes in the wall. Any character who fails their save falls into contact with the slime and takes acid damage. The victim will take damage again at the start of each initiative count until the slime is scraped off or destroyed. Against wood or metal, green slime deals acid damage each round, and any nonmagical wood or metal weapon or tool used to scrape off the slime is effectively destroyed. Applying fire to the slime can also burn it away, but short of a fireball or similar spells, the entire pool’s contents can only be avoided, not fought.
While the chamber is tilted, any movement toward the center of the room can cause an extreme shift that sends the characters tumbling onto another section of the chamber. A character attempting to move up the incline without causing a dramatic shift must make a DC 12 Agility check. On a failure, all characters in the chamber must make another DC 13 Reflex save or potentially fall to the opposite side of the room and into the acid as before.
To reestablish balance, the characters must position themselves relatively evenly around the room and ensure the weight on both pressure plates is equal. Each chest, when full of skulls, weighs 100 lbs. However, after the trap is activated, the chests’ contents spill out with the room’s movements, causing an imbalance. The easiest way to reestablish balance is to empty both chests (which themselves have equal weight). This causes the floor to lock in place once again.
Mirror of Life Trapping: The mirror on the northern wall is a magical prison containing six thieves. If the room’s trap is activated, the mirror falls from the wall and shatters, releasing its inhabitants. The six prisoners are all female members
of the Gravelight Sorority who came to the labyrinth to take back the Reliquary of Silent Sisters from Lyria. Mistaking the characters for another of Lyria’s cruel games, they prepare to defend themselves fiercely. A character succeeding on a DC 15 Personality check can convince them to cease their attack. If befriended, they share the information in the background of the adventure regarding Lyria and Dara’s relationship and the Gravelight Sorority. Under no circumstances do they join the characters in delving deeper into the trap-filled tomb; having gained their freedom, they are eager to leave with their lives intact.
Treasure: The bottom of each treasure chest contains a +1 dagger and five black opals worth 500 gp each.
Area 1-8 Silent Sanctum p.10
Area 1-8 – Silent Sanctum
A pervasive and unnatural silence fills the space of this chamber. Vaulted ceilings loom overhead, adorned with faded frescoes of cowled figures whispering to one another. Old prayer mats line the stone hall; a skeleton adorned in aged, dusty linens lies on the floor near each mat. At the northern end of the sanctum is an altar, behind which stands a large ornate statue of a hooded man with a finger pressed to his lips.
This hall of prayer and worship was trapped by Lyria to slay the monastics after she finished using their labor to build her initial traps.
Unnatural Silence: The chamber is veiled in perfect silence as the result of divine imposition. Attempts to cancel this effect through arcane methods such as dispel magic will fail.
Prayer Mats: Each prayer mat is pierced by a 1” hole, a detail serving as a clue to the trap that killed the monastics who were praying here when they died. A character who searches the stonework underneath the mats and succeeds a DC 13 find trap check finds concealed holes housing spears. The skeletons of the deceased lie nearby in their tattered robes.
Statue of Amun Tor: A character searching the statue and succeeding a DC 12 Intelligence check identifies the hand of the statue is a lever. Moving the lever to the right appears to do nothing, but it releases an odorless gas, filling the chamber over the course of the next 10 minutes (the sound of the gas jets cannot be heard because of the silence spell). Characters who spend the full 10 minutes within this area must succeed a DC 11 Fortitude save or become paralyzed for 1 hour. After 15 minutes, spears shoot up from underneath where the prayer mats are placed. When the trap is triggered, each spear makes a melee weapon attack, dealing damage against any target standing on a trapped mat.
If the statue’s hand is moved to the left, a secret door slides open at the northern end of the room leading back to the labyrinth.
Altar: Upon the northern altar is a bronze bowl, incense, and small strips of parchment paper. A character who searches the altar finds an inscription, which reads “Only an offering to Amun Tor allows you keep what you bequeath.” If a character pens a secret or a piece of knowledge few know about on the parchment and burns it in the bowl with the incense, a golden ring materializes on the statue of Amun Tor’s hand and drops to the floor.
The ring contains the soul of the Sister Abbess, the head monastic of Amun Tor’s faith. She will telepathically share with the character who wears the ring the tale of the order’s downfall, the theft and return of the Reliquary of Silent Sisters, and the betrayal they endured by trusting the thief Lyria. The Sister Abbess directs the character to obtain the Reliquary of Silent Sisters so it can be taken from the hands of a heathen and restored. The Sister Abbess mistakenly believes the holy artifact is still located in area 1-14.
While wearing the ring, a character gains a bonus to Willpower saving throws.
Area 1-9 The Labyrinth p.10
Area 1-9 – The Labyrinth
The stonework in these halls features a sophisticated network of interlacing grooves forming an unbroken, flowing design stretching the length of the hallway. Bas relief sculptures line the top of the corridor’s décor, depicting rows of monastic faces leering down to gaze at passersby. Statuettes of young street urchins hold candles within recesses placed in the walls providing dim, flickering light throughout the passage.
The labyrinth has numerous locations, described as follows.
A. Moving Stone Block: After the characters pass by either of the areas marked “A” on the map, an animated stone block rises from the floor. The stone block is 4’ wide and 8’ tall. Once active, the stone block and the characters roll initiative. The block follows the characters through the corridor but stops short of crushing them, slowing its movement to a negligible pace once it comes to within 10’ of a
dead-end corridor. Characters who enter a corridor where there is a dead end may become fearful of being crushed to death by the stone block and attempt to push back against it. The animated stone block discharges its spike trap ability 1 round after it halts its movement. Any character actively pushing against the stone block must make a DC 13 Reflex save with a -1d penalty or be impaled upon the protruding spikes and take damage.
Animated stone block: Init ; Atk spike trap melee (); Crit M/; AC 15; HD (hp 70); MV 20’; Act ; SP false appearance as ordinary stone block when motionless, forceful reposition, antimagic susceptibility, half damage from piercing and slashing weapons; SV Fort , Ref , Will ; AL N.
Forceful reposition: The stone block’s forceful movement pushes creatures in its path. When it enters someone’s space, that person must make a DC 11 Reflex save or be pushed back and fall prone, taking damage.
Antimagic susceptibility: The magic that animates the stone can be temporarily suppressed with a successful casting of dispel magic or a similar spell. Doing so freezes it in place for 10 minutes.
After the block discharges its trap, an illusory mouth appears on its stonework and Lyria’s voice speaks: “These walls have been Amun Tor’s ears. Now I’ve given them teeth. I’ve been going easy on you—that won’t last much longer.” The stone block then withdraws and returns to its original position, blocking the passage for 30 minutes before descending back into the floor.
B. Pits: Throughout the labyrinth (marked “B” on the map) are 5’-wide pits in the floor that have pressure plates at their bottoms. The adventurers may be tempted to lead the moving stone block to one of these openings to ditch it. Doing so causes the block to slide down into the pit, activating the pressure plate. This triggers the mouths on bas-relief faces throughout the labyrinth’s walls to dispense a cloudy, sulfurous-smelling gas. The cloudy vapor makes visibility difficult, imposing a -1d penalty on checks to find traps and secret doors.
The lit candles within the hall signal the gas’ combustibility by flickering more intensely. It takes 20 minutes for the gas to become dense enough to be explosive. Once it reaches this critical level, any spark can set off an explosion erupting throughout the corridors. This includes the candles that line the corridors. Everyone in area 1-9 when this occurs must make a DC 12 Reflex save. A character suffers fire damage on a failed save or takes half damage on a successful save.
C. Firebolt Trap: Any of the areas marked “C” on the map contain trip wires that can be spotted with a successful DC 15 find trap check. When tripped, two blasts of magical flame are discharged from the eyes of a bas relief face from the opposing wall. Two attacks are made against the individual tripping the trap with a on each attack roll that deals fire damage. If the corridors have accumulated explosive gas for 20 minutes, activating the firebolt trap may ignite the gas, potentially causing the explosion described before.
Secret Door: The secret door leading to area 1-10 is detectable with a DC 10 Intelligence check. Dwarves and elves automatically attempt this check to discover the secret door when passing within 10’ of it. No check is necessary for finding the switch to open it if the characters are not under pressure, as its discovery is only a matter of time after finding the secret door. If the animated stone block is still in pursuit or another threat requires a hasty discovery, the door’s discovery is more challenging and characters must make a DC 13 Intelligence check while frantically searching the southern wall to find the door’s hidden switch.
Area 1-10 Trip Wire That Isn’t p.11
Area 1-10 – Trip Wire That Isn’t
The corridor ahead is interrupted by a pair of metallic trip wires emerging from the walls, positioned roughly one-foot above the floor. The trip wires are spaced ten-feet apart from each other. Beyond this, the passage continues forward into the stillness of silence and shadow.
On either side of a 10’-long section of floor within this corridor is an obvious pair of trip wires.
Detection: Characters spot the trip wires automatically. Upon closer inspection, a DC 14 find trap check allows a character to identify that the floor is designed to pivot on a central axis when weight is placed on it that drops delvers into a pit.
Trigger: If the hinged section of floor is not somehow anchored, stepping on it automatically opens the hinged section of floor. The victim must make a DC 15 Reflex save or fall into the pit.
Effect: There is a 40’-deep pit below the rotating section of floor. A character who leaps over the trip wire or otherwise steps into the trapped area must make a DC 15 Reflex save or fall into the pit, taking damage. Any damage die that comes up a natural 6 indicates that the victim breaks a random bone and permanently loses 1 point of Strength of Agility (player’s choice).
If the trap is triggered, an illusory mouth appears on one of the walls within the pit and goads the victim: “Careful, the floor here will betray you. Perhaps it took a lesson from you, Dara. If you are still breathing, make haste, your reward awaits.”
Countermeasures: Breaking the trip wire activates spikes underneath the floor that lock it into place, disabling the trap. Deactivating the trap without using this method requires a DC 18 disable trap check to somehow jam the hinged floor shut.
Reset: If the trip wire is broken, the trap requires a manual reset. Otherwise, the trap resets when the trapped floor stops spinning after 1 minute.
Area 1-11 Perdition’s Prison p.11
Area 1-11 – Perdition’s Prison
A narrow five-foot-wide walkway edges around a deep pit filled with bones and detritus forty feet below. Across the pit, the path leads to an archway with a spiral staircase ascending upward. From the shadows below, a ghastly figure moves into view: a woman with bone-white hair and eyes that glow red with undying fury.
The walls of the pit are composed of smooth stone requiring
incredible strength to climb without magic or climbing gear. A character succeeding a DC 23 climb sheer surfaces check could achieve such a feat.
The creature is Dara, who ousted Lyria as leader of the Gravelight Sorority thieves guild. After sending many agents to retrieve the Reliquary of Silent Sisters, Dara took it upon herself to try and reclaim their treasure. She failed and perished during a confrontation with the trap golem in
Area 1-12 The Trapped Antechamber p.12
Area 1-12 – The Trapped Antechamber
An elongated hallway stretches thirty feet in length and ten feet in width. The walls are devoid of the familiar design patterns seen elsewhere on this dungeon level. At the far end, a pair of formidable bronze double doors stand closed.
This hall is trapped. A giant crossbow is hidden beneath a 10’ section of the corridor pointed toward the ceiling. Upon being
stepped on, it fires upward, crushing victims between its floortopped quarrel and the ceiling 20’ above. After it discharges, the opening in the floor exposes a chamber where the crossbow mechanism is held. Shortly after being activated, a volley of normal-sized crossbow bolts fire from hidden compartments in the walls of the shaft at targets within the corridor.
Features: This trap has two main features: the Giant Crossbow and the 12 Hidden Crossbows.
Detection: The trap is triggered by a standard pressure plate, which a thief actively searching the floor can find with a DC 13 find trap check.
Trigger: Any weight of more than 50 lbs. on the pressure plate sets off the primary crossbow. The launching of the first bolt triggers the remaining 12 crossbows, which fire an instant later.
Effect (Main Crossbow Instantaneous; Secondary Crossbows Init ): The primary bolt launches with such force that it lifts a section of floor with it. This is unlikely to strike the adventurer who triggered the trap—they can make a Luck check on a and are only struck on a failed check. If the triggering adventurer is not targeted, the second in line is. In either case, the targeted individual must make a DC 14 Reflex save or be crushed against the ceiling for points of damage.
The remaining 12 crossbows fire on their initiative round, targeting any individual within 12’ of the breach in the floor and doing damage if they hit. Everyone in range should make a Luck check; failure means they are targeted by two bolts instead of only one. These secondary bolts are at to hit and also strike for damage.
Deactivation: If the pressure plate is detected before the trap is triggered, a thief can deactivate it with a DC 13 disable trap check.
Reset: Resetting the trap is a time-consuming process, requiring all 13 bows to be reloaded—one with a specialized enormous bolt—and then repairing the floor. The process could take weeks depending on the available workforce.
Vault Doors: Opening the vault doors triggers a magical effect as per scare, result 14. The PC who opened the doors can attempt a DC 14 Willpower save to resist this effect. Failure indicates they experience a moment of fright and immediately flee the area at their maximum speed. This effect lasts 1 round following the failed save. A victim who fails the check retreats from the vault doors and automatically steps upon the pressure plate, triggering the trap if it had been safely bypassed earlier.
Area 1-14 After her death, Lyria took efforts to reanimate her as an intelligent un-dead wretch so she could continue to torment her. Dara remains trapped in this pit, fantasizing about the day she may get vengeance. p.12
Area 1-14 – After her death, Lyria took efforts to reanimate her as an intelligent un-dead wretch so she could continue to torment her. Dara remains trapped in this pit, fantasizing about the day she may get vengeance.
Dara, the Accursed Thief: Init ; Atk claw melee ( plus Stamina drain); Crit U/; AC 15; HD (hp 20); MV 30’; Act ; SP un-dead traits; SV Fort , Ref , Will ; AL C.
Stamina drain: A character hit by Dara’s claw attack must succeed a DC 12 Fortitude save or take Stamina damage.
Un-dead traits: Dara is un-dead and can be turned by a cleric. She is immune to sleep, charm, and paralysis spells, as well as other mental effects and cold damage.
Dara asks to be released from the pit and demands the characters throw down a rope. She makes it clear her goal is retribution against Lyria. If the characters refuse, she curses them and vows to hunt them down when she gets her freedom. If the characters begin attacking Dara from the high ground, she scuttles out of sight into a small crevice in the western wall she’s claimed as her den.
At the top of the stairs is a wooden door. A DC 15 find trap check detects that opening the door will trigger a trap. A character succeeding a DC 14 disable trap check can bypass the trap, which allows the door to be opened normally. If the trap is triggered, a trap door at the top of the staircase opens and the victim falls down a winding chute and into the pit. If Dara’s attitude is antagonistic toward the party, she attacks.
Treasure: Dara is wearing a cursed cape that she found elsewhere in the dungeon. Dara did not live long enough after acquiring it to know it is cursed. Any successful casting of detect magic identifies the cape as being magical but not that it is cursed. A character wearing the cape will gain a to all saving throws, but this benefit comes at a cost. The cape leaches age from those who wear it. After wearing the cape for a week, the character will age years. This rapid aging continues at this rate for each week it is worn. For every 20 years aged, the character loses 1 point of Strength, Agility, and Stamina, but gains 1 point of Intelligence and Personality. Partial increments of less than 20 years result in no losses or gains. Note that this effect cannot improve an ability score beyond 18 or reduce it below 3. A remove curse spell can remove this effect.
The curse of the cape could push a character to the limits of age. Upon reaching the age threshold of what would be typical for their race’s natural lifespan, characters must make a Fortitude save each week against a DC equal to the number of
years exceeding beyond their race’s average lifespan. Failure indicates the character succumbs to the ravages of old age. It is up to the judge’s discretion what the average age of a particular race’s lifespan is, but some guidelines are provided here:
• Humans: 75 years
• Dwarves: 250 years
• Halflings: 100 years
• Elves: 1,000 years
Area 1-13 False Reliquary Vault p.13
Area 1-13 – False Reliquary Vault
Past the threshold, a ten-foot-wide bridge stretches across this vaulted chamber to a raised platform at the far end. Upon the platform sits a brass treasure chest, ornately decorated with intricate gold and silver designs embossed into its surface detailing roses shedding their petals. A mosaic on the wall behind the treasure chest features a feminine face with eyes and ears but conspicuously lacking a mouth. On either side of the walkway, the room drops off into a ten-foot pit
2A
teeming with countless writhing serpents nesting within. Set into the east and west walls across the chasm are six stone doors.
This chamber served as the vault for the Reliquary of Silent Sisters prior to Dara and Lyria’s initial acquisition. Lyria has become afflicted with the curse of the artifact; she has taken it down to Level 2 intent to unlock its secrets.
As the characters enter the room, a magic mouth appears on the mosaic speaking: “Sorry, the Reliquary is not here—its true location you shall never find. Farewell, Dara. Know that I gave you all my love and hate.” The platform the treasure chest rests on rises and reveals itself to be the head of a trap golem that prepares to attack.
Trap golem: Init ; Atk scythe arm melee () or poison dart missile fire (, plus poison [DC 10 Fortitude save or lose Stamina]) or activate trap (see below); Crit M/; AC 16; HD (hp 27); MV 30’; Act ; SP golem traits, infravision 60’, activate trap, conjure pit trap, rolling sphere; SV Fort , Ref , Will ; AL N.
Golem traits: The trap golem is immune to sleep, charm, and paralysis spells, as well as fear, petrification, and poison. The trap golem is healed by exposure to extreme cold; when any cold damage is inflicted, the trap golem is not damaged and is instead healed by the same amount. All spells cast against the trap golem are subject to a 50% chance of failure before saves are rolled.
Activate trap: Once per round, the trap golem can use one of its actions to activate a simple trap within 30’ of it.
Conjure pit trap (1/day): The trap golem conjures an extradimensional space in a flat 10’ square area that becomes a spiked pit trap. Characters within the space when it appears must immediately attempt to leap to safety by succeeding a DC 14 Reflex save. On a failure, the PC falls into the 10’-deep pit and takes damage from the spikes. The conjured trap remains for 1 hour. Climbing out of the pit is successful with a DC 10 Strength check or climb sheer surfaces.
Rolling sphere (1/day): The trap golem can spend both its action dice to manipulate its body to contort into a sphere of solid stone that moves up to 60’ in a straight line. Any character in its path when it does so must succeed a DC 14 Reflex save or take damage and be knocked prone. While it is a rolling sphere, it cannot make any other attacks or perform any other actions. It takes an entire round of effort to switch back to its normal form.
Illusory Floor: The pit of snakes is an illusion intended to keep delvers on the bridge or make them retreat to area 1-14, putting them at risk of tripping the crossbow trap if it is still active. Its illusory nature is discovered through direct interaction (such as stepping upon it) or with detect magic (result of 18 or better).
Swinging Scythes (Init ): There are three swinging scythes hidden in the walls that can be released by the trap golem using one of its action dice to trigger. Each scythe requires a separate action to trigger. Once triggered, a scythe is released and swings outward from a hanging chain across the room with a movement speed of 40’. The scythe trap makes an attack against any character in its path with to hit and dealing damage upon striking a target.
A character can leap onto a scythe and grab hold of its chain with a successful DC 13 Agility check. Doing so puts the PC in an advantageous position, granting them a +2d on attack rolls against the trap golem. Additionally, they receive a AC bonus against the trap golem’s attacks.
Trap Doors: Behind each of the six doors is a different statue that deploys a one-time simple trap when opened. Each door can be opened by the trap golem using one of its action dice to trigger. Each door requires a separate action to open. Each door and its effect are as follows:
Door Statue Effect
1 Soldier The statue throws a spear it is holding at a living target within 30’. The spear attack is missile fire ()
2 Wizard The statue’s finger dispenses an arc of lightning directly east in a 30’ line that is 5’ wide. Each character in the path must make a DC 13 Reflex save, taking damage on a failed save or half damage on a successful one.
3 Medusa The statue’s face animates along with the 13 serpents that make up its hair, all fixing their gaze upon a character in the room. It targets a victim with a magical effect as per turn to stone, result 16. The character must succeed a DC 16 Fortitude save or their body turns partially to stone. If the target fails, they suffer a penalty to all attack rolls, Reflex saving throws, and initiative, as well as all skill checks involving mobility. The effect lasts for 1 hour.
4 Dragon A spray of corrosive acid shoots out from the statue’s mouth in a 30’ line. Each character in the line of fire must make a DC 13 Reflex save or take damage. Additionally, the effectiveness of any armor worn is reduced by AC.
5 Yeti A frigid blast of cold air issues forth from the statue’s mouth, targeting a 10’ square centered on the bridge directly east of the door. Each character in that area must make a DC 12 Fortitude save, taking damage on a failed save or half damage on a successful one. The ground within this area will become covered in slippery ice that remains for rounds. A character that tries to move through the ice must succeed a DC 12 Reflex save or fall down and immediately end their movement.
6 Hell The statue’s mouth discharges three Hound blasts of flame at three different living targets within 30’. The flame blast attack is missile fire ()
Treasure: Within the chest is a single gold coin etched with a stylized “L” on one side of it and a “D” on the other. This coin was responsible for making decisions between Lyria and Dara whilst they were still comrades during their heists together. Accompanying the coin is a letter scrawled on paper intended for Dara. Provide the characters Player Handout 1.
Area 1-14 Double Trap p.14
Area 1-14 – Double Trap
Stepping into this hall, you see a massive ornate door of bronze, its surface inlaid with the emblematic motif of three interlocking rings encircling a pair of sealed lips. Opposite the door and thirty feet down the hallway, there is a wall covered in spikes.
Detection: A thief searching the hall must make a DC 16 find trap check to notice that the door is likely trapped, evidenced by the pattern of scrapes in the stonework as if caused by friction from a large moving object. Searching the spiked wall reveals a secret door with a successful DC 16 Intelligence check.
Trigger: Anyone touching the door springs the trap. A thief inspecting the false door and failing a DC 16 find trap check also triggers the door’s spring mechanism.
Effect (Instantaneous): The door slams into whoever touches it with great alacrity and gains surprise. Others standing in a 5’-wide line between the spiked panel and the false door may also be struck by the trap’s door if they fail a DC 10 Reflex save. Anyone struck by the door suffers damage. The victim who triggered the trap is smashed into the spiked panel down the corridor and suffers damage (DC 15 Reflex save for half damage).
Deactivation: The door must be triggered and its latching mechanisms covered or stuffed with spikes, detritus, or wads of cloth. The thief can come up with this scheme by making a DC 14 disable trap check.
Reset: After smashing and spindling its victim, the Double Trap door rebounds and returns to its moorings.
Area 1-15 Rolling To Their Depths p.15
Area 1-15 – Rolling To Their Depths
In the center of this circular chamber stands a towering column of smooth stone, its surface carved with vast grooves that spiral along its length, seamlessly merging with the chamber’s floor. On the opposite side of the room on the wall is a lever, currently positioned upward.
Judge’s Note: Prior to the lever being activated, the chamber is depicted as area 1-15A on Map 2. After the lever has been
LEVEL 2: THE VAULTS OF SACRED OFFERING
The second level of the dungeon holds the areas of Amun Tor’s monastery where only the highest ranking of his faithful were allowed access. Most of these areas were former vaults that held material wealth collected and distributed to individuals who made spiritual offerings to the patron of secrets. Now these halls are filled with traps designed to deter adventuring parties from disturbing the former thieves guild leader while she obsessively studies the Reliquary of Silent Sisters.
GENERAL FEATURES
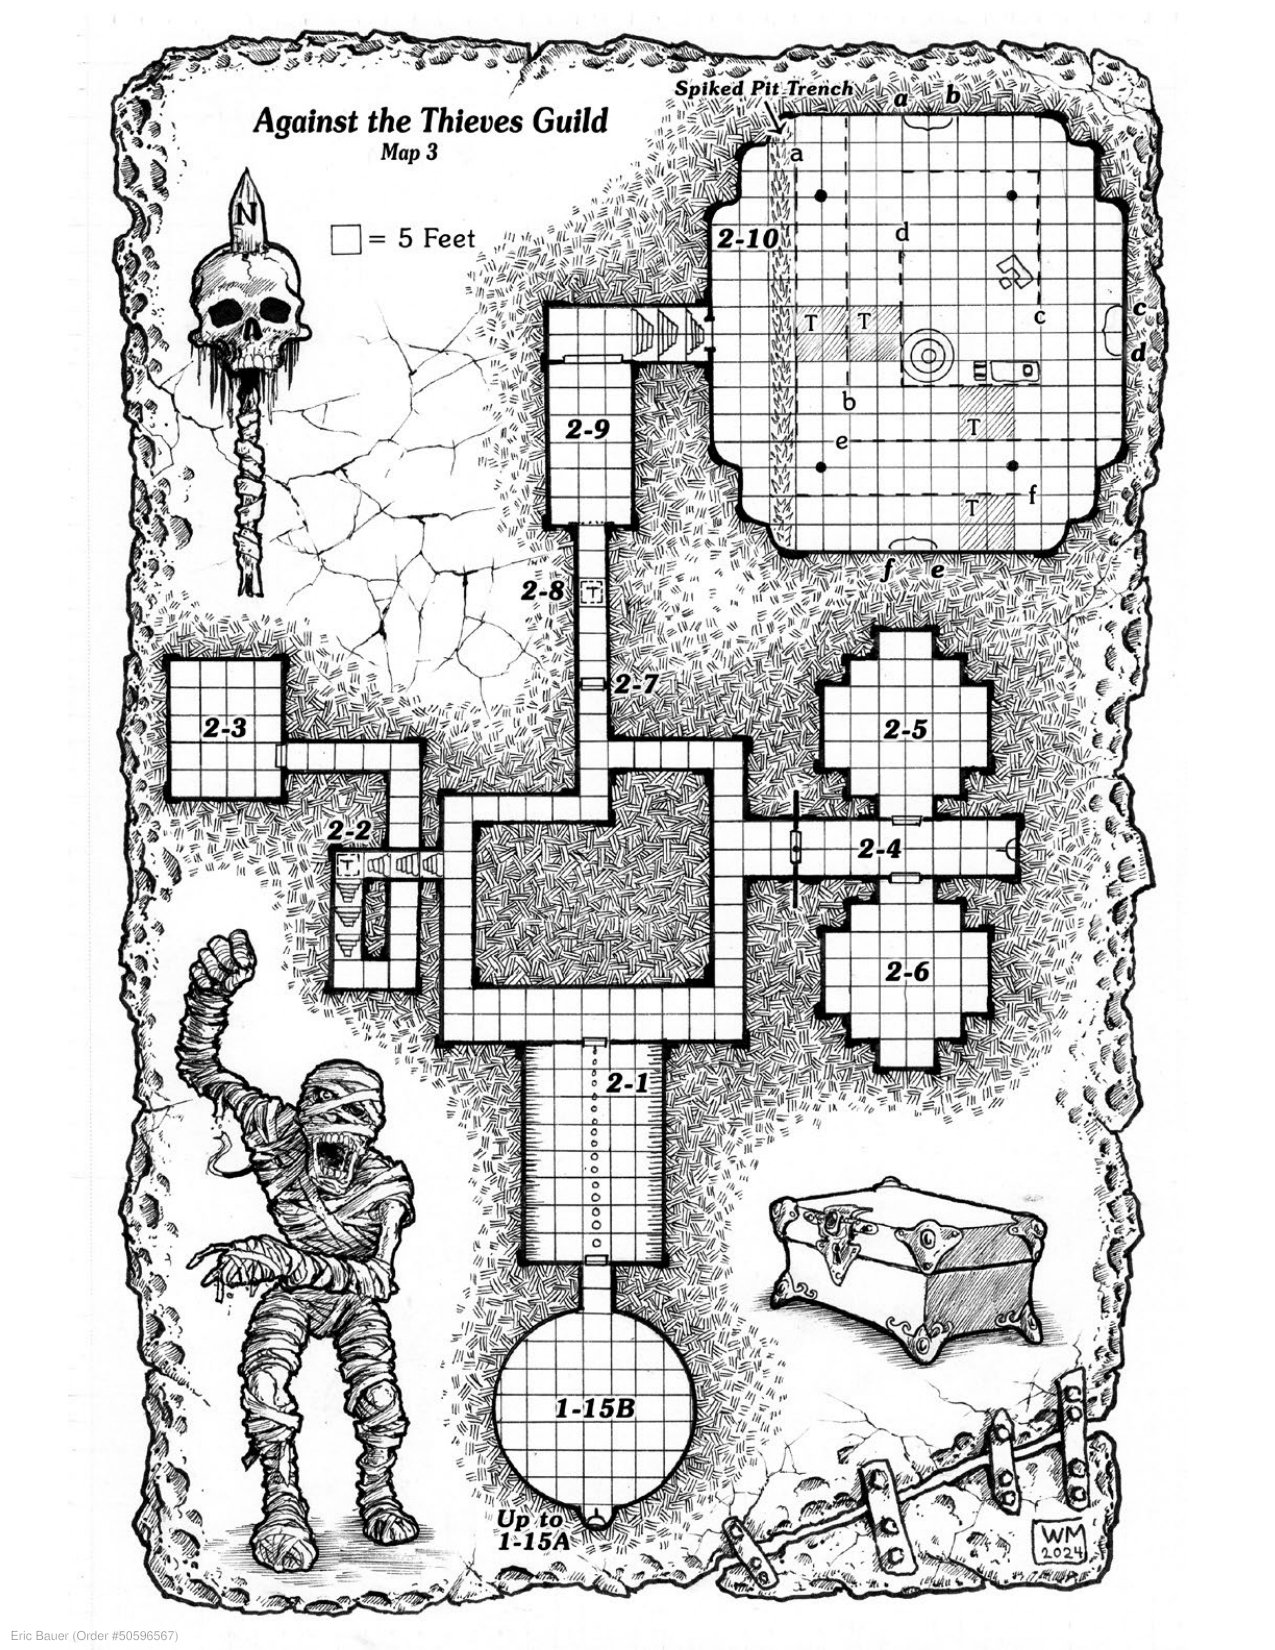
Dungeon Level 2 is depicted on Map 3. Unless otherwise noted, all corridors are 10’ high, and the walls are constructed of finished granite stone. Ceilings in dungeon rooms are 15’ high. The entirety of the labyrinth is unlit unless otherwise noted. Stone doors are 4” thick and have an AC 18 and 22 hit points.
All areas of Level 2 are covered by an obscuring fog pumped into the halls by jets built deep in the walls, causing find trap checks to be rolled with a -1d penalty. Zimgrazhan’s Workshop in area 2-3 and the Reliquary Vault in area 2-8 are unaffected.
Area 2-1 Hall of One-Thousand Slices p.15
Area 2-1 – Hall of One-Thousand Slices
A stone door with the familiar symbol of three interlocking rings surrounding a pair of closed lips precedes this area. When the characters approach it, another illusory mouth appears and delivers a message from Lyria:
Congratulations. You survived the traps designed to slaughter the most cunning thieves from my former guild. Leave while you can
activated and the chamber drops, this room is depicted as area 1-15B on Map 3.
Previously, this chamber operated as a gradual elevator to transport monks down into Amun Tor’s treasury where coins and precious gemstones were held. Lyria has since converted it into one of her traps.
Pushing the lever down causes the chamber to descend to Level 2, whereas pushing it up causes it to return to Level 1, respectively, moving like a colossal gear around the central stone pillar. Once activated, the lever locks in place and the chamber rises or descends 100’ over 18 seconds.
Once the chamber begins its ascent or descent, it quickly begins to accelerate. Characters that have not taken precautions such as anchoring themselves to the floor can attempt to grab onto a piece of stonework if they succeed a DC 15 Strength check as the spinning room begins to accelerate. On a failure, they are flung against the walls and take damage as the chamber wildly spins down to the second level of the dungeon or back up to its current location if returning to the first level.
still make this claim.
After the characters open the door, read or paraphrase the following:
The walls of this rectangular chamber span forty feet in length. Seemingly hundreds of gleaming daggers protrude menacingly from the walls on both sides of the hall. Directly aligned down the middle of the floor and ceiling are an equally sharp row of swords that lead up to a stone door on the opposite wall.
Lyria incorporated the blades from her conquered guildmates into this chamber’s trap. The characters must find a way to navigate to the opposite side of this chamber and reach the stone door to progress further. The stonework on the ceiling and the walls containing the doors are marked with dozens of triangles missing half a segment on one side with a line through it; this is a thieves cant symbol that means “not safe for the guild.”
Detection: A thief searching the floor 10’ inside the room who succeeds a DC 14 find trap check notices the floor appears to be divided into two large pressure-sensitive areas on either side of the line of swords running down the center; both sides are pitted with tiny stab marks.
Trigger: When a character moves more than 10’ into the room, the trap triggers and its effect is dependent on whether one or both pressure-sensitive floors are activated.
Effect: When one of the pressure plates to either side of the line of swords is depressed, the corresponding wall (the wall nearest the pressure floor) falls inward toward the floor, impaling anyone standing on that side of the room. The blade-
filled wall inflicts damage (DC 15 Reflex save to avoid). Note that a successful Reflex save positions the character on the opposite side of the room, triggering the trap again if it has not already been set off earlier.
A character who straddles the line of swords down the middle of the room triggers both walls at the same time, which results in the two walls falling at the same time and jamming them together above the head of the character. This allows safe passage to the other door.
Deactivation: The trap may be averted by avoiding the pressure plate or jamming it with an appropriate object and making a successful DC 14 disable trap check.
Reset: Both walls automatically reset the round after they fall, if set off individually. If both walls are triggered at the same time, it takes 5 rounds for their machinery to pull them back into position.
Area 2-2 Pilum Stairway p.16
Area 2-2 – Pilum Stairway
The unlit staircase descends downward, thick dust covering its steps. Empty sconces along the wall seem to indicate that at one time torches lined this passage.
The staircase leading down to area 2-3 is rigged with a trap activated when the pressure plate marked “T” on the map is stepped upon.
When the trap is triggered, a pilum juts out from each riser (the vertical, front face of the step) at 3, 4, and 5 steps above the pressure plate. Each pilum is 10’ in length, allowing for multiple targets due to the spacing and placement. This trap is particularly effective against parties that do not leave space between characters in the marching order.
Detection: A thief searching the stairs and succeeding on a DC 13 find trap check notices the pressure plate on the triggering step. For each point above the check result, the searcher also detects a concealed pilum launch tube (i.e., a check of 16 reveals the hiding places of all three javelins).
Trigger: Stepping on the pressure plate activates the trap. Additionally, if a DC 14 disable trap check is unsuccessful, the trap is triggered.
Effect (Instantaneous): All those standing on the pressure plate and those next in the marching order are struck by long javelins suffering per fired pilum (DC 18 Reflex save for half damage). If the trap is not disarmed, humanoid-height victims on the step and those of any height standing lower down on the stairs suffer damage ( per pilum). Demihumans on the pressure plate will only suffer damage.
Countermeasures: Once the pressure plate is detected, it can be removed from the step by a thief with a successful DC 14 disable trap check. Alternatively, the pilums could be thwarted by inserting appropriately sized objects or substances into the holes from with they emerge, thus blocking or gumming them up before the spiked poles can jut out.
Reset: The pilum stairway is reset via a removable crank that can be inserted at the top of the stairs that pulls the pilums back into position and resets the pressure plate back into the step.
Area 2-3 Zimgrazhan’s Workshop p.16
Area 2-3 – Zimgrazhan’s Workshop
This cluttered chamber is filled with an array of tools and workbenches that are arranged haphazardly throughout the space. Iron instruments of curious purpose hang from chains throughout the room just above each workbench. Upon the walls are countless scrolls and parchments detailing the design of devilishly complex traps. The floor is littered with loose springs, gears, and wires—assembly pieces for some yet-to-be designed mechanical trap.
This chamber is the workshop for Lyria’s imp ally, Zimgrazhan. Hidden behind the trap schematics halfway up the wall is a valve connected to metal tubes running down the wall and exiting through the floor. This valve controls the obscuring mist pervading this level of the dungeon; turning it off makes it easier to navigate and locate traps.
Whenever Zimgrazhan is not patrolling the upper level of the dungeon to repair or install traps, he can be found here scheming and designing new devices to enhance the labyrinth’s defenses. As soon as the characters arrive, Zimgrazhan elects to turn invisible to interact with the party.
Zimgrazhan: Init ; Atk sting melee ( plus poison [DC 11 Fortitude save or death]); Crit DN/; AC 16; HD (hp 7); MV 20’ or fly 60’; Act ; SP immune to fire, poison stinger, spellcasting ( spell check): spells (1st)
ZIMGRAZHAN THE IMP SABOTEUR
The judge may employ Zimgrazhan in several different ways to maximize the dynamics of the dungeon during play. Here are a few suggestions to allow Zimgrazhan to take a more active role in sabotaging the party.
Setting Traps During Rests: While no wandering monsters exist within the dungeon, at the judge’s discretion, Zimgrazhan may be able to serve a similar function. If the party chooses to rest or decides to wait out a threat, Zimgrazhan might seize the opportunity to set up traps in their vicinity using his Toolbox of Trapsmithing.
Resetting Disabled Traps: Another of Zimgrazhan’s tactics is to revisit traps the characters have already disabled or bypassed and reset them. He takes great care not to make it obvious their preventative measures have been tampered with. For example, he leaves the appearance that pitons under pressure plates are still actively preventing a trap from activating.
Bait and Switch: Zimgrazhan is fond of leaving marks or signs along the walls to confuse adventurers, either pointing them in the direction of a trap he has set or toward one innately found within the dungeon. Alternatively, he also possesses a storm gem (see area 2-3 treasure) used as bait in noticeable locations throughout the dungeon to entice characters to travel along the path toward one of his traps. Of course, the gem itself is also trapped.
charm person, choking cloud, detect magic, (2nd) invisibility; SV Fort , Ref , Will ; AL C.
Zimgrazhan is extremely proud of his traps and takes offense if any comment is made about them being easy to bypass. He fishes for compliments when encountered by asking the adventuring party if there were more of them when they arrived or to describe the worst injury they sustained.
Zimgrazhan is surprisingly chatty but seems reluctant to discuss his master. A character who succeeds a DC 14 Personality check gets him talking about some specific information.
• Lyria was the former leader of a thieves guild called the Gravelight Sorority. She was deposed as its guild leader by her partner, Dara.
• Lyria stole and brought the Reliquary of the Silent Sisters to this dungeon of death to bait her former friend and the other members of the thieves guild into attempting to retrieve it.
• She succeeded in killing off Dara and the Gravelight Sorority but has not left the dungeon. She has become obsessed with the Reliquary of the Silent Sisters and has isolated herself within one of the former vaults with the object. The artifact’s curse has made her ageless but doomed her to an eternal fascination with the object.
Zimgrazhan’s apparent willingness to engage in conversation with the party is a strategic delay tactic as he covertly activates a hidden trap within the room.
Trap Features: Discreetly positioned under the high surface of the central workbench is a concealed button. Zimgrazhan activates the button while invisible. In doing so, an odorless, flammable gas slowly begins to fill the chamber from tiny jets installed within the walls.
Detection: A character succeeding a Luck check notices the blueprints and schematics hanging from the walls begin to quiver, a clue as to the air currents created by the release of the gas into the room.
Effect: After 5 minutes have passed, the gas in the chamber becomes concentrated enough for any spark or flame to cause an explosion. Each character in the room when this occurs must succeed a DC 14 Reflex save, taking fire damage on a failed save or half damage on a successful one.
Once Zimgrazhan observes the adventurers showing symptoms of gas exposure, he slyly reaches for flint and steel from one of the workbenches, intending to ignite the volatile atmosphere. Zimgrazhan remains unscathed due to his immunity to fire damage, and he moves to slip away from the room and escape into the dungeon.
Treasure: Upon one of the workbenches rests Zimgrazhan’s Toolbox of Trapsmithing (see sidebar next page). Also, a small brown bag contains a storm gem that Zimgrazhan uses to bait adventurers toward traps.
The storm gem is an azure blue and black opal with a luminous sheen. A gem of this quality would be worth approxi-
ZIMGRAZHAN’S TOOLBOX OF TRAPSMITHING
This dark, iron-bound box is adorned with infernal runes and contains a variety of sinister-looking tools specifically designed for trapmaking. It includes finely crafted pliers, cutters, wire, springs, gears, and various arcane and mechanical components that all seem to shift and change to suit the task at hand. While the toolbox allows itself to be handled by others on occasion, it is more than capable of using its own powers of telekinesis to finely and expertly employ its vast array of tools to accomplish its tasks.
The Toolbox of Trapsmithing is a sentient object that is capable of hearing and seeing as if it had infravision of 60’. A character in possession of the toolbox who is of chaotic alignment can communicate telepathically with the infernal device and direct the toolbox to lend use of its talents. The toolbox forms a complex relationship with its user. It revels in being used to construct sadistic traps designed to maim and kill. However, it quickly becomes impatient and at times attempts to manipulate its user into making mistakes and sabotaging themselves.
The toolbox has a 1-in chance of alerting its owner of a trap when it comes within 30’ of a trigger. The Toolbox of Trapsmithing is also capable of rearming and disarming any simple mechanical trap without the need for a check. The toolbox eagerly assists with the rearming of traps, as its bloodthirsty instincts yearn for the brutal misfortune it might reap. Asking it to disarm a trap is another matter, requiring a DC 15 Personality check to convince it to begrudgingly disarm a known trap, which it does without the need for a check.
The Toolbox of Trapsmithing is also capable of creating its own improvised traps using materials contained with-
mately 1,000 gp to the right buyer. Although valuable, the item is cursed, a fact that is revealed by casting detect magic with a spell check of 18 or higher. The first time each day a PC in possession of the gem steps outdoors, the opal (and the character) is struck by a massive bolt of lightning. The wearer and each creature within 5’ must make a DC 15 Reflex save, taking lightning damage on a failed save or half damage on a successful save. This effect does not function again until the next dawn. The curse can be removed with dispel magic or similar means.
Area 2-4 Vault Antechamber p.18
Area 2-4 – Vault Antechamber
The door into this area is locked. A character can open it with a DC 18 pick lock check. When the door has been bypassed, read or paraphrase the following:
The ceiling within this chamber is domed and enchanted with magic that casts a bright light within the vault chamber. Etched in precise script along both walls of the hall are numerous names organized and aligned within columns. Recessed into the northern and southern walls are two formidable iron vault doors, circular in form. Their polished metalwork is embossed with the symbol of three circles overlapping to form a set of lips at their intersection.
in it and those it summons from the hells where it was forged. This takes 10 minutes and requires a sufficient environment for setting the trap. When this function is employed, the PC in possession of the toolbox chooses one of the following options or roll a to see which trap is created:
1. Poisoned Dart Trap. This trap is placed and concealed within a flat surface such as a wall and activated by a trip wire. It fires a volley of three darts at targets within 60’ of the trigger, with a to hit and doing damage. Those hit must also make a DC 13 Fortitude save or take an additional damage from the poison.
2. Scorching Flame Trap. This trap is placed within a flat surface such as a wall and activated by a pressure plate. It releases a 30’ cone of fire. Those in the range of fire must succeed a DC 13 Reflex save or take fire damage, half damage on a save.
3. Net Snare Trap. This trap is concealed within a ceiling and activated by a pressure plate. It releases a net dropping upon anyone beneath it within a 15’ area. Characters in the area must succeed a DC 13 Reflex save or become ensnared. Characters stuck within the net cannot move and have a -1d penalty to attack rolls. (Attacks against ensnared victims gain a +1d bonus.) A character can cut their way out of the net with an appropriate weapon (AC 10, 5 hp) or with a DC 15 Strength check.
Traps created by the toolbox are detected with a DC 15 find trap check and disarmed with a DC 17 disable trap check. These traps are magical in nature and can be discovered with a successful casting of detect magic.
A lever on the eastern wall rests underneath a plaque that reads, “Treasure Vault Release.”
These iron vault doors lead to a repository of remains belonging to followers of Amun Tor. The names along the wall are a memorial to the dead who are interned within. Lyria enhanced the security of the vault knowing it would be too enticing for members of the Gravelight Sorority to bypass. The wall-mounted lever on the far wall not only opens the vault doors but also triggers the false floor and false ceiling to split into two, creating two funnels: one beneath the characters to drop them into a pit and one above that will bury them under the weight of thousands of coins hidden above the ceiling.
Detection: A DC 18 find trap check discovers the floor and ceiling are constructed of carefully concealed stonework designed to open.
Trigger: The trap activates when the lever is pulled.
Effect (Instantaneous): The false floor divides the room in half and drops into a funnel. Each PC standing on the false floor may attempt to leap to safety within the vault doors that open when the lever is pulled by succeeding a DC 16
Reflex save. Characters who fail the save fall into the funnel that culminates in a 40’ drop, causing damage. In addition to the falling damage, characters who fall into the funnel begin to be buried by a torrent of coins released from the ceiling.
PCs in the pit have one last opportunity to scramble out of the pit before becoming engulfed. Each PC in the pit must make a DC 16 Strength or Agility check (player’s choice) to extricate themselves from the ever-increasing pile of coins. Those who fail by 1 to 4 points are held fast by the coins up to their chests. They will need outside assistance (rope, 10’ pole, etc.) and the half-buried PC must make a DC 14 Strength check to be pulled free. Those who fail by 5 or more points are engulfed by coins, and the target must succeed in a DC 12 Stamina check each round. When the first check fails, the target begins suffocating and loses points of Stamina per round until they are freed. If the PC reaches 0 Stamina, they have died. The weight of the coins surrounding the entombed PC makes it impossible for them to move. Finding and rescuing an engulfed party member will be extremely difficult without inventive solutions and/or magical assistance, requiring a DC 20 Strength check to lift them free.
Deactivation: A thief may disassemble the lever’s housing; examine its gears, pulleys, and wire cables; and destroy its operation with a DC 15 disable trap check. Doing so will keep the catch-pins holding the corridor’s ceiling and floor in place but will also not release the trap’s gold.
Reset: This trap does not reset automatically. However, a contingent of workers can empty the pit of the trap’s gold, reload the funnel, and reset the pit trap.
Treasure: The coins contained within the ceiling are fake iron coins enchanted to look like gold.
Area 2-5 North Skull Ossuary p.19
Area 2-5 – North Skull Ossuary
The walls of this chamber are lined with dozens of small niches, each containing a skull. At the center of this macabre gallery is a simple sarcophagus carved from a single slab of grey stone.
The untold secrets of Amun Tor’s worshippers are intended to be sacred and maintained by his worshippers, even beyond death. This vault is a place for the deceased worshippers of Amun Tor to have their remains interred so they will be protected from the magic of diviners and necromancers who might compel the deceased to reveal their knowledge. Upon anyone entering the room, the lid of the sarcophagus slides open, and an awakened mummy guardian rises from its resting place to defend the vault.
Mummy: Init ; Atk choke melee (///etc.); Crit U/; AC 11; HD (hp 29); MV 20’; Act ; SP damage reduction 5, mummy rot, vulnerable to fire (takes double damage), un-dead traits; SV Fort , Ref , Will ; AL C.
Un-dead traits: As un-dead, the mummy can be turned by a cleric and is immune to sleep, charm, and paralysis spells, as well as other mental effects, poison, and cold damage.
Choke: On the first round the mummy succeeds in a choke
attack, it deals damage as it throttles its target. If the mummy succeeds in a second attack, the next attack causes damage. If the third attack succeeds, the attack causes damage, and so on until its attack fails or its victim is suffocated.
Mummy rot: Any character that takes damage from a mummy may contract mummy rot (DC 12 Fortitude save to avoid). Mummy rot causes the victim’s body to slowly shrivel and desiccate. Affected characters take 1 Stamina damage each day and are constantly thirsty. The Stamina damage will not heal naturally until the rot is arrested by magic.
Treasure: The northern vault’s skulls belonged to scribes and spellcasters. The following spell scrolls can be found rolled up within the skulls: Ekim’s mystical mask, ward portal, and forget. An iron ring worn by the mummy is set with a moonstone worth 150 gp. Inside the sarcophagus is a simple brass music box worth 75 gp.
Area 2-6 South Skull Ossuary p.19
Area 2-6 – South Skull Ossuary
This neglected ossuary contains many skulls held within niches cut into the stone walls. A weathered and cracked sarcophagus sits at the center of the chamber, its lid slightly askew.
Much like area 2-5, this chamber serves as a final resting place for the followers of Amun Tor, although these skulls belong to individuals who broke their oaths to Amun Tor. The zombie “guardian” of this chamber was never afforded the ritual to preserve its dignity, instead placed here as a rotten animated corpse to serve as a reminder of their dishonor. It rises from the sarcophagus to attack as soon as anyone enters the chamber.
Zombie: Init ; Atk bite melee (); Crit U/; AC 9; HD (hp 11); MV 20’; Act ; SP un-dead traits; SV Fort , Ref , Will ; AL C.
Un-dead traits: As un-dead, the zombie can be turned by a cleric and is immune to sleep, charm, and paralysis spells, as well as other mental effects, poison, and cold damage.
Treasure: Characters searching the skulls discover a total of seven gemstones each worth 50 gp concealed within. The zombie is wearing a golden gorget worth 750 gp.
Area 2-7 The Guillotine Door p.19
Area 2-7 – The Guillotine Door
The end of this passageway contains a heavy-looking iron door spanning the entire height of the ten-foot-tall corridor.
Above this door is a slot that hides a heavy guillotine knife. The knife is propped up by the door itself. Its thin edges are coated with a rough substance, so it doesn’t immediately fall once the door opens; it takes several seconds for its weight to overcome the friction.
Detection: A thief searching the door for traps will notice a slit above the door jamb and a slot running along either side of the door with a DC 12 find trap check. The upper slit is where the guillotine blade drops from; the slots are guides. Further investigation automatically shows signs of wear in the guide slots. If the obscuring fog has been deactivated in area 2-3, the guillotine blade can also be seen without an additional check.
Trigger: The trap is triggered by opening the door.
Effect (Instantaneous): A guillotine blade drops from the slot, cutting through anything in the door frame. This blade makes a melee attack against the PC who opened the door, inflicting damage on a hit. A character who takes damage from this trap must immediately make a Luck check; on a failure, the guillotine severs any limb in the door for an additional damage plus a permanent reduction of Agility.
Deactivation: The trap can be disabled by jamming the upper slit with an iron spike (or similar) with a successful DC 10 disable trap check. Blocking the guide slots is less effective and requires a DC 15 disable trap check to succeed.
Reset: Carefully pushing the guillotine blade back into place and closing the door resets the trap.
Area 2-8 The Double Scythe p.21
Area 2-8 – The Double Scythe
The air hangs thick in this narrow passage that extends thirty feet forward into the obscurity of the dungeon. The stonework beneath your feet is covered with a thin layer of dust.
The trap in this hallway causes two powerful scythe blades to emerge from the ceiling and floor at the same time, swinging in opposite directions and threatening all characters within 10’ of the triggering pressure plate.
Detection: A successful DC 20 find trap check notices the pressure plate among the stonework.
Trigger: The trap in this hallway is activated by a character stepping upon the pressure plate halfway down the hall or on a failed attempt to disarm the trap.
Effect (Instantaneous): All characters standing within 10’ of the pressure plate in the corridor (in either direction) are simultaneously subjected to two attacks by two great reaper’s blades, one at head level and one at knee level. Each is a melee attack that deals damage. These attacks count as critical hits on a roll of 18-20; critical hits by the double scythe trap are rolled with a on Crit Table V.
Deactivation: A thief must remove the plate from the floor. Once the mechanics are exposed, they may opt to disable the pressure plate, leaving the blades in their hiding places or sabotage the reset mechanisms leaving the trap in a triggered, open state. In either case, the thief deactivates the trap on a DC 20 disable trap check.
Reset: Once the blades have swept the corridor, a spring system pulls the trap back into place.
Area 2-9 The Vault Door p.21
Area 2-9 – The Vault Door
Tapestries hang from the east and west walls, woven from fine silk intermixed with gold and silver thread. Dominating the scene is a deity with a stoic expression devoid of a mouth. His clenched fist holds the tongues of a dozen unfortunate individuals who hang suspended in air from their open mouths.
A tall arched iron door is set into the northern wall. It is embossed with Amun Tor’s religious sigil. Dominating its center is a circular dial, intricate in design, festooned with letters.
The door holds the spirit of a monk who served as a cus-
todian for the labyrinth. He betrayed Amun Tor’s trust by sharing secrets he eavesdropped upon that were whispered by worshippers in the halls. As punishment, Amun Tor had him imprisoned within this vault door, rendering him incapable of speaking.
The spirit can manifest eyes within the face of the door that gaze at the party. Even in punishment, the loose-lipped monk still yearns to proudly display the secrets he knows with others. He can only communicate by blinking. He knows the combination to the door, but he is also limited in how he can communicate with the party. By blinking, he can provide “yes” and “no” responses to questions the party may ask of him. In doing so, they may be able to deduce the passphrase. After he answers 20 questions, his spirit’s ability to manifest within the door ceases and he is incapable of reappearing until the next dawn.
The code for the combination lock is HONOR. The code can be cracked without learning it from the door (see countermeasures below).
The dial on the door is connected to a trap linked to the floor.
Detection: A successful DC 18 find trap check allows a character to notice a slight groove at the base of the wall just above the floor indicating the floor is designed to shift.
Trigger: Each time the dial is turned and does not use one of the correct letters of the combination, the trap’s effect causes the floor to recede.
Effect (PC Action): When the dial is turned and lands on an incorrect letter, the floor slides 5’ under the wall toward the vault door. The floor can retract six times before it disappears. A character standing on the retracting floor when it withdraws the last 5’ automatically falls. The pit below the floor is 70’ deep. Anyone falling into it takes damage from the fall. The entire pit area is shrouded in magical darkness concealing a grell lurking patiently near the door leading to area 2-10. It has been over a month since Zimgrazhan last fed it, and it hungrily waits to reach up with its tentacles and attack any characters choosing to leave the chamber through the southern hallway to area 2-8.
Grell: Init ; Atk tentacle melee ( plus paralysis and grapple) or bite melee (); Crit M/; AC 11; HD (hp 26); MV 10’ or fly 30’; Act ( per tentacle plus bite); SP electricity immunity, infravision 100’, paralysis (DC 9 Fortitude save or paralyzed for 1 turn); SV Fort , Ref , Will ; AL C.
The grell’s swollen head resembles a floating brain with a razor-sharp beak. Ten barbed, tentacle-like appendages extend from its mass and reach out to paralyze and ensnare its victims. Anyone hit by a tentacle must make a DC 9 Fortitude save or become paralyzed for 1 turn and become grappled. After a character grappled in such a way regains control of their body, they may attempt a DC 14 Strength or Agility check to escape. Any attack made against the grell can specifically be directed at its tentacles (AC 13). Damage to the grell is halved but renders tentacles unusable.
Countermeasures: A character attempting to crack the safe without learning the combination must succeed on five DC 18 disable trap checks. The successful checks need not be consecutive. Each failed check causes the floor to withdraw 5’.
Reset: The trap automatically resets 10 minutes after the whole floor has slid under the wall or immediately after the correct combination has been dialed on the safe.
Area 2-10 The Reliquary Vault p.22
Area 2-10 – The Reliquary Vault
Beyond the door lies a massive vault bathed in a warm magical light cast from wall sconces surrounding the perimeter of the room. Towering high relief sculptures loom over the hall, each depicting an emotionless deity’s face, his crystal eyes gazing down over the hall. Bisecting the chamber toward the entrance is a five-foot-wide trench filled with rusty iron spikes that runs from north to south. Arranged around the center of the chamber is a plush leather chair accompanied by a matching footstool, a writing desk, a lavish bed, and at its foot an ornate treasure chest. Standing in the middle of these furnishings is a thin, wiry haired woman dressed in black leather holding a curious box of elegant craft. With profound reluctance, she stows away the object and draws her weapon.
This chamber once held the coffers of Amun Tor that were used to reward those who shared their secrets. Now, it has been claimed by Lyria who has made it her personal sanctuary to isolate herself while she learns all she can from the Reliquary of the Silent Sisters.
Lyria: Init ; Atk short sword melee () or throwing dagger missile fire ( plus poison [DC 9 Fortitude save or damage]); Crit II/; AC 15; HD (hp 19);
MV 30’; Act ; SP backstab, thief skills, spellcasting ( spell check): spells (1st) charm person, spider climb, (2nd) invisibility; SV Fort , Ref , Will ; AL N.
Lyria can backstab and use thief skills as if she was a level 5 thief. She can cast the following spells: invisibility, spider climb, and charm person.
Lyria’s enchanted short sword grants a bonus to attack and damage rolls. Additionally, the wielder of the blade can speak a command word to transport themselves to the physical space of a creature they can see. The target of this effect must make a DC 15 Willpower save, or they are teleported physically, swapping positions with the wielder of the sword. Each time the power of this sword is used, there is a 5% chance that the wielder of the sword accidentally swaps positions with a different creature within 10 miles. Lyria has gained mastery over the sword in her time with it and is immune to this quirk.
Lyria’s Tactics: Lyria knows she is outnumbered and attempts to use her knowledge of the maze and its traps to her advantage, intentionally setting some of them off to divide the group. She first casts invisibility, and her strategy focuses on attempting to isolate a single party member to gain a strategic position. She prefers targeting the spellcasters among the group while proceeding to move stealthily through the labyrinth to selectively trigger the crushing floor traps. While sections of the maze remain invisible, she uses the magic of her short sword to swap places with a character to intentionally isolate them or place them where they are more likely to trigger a crushing stone trap.
Invisible Walls: The crystal eyes adorning the three Amun Tor relief sculptures in the north, east, and south walls are enchanted with the ability to make objects invisible. Once used by the monastics to conceal their treasure, Lyria has harnessed the power of these statues on a series of walls to provide an advantage in combat. A network of invisible floor-to-ceiling stone walls creates a maze that leads to the center of the room. Attempting to step into an invisible section of wall takes 5’ of movement and electing to feel for a wall while moving can be done at half-speed.
Crystal Eyes: Each of the crystal eyes in the three Amun Tor relief sculptures are magically enchanted crystals responsible for the invisible walls. Each crystal eye has an AC 13 with 5 hit points. When a crystal eye from a statue is destroyed, the illusory magic is interrupted and the corresponding wall becomes visible. These crystals and the walls they are associated with are labeled on the map as a, b, c, d, e, and f.
Spike Pit Trench: A clearly visible trench filled with iron spikes runs from the north wall to the south wall. Characters who attempt to leap over a section of the trench run into an invisible wall and plummet to the bottom of the pit, taking damage from the spikes. Due to the poison coating the spikes, the character must also succeed a DC 11 Fortitude save or take permanent Strength loss. On a successful save, the character takes 1 temporary Strength loss, which recovers after a week of rest.
Crushing Stone Trap: Pressure plates (marked on the map as “T”) located within the invisible maze are subtly integrated into the floor design, requiring a DC 16 find trap check to notice. If stepped upon, they activate a trap. A stone slab falls from the ceiling, threatening the 10’ square below centered on the pressure plate. Any character standing within the area must succeed a DC 13 Reflex save to leap out of the way of the falling stone, otherwise they take damage. The stone slab remains intact and is designed to cover the entire width of the hall where it drops, cutting off easy
This printing of DCC: Against the Thieves Guild is done Inc. and is Copyright 2000 Wizards of the Coast, Inc (“Wizor graphic designs; and any other trademark or registered under version 1.0 of the Open Gaming License, and the ards”). All Rights Reserved. trademark clearly identified as Product identity by the owner System Reference Document by permission from Wizards 1. Definitions: (a)”Contributors” means the copyright and/ of the Product Identity, and which specifically excludes the of the Coast, Inc. Designation of Product Identity: The folor trademark owners who have contributed Open Game ConOpen Game Content; (f) “Trademark” means the logos, lowing items are hereby designated as Product Identity in tent; (b)”Derivative Material” means copyrighted material names, mark, sign, motto, designs that are used by a Conaccordance with Section 1(e) of the Open Game License, including derivative works and translations (including into tributor to identify itself or its products or the associated version 1.0: Dungeon Crawl Classics, DCC RPG, Mighty Deed other computer languages), potation, modification, correcproducts contributed to the Open Game License by the Conof Arms, spell check, Luck check, spellburn, mercurial magic, tion, addition, extension, upgrade, improvement, compilatributor (g) “Use”, “Used” or “Using” means to use, Discorruption, disapproval, all spell names, all proper nouns, tion, abridgment or other form in which an existing work tribute, copy, edit, format, modify, translate and otherwise capitalized terms, italicized terms, artwork, maps, symbols, may be recast, transformed or adapted; (c) “Distribute” create Derivative Material of Open Game Content. (h) “You” depictions, and illustrations, except such elements that almeans to reproduce, license, rent, lease, sell, broadcast, or “Your” means the licensee in terms of this agreement. ready appear in the System Reference Document. publicly display, transmit or otherwise distribute; (d)”Open 2. The License: This License applies to any Open Game Designation of Open Content: Subject to the Product Identity Game Content” means the game mechanic and includes the Content that contains a notice indicating that the Open designation above, such sections of creature statistics as demethods, procedures, processes and routines to the extent Game Content may only be Used under and in terms of rive from the SRD are designated as Open Gaming Content. such content does not embody the Product Identity and is an this License. You must affix such a notice to any Open Game Some of the portions of this book which are delineated enhancement over the prior art and any additional content Content that you Use. No terms may be added to or subOGC originate from the System Reference Document and clearly identified as Open Game Content by the Contributracted from this License except as described by the License are copyright © 1999, 2000 Wizards of the Coast, Inc. tor, and means any work covered by this License, including itself. No other terms or conditions may be applied to any The remainder of these OGC portions of these book are translations and derivative works under copyright law, but Open Game Content distributed using this License. hereby added to Open Game Content and, if so used, should specifically excludes Product Identity. (e) “Product Identity” 3.Offer and Acceptance: By Using the Open Game Content bear the COPYRIGHT NOTICE “DCC: AGAINST THE THIEVES means product and product line names, logos and identifyYou indicate Your acceptance of the terms of this License. GUILD”, copyright © 2024 Goodman Games LLC, all rights ing marks including trade dress; artifacts; creatures charac- 4. Grant and Consideration: In consideration for agreeing reserved, visit www.goodman-games.com or contact info@ ters; stories, storylines, plots, thematic elements, dialogue, to use this License, the Contributors grant You a perpetual, goodman-games.com” incidents, language, artwork, symbols, designs, depictions, worldwide, royalty-free, non-exclusive license with the exact DCC: Against the Thieves Guild is copyright © 2024 Goodlikenesses, formats, poses, concepts, themes and graphic, terms of this License to Use, the Open Game Content. man Games LLC. Open game content may only be used photographic and other visual or audio representations; 5. Representation of Authority to Contribute: If You are under and in the terms of the Open Game License. names and descriptions of characters, spells, enchantments, contributing original material as Open Game Content, You personalities, teams, personas, likenesses and special abilirepresent that Your Contributions are Your original creation OPEN GAME LICENSE Version 1.0a ties; places, locations, environments, creatures, equipment, and/or You have sufficient rights to grant the rights conThe following text is the property of Wizards of the Coast, magical or supernatural abilities or effects, logos, symbols, veyed by this License.
access to the hall beyond. A character can attempt a DC 12 Strength check to climb to the top of a dropped stone.
Treasure: Lyria carries with her the Reliquary of Silent Sisters (see sidebar). The treasure chest at the foot of her bed is locked, requiring a DC 18 pick lock check to open. Inside are 10 lustrous white pearls (worth 100 gp each); 750 gp; an opaque, corked bottle that when opened instantaneously casts choking cloud as with a spell check of 18; and a leather bag containing a silvery powder that when sprinkled on a creature or object makes it invisible for 1 turn.
CONCLUDING THE ADVENTURE
If the characters obtain the Reliquary of the Silent Sisters, they find themselves in possession of an item yielding unknown potential and incredible risk. While the temptation to discover a forbidden secret may be potent, Lyria’s descent into obsession may be a cautionary tale for anyone considering the idea of using it. Players should be ready to accept these risks before attempting to use the object.
If Sister Abbess is in communication with a member of the party via the ring found in area 1-8, she encourages the party to return it to members of the faith, whom she can help lead the group to. The Order of Amun Tor would be willing to pay handsomely for the return of the Reliquary of the Silent Sisters, granting a party who does so 5,000 gp.
Another option would be to sell the object. There is no shortage of collectors who would relish to have such an item, which could easily fetch 25,000 gp or more. Of course, doing so would likely continue to perpetrate the curse of the object on others.
6.Notice of License Copyright: You must update the COPYLicense with every copy of the Open Game Content You RIGHT NOTICE portion of this License to include the exact Distribute. text of the COPYRIGHT NOTICE of any Open Game Content 11. Use of Contributor Credits: You may not market or You are copying, modifying or distributing, and You must advertise the Open Game Content using the name of any add the title, the copyright date, and the copyright holder’s Contributor unless You have written permission from the name to the COPYRIGHT NOTICE of any original Open Game Contributor to do so. Content you Distribute. 12 Inability to Comply: If it is impossible for You to comply 7. Use of Product Identity: You agree not to Use any Product with any of the terms of this License with respect to some or Identity, including as an indication as to compatibility, except all of the Open Game Content due to statute, judicial order, as expressly licensed in another, independent Agreement or governmental regulation then You may not Use any Open with the owner of each element of that Product Identity. Game Material so affected. You agree not to indicate compatibility or co-adaptability 13 Termination: This License will terminate automatically if with any Trademark or Registered Trademark in conjuncYou fail to comply with all terms herein and fail to cure such tion with a work containing Open Game Content except as breach within 30 days of becoming aware of the breach. expressly licensed in another, independent Agreement with All sublicenses shall survive the termination of this License. the owner of such Trademark or Registered Trademark. The 14 Reformation: If any provision of this License is held to be use of any Product Identity in Open Game Content does unenforceable, such provision shall be reformed only to the not constitute a challenge to the ownership of that Product extent necessary to make it enforceable. Identity. The owner of any Product Identity used in Open 15 COPYRIGHT NOTICE Game Content shall retain all rights, title and interest in and Open Game License v 1.0 Copyright 2000, Wizards of the to that Product Identity. Coast, Inc. 8. Identification: If you distribute Open Game Content You System Rules Document Copyright 2000 Wizards of the must clearly indicate which portions of the work that you are Coast, Inc.; Authors Jonathan Tweet, Monte Cook, Skip Wildistributing are Open Game Content. liams, based on original material by E. Gary Gygax and 9. Updating the License: Wizards or its designated Agents Dave Arneson. may publish updated versions of this License. You may use DCC: Against the Thieves Guild, copyright © 2024 Goodman any authorized version of this License to copy, modify and Games LLC, all rights reserved, visit www.goodman-games. distribute any Open Game Content originally distributed com or contact info@goodman-games.com under any version of this License. 10 Copy of this License: You MUST include a copy of this
APPENDIX A: PLAYER HANDOUTS
Player Handout 1: This handout depicts a piece of parchment written in ink that has the following message scrawled upon it
been avoided if I correctly assessed your capacity for betrayal. But let’s not dwell on the past—this place I created for you has exhausted my capacity person. And presumably you are still breathing, although depending on how you fared that might If you are reading this, then perhaps I underesti-mated you again. Maybe all of this would have reward is that you have been forgiven—not that you ever asked for it. But as ever I am the bigger
PLAYER HANDOUT 1
I will be brief with the sentimentalities. Your
Dear Dara, for regrets.
RELIQUARY OF THE SILENT SISTERS
This relic is an ornate box forged of mithril and accented with gold filigree. Patterned around the sides of the box are images of saints who hold a silent finger to their pursed lips. The front of the box yields a feminine face containing a complex dial where its mouth should be. The dial contains letters, numbers, and symbols.
The spiritual contents of this box are believed to contain all the secrets and knowledge shared with Amun Tor.
Divine Insight: While in focused engagement with the Reliquary, a PC can ask a question about a person, place, or object. To receive the response, concentrated focus must be maintained for the next 8 hours over which the Reliquary slowly provides an answer using its dial to reveal either a direct or cryptic response. It is up to the judge’s discretion regarding what knowledge Amun Tor has received from his worshippers and is accessible via this means. This property is accessible once per week, after which it cannot be used until Amun Tor accepts a gift of knowledge deemed worthy or a sacrifice of material goods worth 200 gp.
Consider our business concluded. The Reliquary be a charitable assessment of your health. Each geon’s deepest vaults. I’ve found myself a cozy of Silent Sisters is mine, safe within the dunof way. We’ve played this out, Dara, and some games are just too dangerous to play a second little nook, impervious and secure. It’s quite charming, in a ‘surrounded-by-death’ kind
scar is a lesson—cherish them. In the shadow of our allegiance,
time. Lyria
Curse: The Reliquary bears a curse that may affect anyone who wields it. Each time the Reliquary of the Silent Sisters is used to learn information, there is a cumulative 5% chance they fall victim to this curse. The curse has the following properties:
• The afflicted character no longer requires food, water, or sleep. Their body stops aging.
• Cursed characters become obsessed with learning everything they can from the Reliquary. Pursuing another activity other than asking it questions for more than an hour makes them irritable and imposes a -1d penalty on all attacks, ability checks, and saving throws.
• The cursed character refuses to willingly share what they have learned from the Reliquary with others. Nothing short of magical compulsion can make them reveal information obtained from using the artifact.
• The curse can be canceled with a remove curse spell cast with a spell check of 34 or higher.
ER LANKHMAR ADVENTURES 15 OTH
Enter the thrilling world of Fritz Leiber’s Nehwon, home to the legendary city of Lankhmar and the infamous heroes Fafhrd and the Gray Mouser! Prepare yourself to battle members of the city’s nefarious Thieves’ Guild in fog-shrouded alleys, to barter for cursed curios in the Plaza of Dark Delights, and to seek the wisdom of Ningauble of the Seven Eyes and Sheelba of the Eyeless Face! All this and more is possible with DCC Lankhmar.
Inside the Dungeon Crawl Classics Lankhmar boxed set: The Judge’s Guide to Nehwon • Compendium of Secret Knowledge Lankhmar: City of the Black Toga • A card stock 3-panel Judge’s Screen • No Small Crimes in Lankhmar adventure Beautifully detailed poster maps of Lankhmar and Nehwon
AVAILABLE FOR DCC LANK HMAR!
EARN DUBIOUS FAME
PLAY DCC RPG & VISIT A THOUSAND INSANE WORLDS!
Hey, Reaver! Tired of boring magic and fighting the same old monsters? Looking for ADVENTURES with PICK FROM REAL risk and reward? 100 OVER RPG is for you! With artwork by SWEET ADVENTURES
— DCC RPG —
DCC #83: DCC #84: DCC #85: DCC #86: DCC #87: The Chained Peril on the The Making of Hole in the Sky Against the Coffin Purple Planet the Ghost Ring Level 3 Atomic Overlord Level 5 Level 4 Level 4 Level 5
DCC #91: DCC #92: DCC #93: DCC #94: DCC #95: Journey to the Through the Moon-Slaves of Neon Knights Enter the Center of Aereth Dragonwall the C. Kingdom Level 3 Dagon Level 4 Level 3 Level 2 Level 5 — MCC RPG —
MCC #2: MCC #3: MCC #4: MCC #5: MCC #6: The A Fallen Star Incursion of the Warlords of Blessings of the Apocalypse for All Ultradimension ATOZ Vile Brotherhood Arc Level 1 Level 2 Level 3 Level 4 Level 5
TODAY START YOUR NEXT ADVENTURE TODAY! goodman-games.com/store
*Missives from the Purple Planet, Shudder 24 HOURS A DAY . . . Mountains, or the Center 7 DAYS A WEEK, including Sunday of Áereth should expect 6 to 8 weeks for reply.
cyclops@goodman-games.com
ROLL WEIRD DICE
AND
some of the finest artists working today, and adventures drawn from the wellspring of yore, each module feaThe DCC tures fast play, cryptic secrets, and mysterious worlds!
DCC #87.5: DCC #88: DCC #88.5: DCC #89: DCC #90: Grimtooth’s The 998th Curse of the Chaos Rising The Dread God Mus. of Death Conclave of Kingspire Levels 1-5 of Al-Khazadar Level 1 Wizards Level 6 Level 2 Level 4
DCC #96: DCC #97: DCC #98: DCC #99: DCC #100: The Tower of The Queen of Imprisoned in The Star Wound The Music of Faces Elfland’s Son the God-Skull of Abaddon the Spheres Level 6 Level 1 Level 6 Level 3 Level 5
MCC #7: MCC #8: MCC #9: MCC #10: MCC #11: Reliquary of The Data Orb Evil of the Seeking the The Omnivary the Ancients of Mankind Ancients Post-Humans of Eden Level 0 Level 3 Level 3 Level 0 Level 2
Ask for the Cyclops
He or another Weird Relative is waiting to rush your order out today!
*PLEASE … the Cyclops can take orders only … CANNOT answer rules questions.
Available Now!
Sustainability in Book Publishing
Goodman Games is committed to sustainability in our printing, publishing, and shipping. Scan the QR $ code to learn more! ISBN 9781961756243
9 781961
10.99 GMG4726
90000 >
756243