Blades Against Death
Lv 4DCC 74 · p.1
Open source p.1Introduction
Remember the good old days, when adventures were underground, NPCs were there to be killed, and the finale of every dungeon was the dragon on the 20th level? Those days are back. Dungeon Crawl Classics adventures don’t waste your time with long-winded speeches, weird campaign settings, or NPCs who aren’t meant to be killed. Each adventure is 100% good, solid dungeon crawl, with the monsters you know, the traps you remember, and the secret doors you know are there somewhere.
This adventure is designed for 6 to 10 4th-level characters aided by stout-hearted hirelings. The adventure can also be attempted by a smaller party of 5th-level characters and will prove no less challenging. The urban environs offer thieves and charismatic scoundrels the opportunity to shine, but before the adventure is complete the strengths of each core class will be called to the fore.
Adventure Background
Contrary to the words of scholars, the foul city of Punjar is far from godless. Wide-eyed madmen stalk the streets pronouncing the end of days, mail-clad priests crush the skulls of heathens underfoot, and timorous virgins are offered up in sacrifice within sooty temples. For while the capricious gods of Aéreth turn a blind eye on much of the world, they lavish Punjar with their attentions. It is no accident that the most wicked city in the Known World is also the most god-haunted.
In Blades Against Death, adventurers dare the impossible: to cross between the realms of the living and the dead. Whether for kith and kin or at the bequest of Punjar’s noble sons, the PCs seek to liberate a soul from death’s hoary grasp.
Such ambitions can hardly escape the notice of Punjar’s jealous gods. The PCs’ answer to challenges sent by the divine will determine whether they are mere pawns in the games of gods or masters of their own fates.
The adventure has three principle acts, each prefaced with a prologue. It begins with the PCs consulting the Witch of Saulim, a blind fortuneteller who is far more than she appears. Then, the PCs venture into the Temple of the Moon armed with strange portents and a single tarot card. Their goal is to steal the cult’s most sacred relic, the Argent Falx, a legendary weapon said to be capable of cutting the chains of death.
Armed with the holy blade, the PCs press into the heart of Punjar’s slums, to the notorious charnel pits, where the tormented spirit has barred the gates of death. Whether by guile, faith, or blade, the adventurers dismiss the ghost and use the Falx to sever the silver chains sealing the gates to the realms of the dead.
There, faced with Lord Death and the god’s fell minions, the PCs must wager their very lives in a desperate gambit. With luck and perhaps a bit of back-alley card sharping, the PCs manage to cheat Death himself. Those that fail join his grim entourage, trapped forever within the Realms of the Dead.
Resurrection in DCC RPG...
Returning from the dead does not come easily in the DCC RPG; indeed raise dead and the “speed bump resurrection” have no place in the Appendix N canon.
However, the provenance is clear: if Orpheus can venture into Hades in search of his love, so, too, can the PCs. But the chthonic quest is anything but easy, as Eurydice readily demonstrates. In order for the PCs to rescue a soul from death they will need to be clever, cunning, and courageous in turn.
Playtests of the adventure have proven especially grim. Entire parties have been lost while dicing with Death. If the PCs succeed in their gambit against the gods of Punjar, they will return fully worthy of the title of adventurers!
...and Death in Punjar
Death, the Lord of Dooms, is not the sole god of death worshipped in Aéreth. Nor is he the absolute embodiment of death. Rather, he serves as a sort of patron to Punjarans, invoked by those wishing to forestall or speed the act of death. As warden of the Realms of the Dead, he bears witness to all those that die within the wicked city, sending them on to the afterlife, and, in the rarest of instances, granting a reprieve from death.
Similarly, though the ghost of Moira bars the gates of death, this does not mean that all deaths have ceased in Punjar. Only those that die in close relation to the charnel pits are kept from their eternal reward (or punishment). For, as even the most simple of beggars can avow, there are hundreds of ways to meet death in the City of a Thousand Gates.
Adventure Hook
The adventure is most effective if the PCs are questing for a means of rescuing an ally or favored henchman from death. Word on the street reaches the PCs that the Witch of Saulim, a blind fortuneteller working Squalor Court, knows of a way to breach the veil separating the dead and the living.
In the unlikely event that the PCs have no fellows to save (or simply none they care to rescue), they are approached by Orio the Elder, scion of the merchant house of Diagabe.
The overfed son of a prominent merchant lord, Orio offers the PCs 500 gp to serve as his agents. Astute PCs can drive a harder bargain, but Orio will go no higher than a total of 2,500 gp for the PCs’ services, with a quarter paid in advance.
Orio directs the PCs to the Witch of Saulim, believing that the wretched crone holds the secret to stealing souls from death. Specifically, Orio seeks to win back his lover, the fair Zesi. He instructs the PCs to follow up on any threads that the witch might offer and to not return until they have Zesi in tow.
Sons of the City: Character Knowledge in Punjar
Depending on their training and social circles, PCs will know key secrets, rumors, and facts about the City of a Thousand Gates. This is an opportunity for the judge to play up the PCs’ backgrounds as well as their adventuring careers—as the Overlord often notes, you can take the beggar out of the slums, but he’ll ooze filth to the end of his days.
Rather than share all the information prior to the adventure, judges should review the PCs’ occupations and share insights and knowledge with the appropriate players as the adventure unfolds. This gives PCs a chance to shine outside of their class roles and helps bring the city to life. (“Ratvik the Mad? Of course I’ve heard of him! Mum would tell us stories about the Terror of Old Punjar to keep us out of the alleys …”)
Knowledge: Serfs, Peasants, and Common Freemen
Raven Queen: A goddess of death, also known as the Carnifex, patron to the criminals and lower classes. A shrine in her honor is hidden in the back alleys of Old Punjar, above the wicked Charnel Pits. The shrine is maintained by descendants of a fishwife who was murdered by the Charnel Pits’ master.”
The Witch of Saulim: A fortuneteller that can be found in Squalor Court. Her strange prophecies are often bewildering but always unerringly true.
Charnel Pits of Punjar: The infamous charnel house used to dispose of Punjar’s lower-class dead. Who can say how many dead passed through those cursed doors and how many spirits still stalk its halls. The pits were closed when their master succumbed to madness.
Knowledge: Merchants and Artisans
Temple of the Moon: Found in the temple quarter (better known as the City of the Gods), the Temple of the Moon is a ziggurat dedicated to the fickle goddess Máni, the Maiden of the Moon. Stories hold that the priestesses smuggle their sacrifices into the temple via subterranean passages.
City of the Gods: Also known as the Temple Quarter, it is home to Punjar’s most affluent cults.
Knowledge: Priests, Nobility, and Sages
Death, Máni, and the Carnifex: Death, the Lord of the Dooms, is the most prominent of several death gods worshipped in the City of a Thousand Gates. The god has two daughters: Máni, goddess of the moon, and the Carnifex, patron of the lower classes and outcasts.
Ratvik the Mad: Ratvik Thirdson was an outcast of the noble House Tormanu, a family reviled for its inbreeding and decadent pleasures. Given to strange predilections and foul desires, Ratvik was deeded the Charnel Pits by the Overlord and tasked with disposing of Punjar’s lower-class dead. All traces of Ratvik the Mad and his legacy vanished decades ago.
Argent Falx: A legendary weapon exalted by the Cult of Máni, the two-handed blade is said to be sharp enough to cut the shackles of death.
City of the Gods: See above.
Encounter Table
Area Type Encounter
1-1 C/P 3 eunuchs Devotees
1-1a C/P Devotees
1-1b C 2 eunuchs
1-2b T/C Bull idol spirit
1-4 T Poison gas trap
1-4a T Poison needle trap
1-5 C 4 eunuchs
1-6 P/C 13 plague rats
1-7a C Master Bellows
1-9 P/C The Abbotess 4 handmaidens Potiphar, captain of the Mánistales 10 eunuchs Devotees
Interlude C 9 thief takers
2-2 T/C 10 phantom skeletal hands
2-3 P/C Phantom scrivener
2-3a C Ossuary cloud
2-5 P/C Mnom-Mothot 3 court skeletons 2 desiccated lovers Jester 3 skeletal troubadours
2-6 T/C Ratvik the Mad
2-7a-d T Cremation furnaces
2-8 P/C Moira
Player Start: The Hunger Moon Tarot
You thread your way through the muddy maze of tents and market stalls, one hand on your blade, and the other on your coin purse. The air is thick with buzzing flies, dust, and the hoarse cries of weary traders hawking the last of the day’s wares.
You spy your goal in the crimson light of the fading sun: a lowly tent stitched with patches and weird sigils. Violet mists and traces of incense drift from within. The beaded curtain of tiny skulls—mice, birds, and bats—confirms your suspicions. Certainly this must be the Witch of Saulim.
If the PCs muster the courage to enter the tent, read or paraphrase the following.
You draw aside the clacking curtain to reveal an emaciated crone, her white eyes staring into nothingness. A third eye is tattooed on her forehead and seems to blink when she wrinkles her face. Pointing with a long, bony finger, the hag bids you to sit on the threadbare pillows. Once you and your companions are settled she feeds more offal onto a glowing brazier and removes a tattered deck from a wrapped scarf. “What would you know of the plaques of Thoth-Ruin?”
The scene begins with the Witch of Saulim offering insights and divinations into the past, present, and future. While the readings are sure to confound PCs (and players!), they also contain vital clues to help the adventurers determine their next course of action. The scene closes with the crone offering the PCs a gift to aid in their adventure.
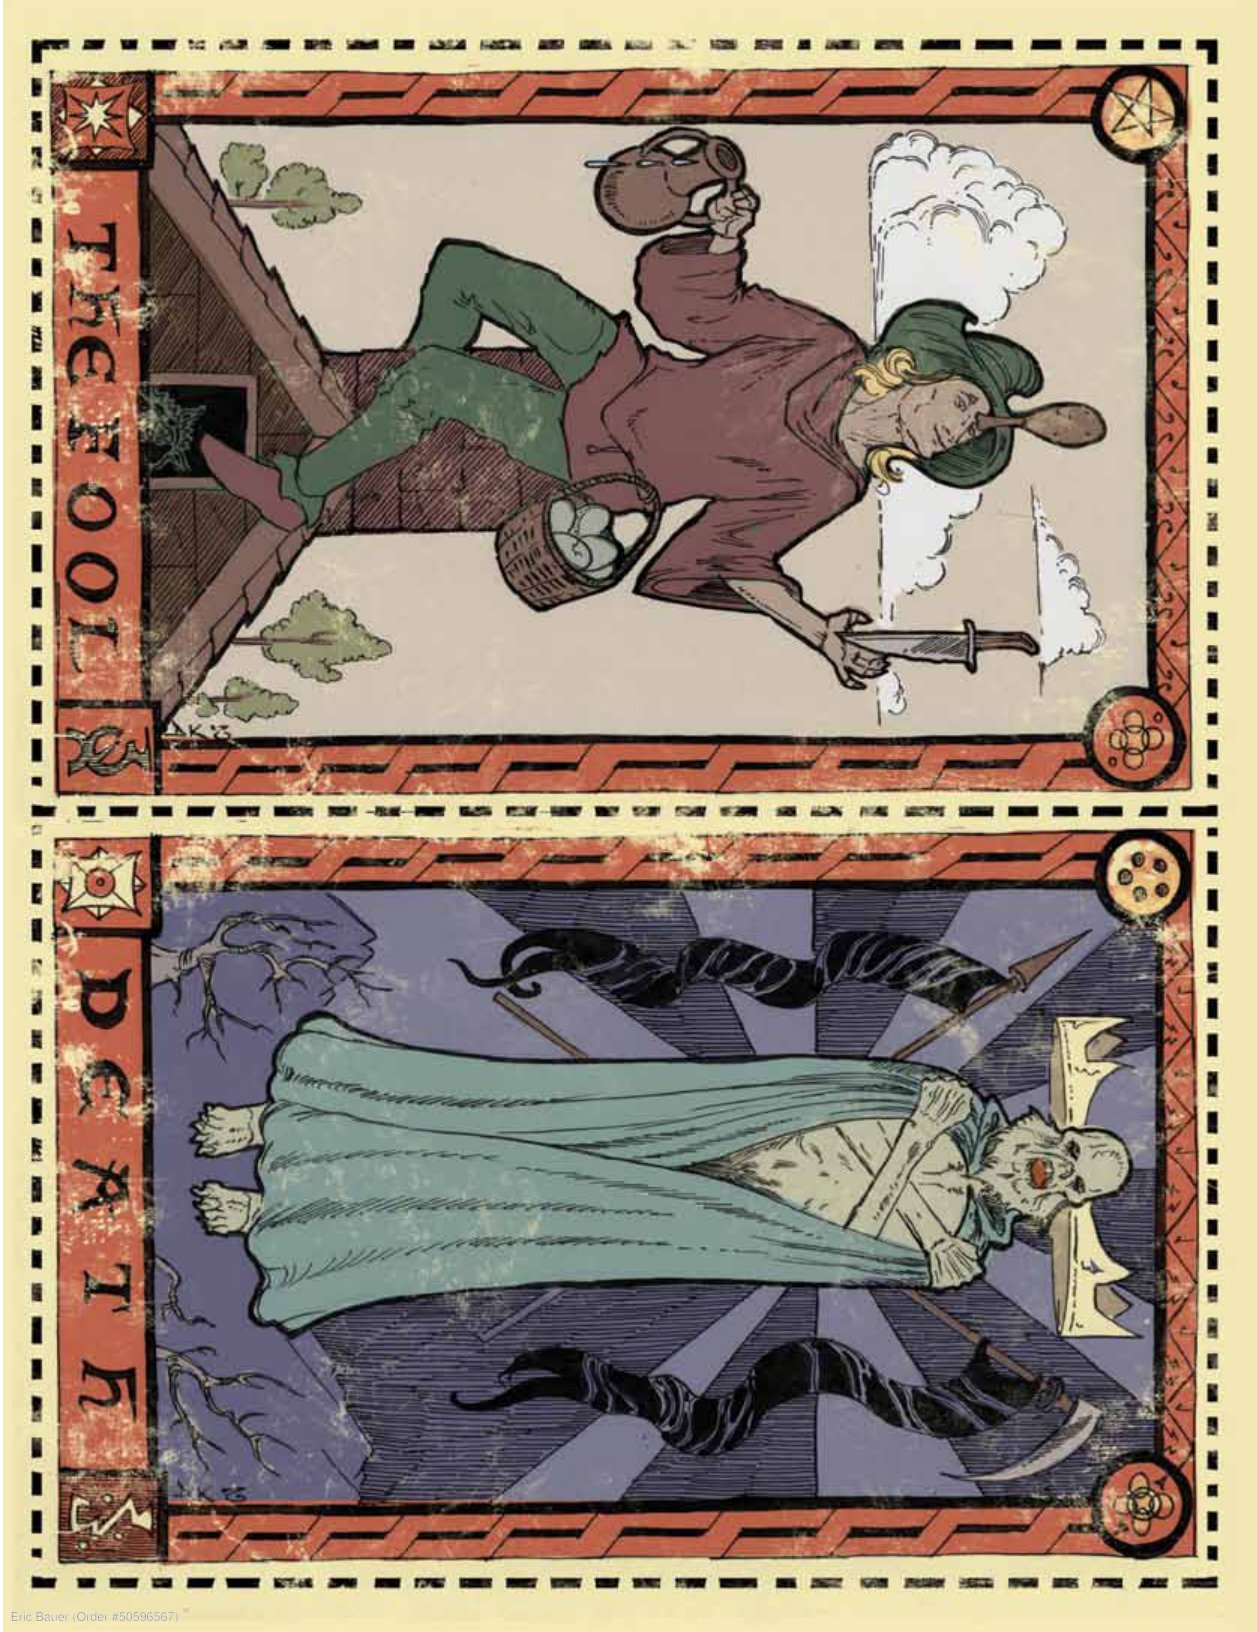
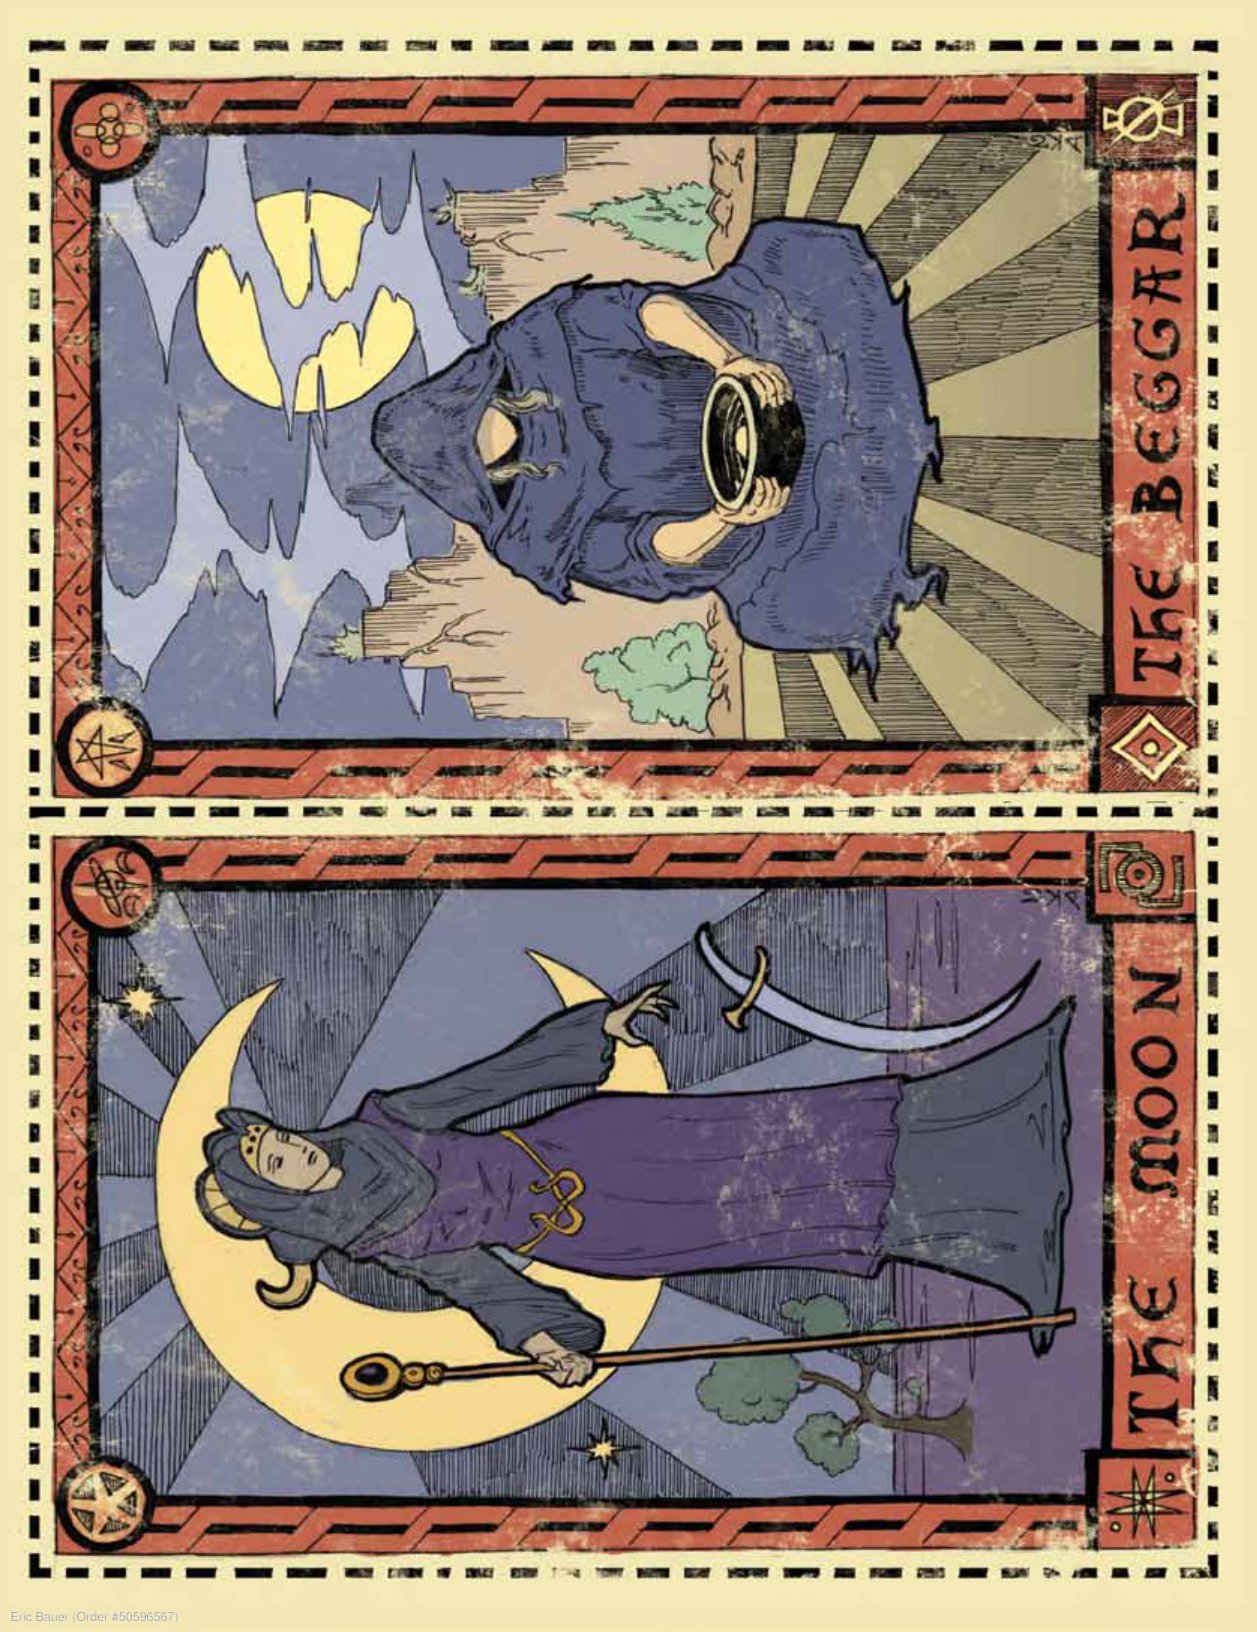
Shuffle the four cards (see handouts on page 21) and place them before the players, face down. (Ideally the judge should prepare two decks of handouts on cardstock: the first for the Witch’s reading, the second for the game of Death’s Trump at the end of the adventure.)
By some occult rite the hag discards cards from her deck until only four worn cards remain. She runs her bony finger across each in turn. “Turn the cards and cast the second sight of Thoth-Ruin upon the unknown.”
Read or paraphrase the crone’s reading of each card as it is revealed:
The Fool:“I see a band of fools, daring to risk the kingdom of death. Two relics are demanded of this quest: a blade capable of cutting the chains of fate and a gate between the living and the dead.”
The Moon:“The first step lies with the waxen maid, fickle and ever-changing. With every gibbous turn she blesses a crescent blade.”
The Beggar: “The mad king stole the Crow Queen’s maid for his wicked court. Now her tormented ghost stands watch over smoking pits that stink of charred flesh and hair, barring the fiery gates of bone.”
Death: “Death laughs at the ploys of the Raven and the Maid, one with portal, the other with blade. Before your quest is done you shall gamble your lives with the hoary king.”
Once all four cards are turned, read or paraphrase the following:
The blind witch runs her fingers over each of the stained cards. “You cannot vie against death without aid. Choose one to be your totem, your standard. Choose wisely; for it shall be your banner unto the very gates of death.”
The party may pick any one of the four cards as their icon, which plays a role in the final scene of the adventure. Each card also carries its own blessing, which lasts the course of the entire adventure:
The Fool: Each PC receives + Luck points. These additional Luck point must be spent during the adventure or they are lost. Upon successful completion of the adventure, each PC receives to his Luck.
The Moon: Each PC receives + hit points. Half of the additional hit points are made permanent upon the successful completion of the adventure.
The Beggar: Each PC receives + to a single saving throw or Luck check. PCs surviving the adventure receive a permanent bonus to a saving throw of their choice.
Death: Each PC may add + to a single attack or damage roll during the course of the adventure. PCs that survive the adventure may add a permanent bonus to attack, spell check, and damage rolls with a single chosen weapon or spell.
When the PCs exit the tent, they discover that many hours have passed. The moon, waxing gibbous, is sinking beneath the ward’s mottled rooftops; tomorrow night’s moon will be full. The Squalor Court is deserted save for the occasional mongrel pawing through the trash.
Judge’s Notes: Armed with the witch’s divination and their own knowledge of the city, the PCs should be able to puzzle out a path before them: first to the Temple Ziggurat of the Moon, to liberate the Falx of Máni, then to the Shrine of the Carnifex, found above the Charnel Pits in the foul neighborhood of Smoke.
If the readings and clues have fallen on deaf ears, divine intervention is called for, and a two-headed raven with a strip of cloth tied to its leg lands upon a nearby gibbet. The raven caws repeatedly at the PCs but must be induced down from its perch (any magic or a bit of food suffices). The scrap of cloth is inked on each side: on one side is the icon of a crescent moon within a triangle (symbolizing the Temple of the Moon); on the second side is the icon of the Carnifex (a two-headed raven) smudged with charcoal.
The Temple of the Moon
Cut from rough black basalt, the temple of the Moon Maid rises some two hundred feet into the sooty city air. Unlike some of the shining churches in the temple district, the Ziggurat of the Moon is squat and imposing, an ominous lurker in the City of Gods.
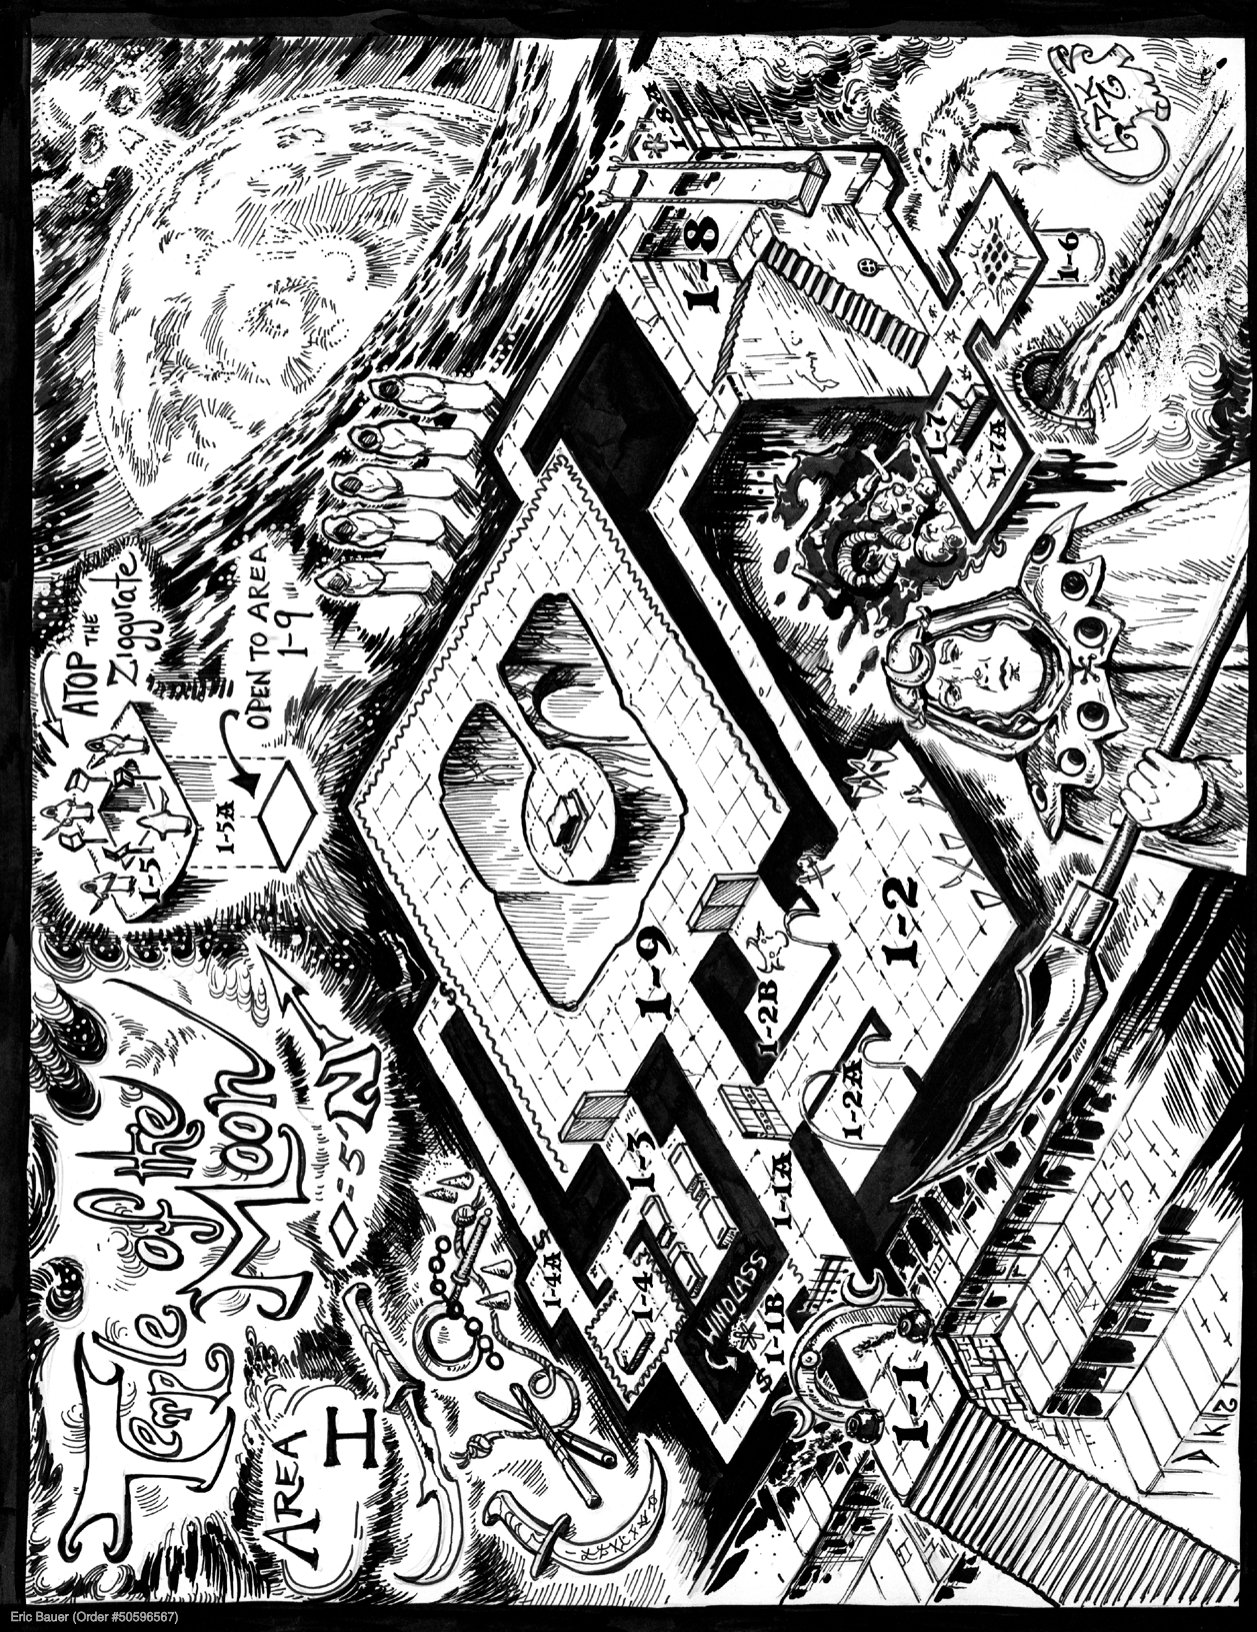
There are three principle entrances to the main temple:
• The Arch of the Moon, primary entrance to the temple (area 1-1a). The bronze gates are closed and barred at dawn and opened again at dusk.
• The sewers beneath the temple used by priests to dispose of waste and bodies (area 1-6). Thieves, beggars, and gong farmers are aware of the sewers beneath the temple.
• The Path of the Moon, a vertical shaft atop the temple plunging directly into the heart of the ziggurat (area 1-5). Guarded by temple eunuchs day and night, the shaft is the shortest and most dangerous route into the temple. Clerics and sages are aware of its existence.
The object of the PCs’ quest, the blade named the Argent Falx, only appears when the goddess Máni manifests on the night of a full moon. The next full moon is on the night following the PCs’ tarot reading. To steal the silvery blade, the PCs must make their way to the heart of the temple, wait for the lunar rite to reach its climax, and then steal the goddess’ blade from beneath the noses of a horde of cultists.
Infiltrating the temple is most readily accomplished by stealth or deception, though PCs are free to employ whatever tactics they choose. Devoted to the lunar cycle, the cultists will do all in their power to ensure the ritual is completed, even if the temple is under assault. However, once the alarm is sounded, the temple eunuchs spring into action, dropping the bronze gates in area 1-1a then withdrawing to the Sanctuary of Máni (area 1-9) to defend the high priestess and her devotees.
Except where noted, the temple is lit with pitch torches that hiss and sputter as they burn. The walls and ceiling are covered in rough plaster, giving the interior a rounded, organic look. The floors of the temple are tracked with fine dust, disturbed by a hundred footprints. The air is smoky and heavy with the smell of incense. The chanting of priestesses (originating in area 1-9) can be heard throughout the temple complex, though only faintly in areas 1-6, 1-7, and 1-8.
Areas of the Map
Temple of the Moon: The enormous ziggurat looms above you in the dimming light. Silent devotees arrayed in hoods and bearing sputtering torches march up the long stairs to the temple’s entrance. To the east the first sliver of the moon pulls itself from the sea like a pale god.
Maps (8)
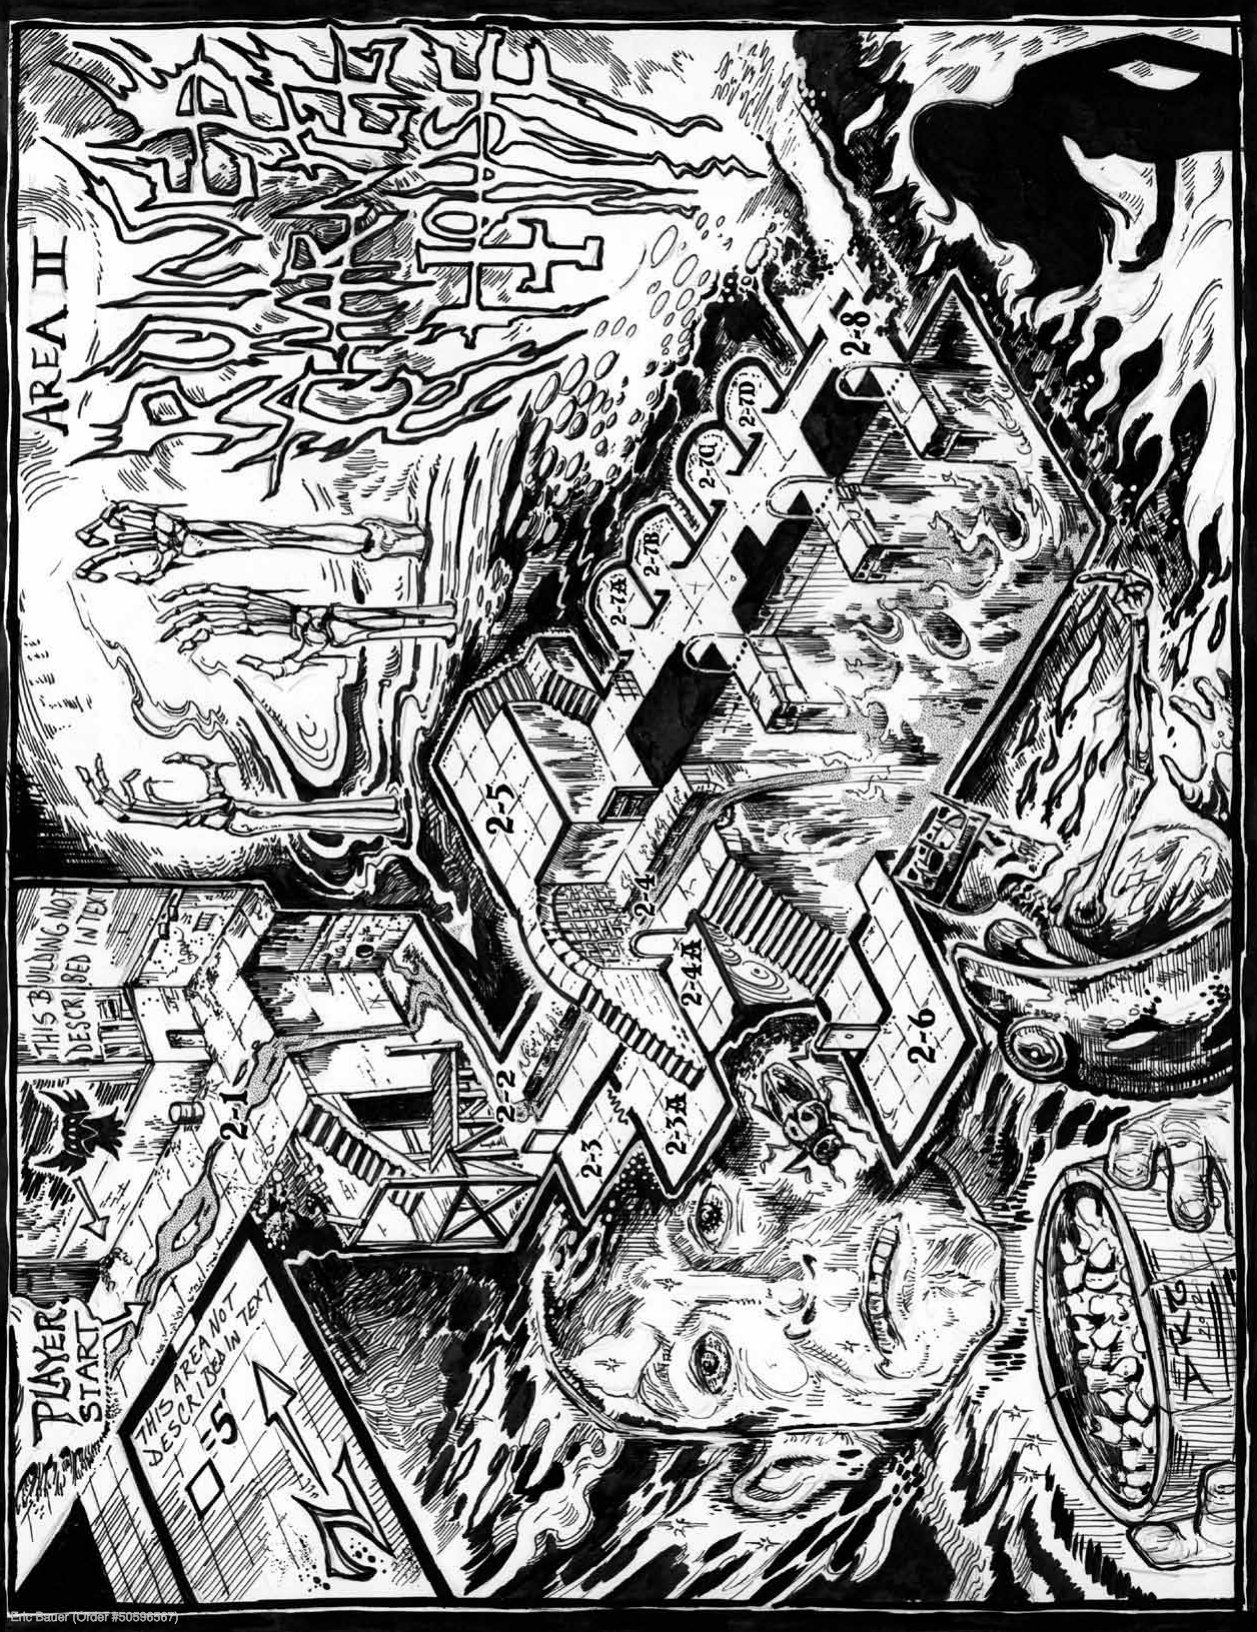
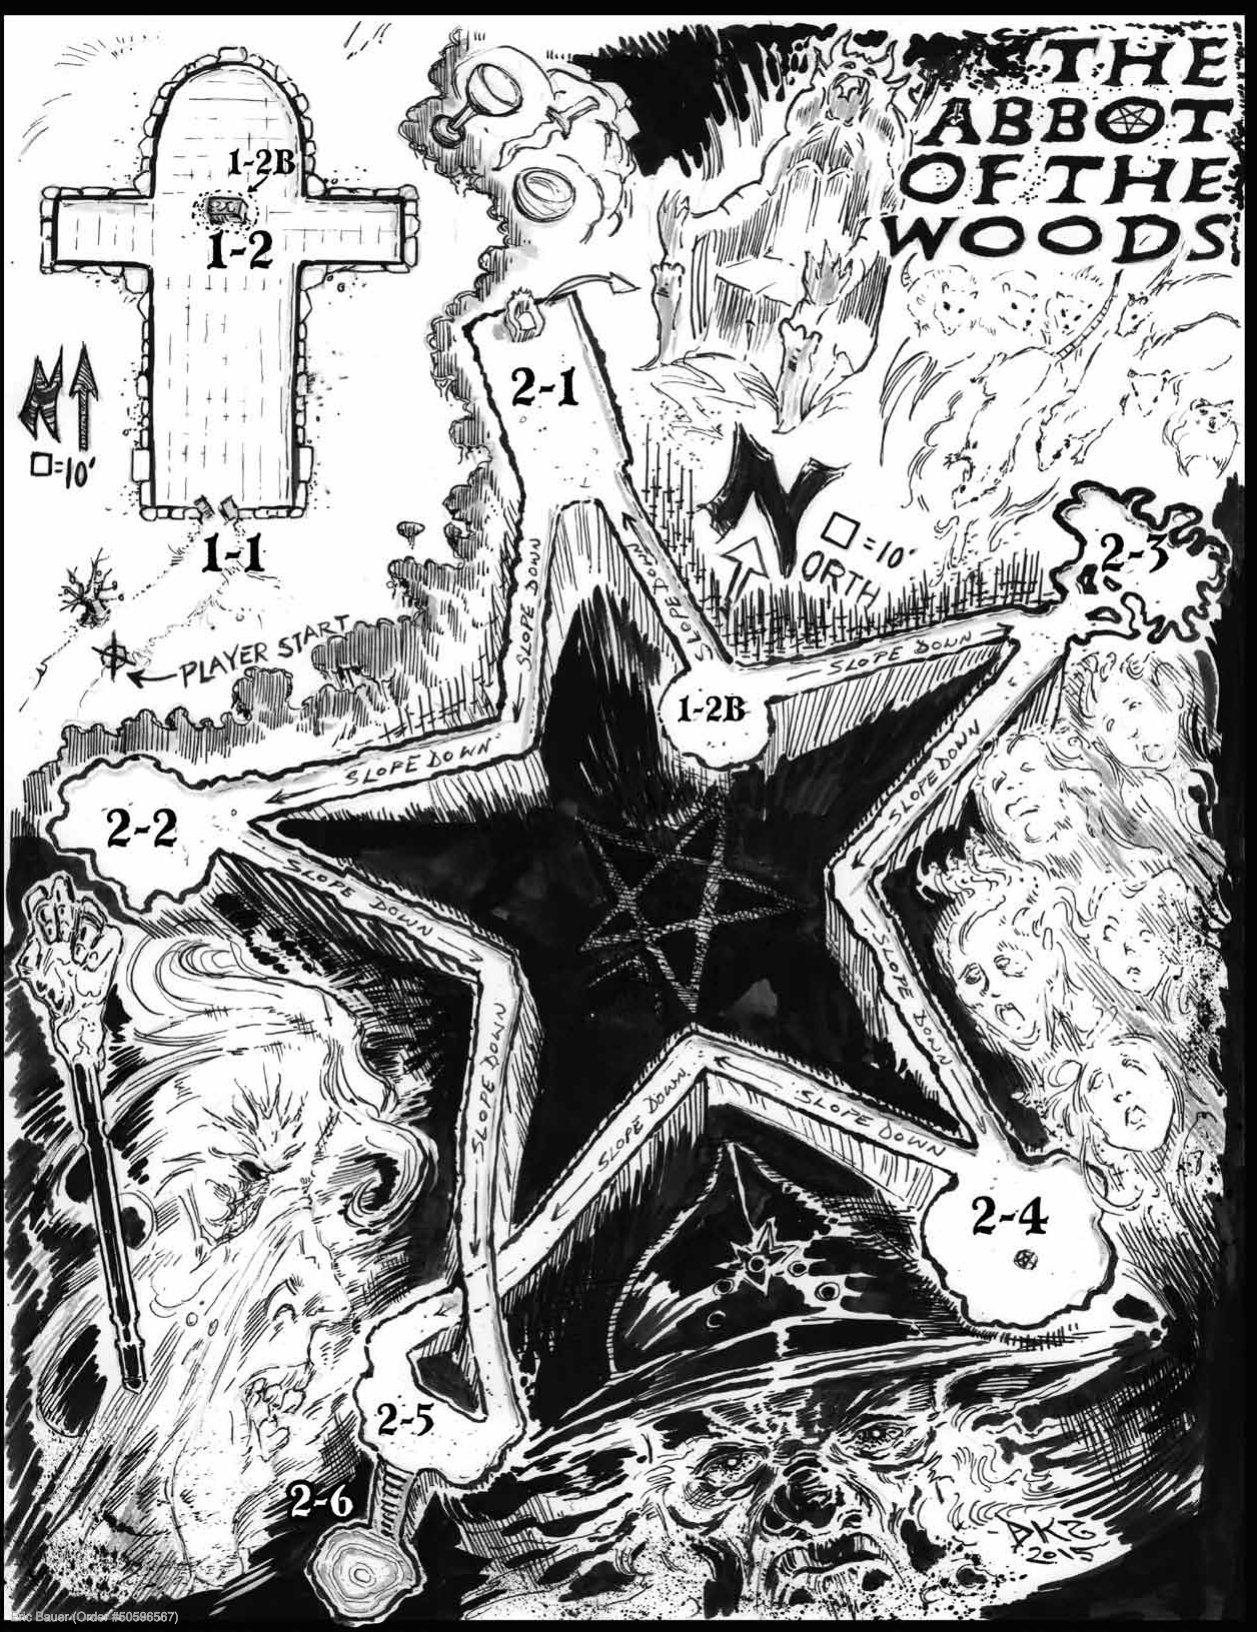
Bestiary (29)
Rooms (35)
Area 1-1 Arch of the Moon p.6
Area 1-1 – Arch of the Moon
The stairs rise to a darkened archway, flanked by fiery braziers spewing black smoke. The devotees march to the top of the stairs and offer obeisance to the carved arch before passing into darkness. A trio of towering sentries dressed in white robes and bearing wickedly curved glaives hold solemn watch over the silent procession.
The devotees are distinguished by their pale ceramic masks. Any thief can pass the sentries with a successful DC 10 disguise self check, but other PCs must either wear a white mask or succeed on a Luck check with a . All others are turned away by the eunuchs without a word. PCs attempting to talk or coerce their way into the temple are turned away by force.
If combat breaks out on the platform, the devotees panic, pushing and shoving each other in their flight. The panicked mob is dangerous to those lower on the stairs (Reflex save, DC 10 or be crushed by the panicking mob for damage). If it suits the judge’s plots, the PCs might briefly spy a key campaign personality among the fleeing throng.
If faced with overwhelming force, the eunuchs withdraw into the temple, calling to their fellows in area 1-1b to lower the gate. The PCs have two rounds before the gate is fully lowered. The gate’s descent can be arrested with a DC 13 Strength check, but the PC or PCs must continue to make the check every round until the gate is propped or the windlass is reversed. Joining their fellows in area 1-1b, the eunuchs fight to the death. Each enormous eunuch wears appropriately-sized banded mail, which may only fit the largest of PCs.
Eunuchs (3): Init ; Atk glaive melee (); AC 16; HD ; hp 19, 16, 13; MV 30’; Act ; SP wolfpack (+1d to hit when 2 or more eunuchs attack the same target); SV Fort , Ref , Will ; AL C.
Devotees (): Init ; Atk fist or dagger melee (); AC 10; HD ; hp 4 each; MV 30’; Act ; SV Fort , Ref , Will ; AL C.
Area 1-1a Unholy Hall p.6
Area 1-1a – Unholy Hall
The walls of this long hall are decorated with strange mosaics and fonts set into the rough plaster and lit by sputtering torches. A simple curtain hangs over an archway to your left, and farther down you can see a pair of doors on your right. Chanting and a strange pale glow emanate from the end of the hall.
If the PCs have passed this far undetected, a steady stream of cultists is slowly proceeding north to area 1-9. The devotees pause at each of the three fonts to anoint their foreheads with holy oil and debase themselves before the unholy mosaics.
The fonts are spaced some 15 feet apart and each is cut from pale marble shot through with verdigris veins and carved in the semblance of a gaping demon maw. The oil sears the skin of any cleric professing a Neutral or Lawful faith (Fortitude save DC 13 or damage and points of disapproval). Similarly, wizards risk the ire of their patrons by anointing themselves with the unholy oil (Will save, DC 13 or to spell checks until their patron is appeased). Others anointing themselves with the oil suffer no ill effects but suffer repercussions in area 1-9.
Rogues can fake anointment with a DC 5 pick pocket check. All others that abstain from anointing themselves with must make this “untrained” check with a or draw the attention of the cultists. The cultists confront the PCs, calling them out as intruders. Faced with the threat of violence, the cultists call for the temple eunuchs then flee. The cultists fight only if cornered.
Devotees (): Init ; Atk fist or dagger melee (); AC 10; HD ; hp 4 each; MV 30’; Act ; SV Fort , Ref , Will ; AL C.
Area 1-1b The Windlass p.6
Area 1-1b – The Windlass
The small square chamber is dominated by a windlass and counterweight. A thick chain, wound round the windlass, rises through the ceiling.
A pair of eunuchs guards this chamber, ready to assist their brothers in area 1-1 if summoned. Armed with scimitars and girded with banded mail and shields, the eunuchs take two rounds to lower the gate then leap to the defense of the temple.
Raising the gate fully takes three rounds, but even a single round turning the windlass is sufficient to allow PCs to squirm past.
A close inspection of the west wall reveals a narrow slot cut between the basalt blocks. Hidden within the slot is a simple wire, fashioned in the shape of a hoop. Pulling on the ring triggers a secret door. Unless spiked open, the secret door swings closed after 3 rounds.
Eunuchs (2): Init ; Atk scimitar melee (); AC 17; HD ; hp 16, 13; MV 30’; Act ; SP wolfpack (+1d to hit when 2 or more eunuchs attack the same target); SV Fort , Ref , Will ; AL C.
Area 1-2 Barracks p.6
Area 1-2 – Barracks
The iron-bound doors open into barracks. Suits of banded armor stand in the corners of the room; shields, scimitars, and curved glaives hang from racks on the walls. Sleeping mats are arrayed throughout.
This chamber is home to the Mánistales, the sacred eunuchs that ward over the temple. There are twenty mats crammed into the quarters, nearly covering the floor.
There are fifteen scimitars, ten glaives, fifteen shields, nine steel helms, and four suits of banded mail in the chamber, though the banded mail is sized for the enormous eunuchs and only fits the largest of PCs.
The eunuchs have foresworn all material wealth, but Potiphar, captain of the Mánistales, keeps a hoop of pearl prayer beads in a simple wooden case hidden in his sleeping mat. The pearl beads are worn smooth with use, and imbued with the wickedness of seventeen generations of devotees. The prayer beads are worth 250 gp and bestow a bonus to spell checks when carried by a chaotic cleric or wizard. If sacrificed by a lawful or neutral cleric, the beads offset 500 gp worth of penalties.
Area 1-2a Storeroom p.6
Area 1-2a – Storeroom
The small vaulted chamber is filled with crates, casks, and bales.
This chamber serves as a storeroom for the temple’s foodstuffs, wine, and bedding. There is nothing of interest to adventurers.
Area 1-2b Chapel of the Bull p.6
Area 1-2b – Chapel of the Bull
Immaculate white robes hang along the walls of the small chamber. On the west wall is a simple shrine depicting the golden head of a bull with crescent horns. A cone of incense burns atop a short stone pedestal, filling the air with bitter smoke.
The robes are the sticharions worn by the Mánistales. There are eight in all.
PCs donning the long robes can easily move among the devotees in area 1-9. However, deceiving a Mánistal or priestess requires a thief’s DC 10 disguise self check or a Luck check rolled with a .
Clerics immediately recognize the bull idol as Hujuki, divine manservant to Máni. Disturbing the shrine releases the spirit of the bull idol. A white phantom bull charges from the wall at the would-be despoiler, achieving surprise on a roll of 1-2 on a . The spirit of the bull idol vanishes after taking 15 points of damage.
A successful trample attack permits the bull spirit to attempt a gore attack, plunging its long, hooked horns into the target’s belly. A PC struck by the gore attack must attempt a DC 13 Fortitude save. On a failed save, the bull idol spirit vanishes into the target, turning the PCs skin and hair milky white and infecting the PC with a bizarre curse: anytime the PC’s skin is struck by the light of the full moon, he transforms into a raging, berserk minotaur. The body-wracking transformation takes place over 3 painful rounds and persists as long as the PC remains in the moonlight plus rounds. In bull-man form, the PC gains + hp, Strength, and cannot help mindlessly attacking the nearest creature. Lifting the curse requires a suitable adventure, as determined by the judge.
The golden idol is worth 750 gp or thrice that to any wealthy cultist of Máni.
Bull Idol Spirit: Init ; Atk trample melee ( + gore); AC 20; HD ; hp 15; MV 40’; Act ; SA gore melee ( + curse of the bull god); SV Fort , Ref , Will ; AL C.
Area 1-3 The Handmaidens’ Chamber p.7
Area 1-3 – The Handmaidens’ Chamber
The chamber is occupied by four beds made up with lavish pillows and heavy embroidered blankets. A simple iron coffer stands at the head of each bed. The chamber is unadorned, save for twelve polished silver plaques hanging on the walls.
This chamber is home to the handmaidens of Máni, nuns in service of the high priestess. The handmaidens are found in area 1-9 during the night, retiring to 1-3 to sleep during the day.
Each coffer contains a handmaiden’s effects. There is little of worth here, the handmaidens having given their material wealth over to the abbotess. The coffers are unlocked. In each the PCs find a simple white tunic, a black scapular, and a black habit. Beneath the clothing, PCs discover a whetstone, a vial of weapon oil, candles wrapped in wax paper, cones of incense, and ep.
Given that there are only four handmaidens in the entire temple, disguising oneself as a nun is a challenge. The PCs will attract the attention of the other handmaidens and Mánistales any time there are more than four nuns in one place.
The silver plaques depict the twelve icons of Máni: the Ice Moon, Hunger Moon, Crow Moon, Hare’s Moon, Planting Moon, Mead Moon, Thunder Moon, Dog Moon, Barley Moon, Blood Moon, Frost Moon, and the Long Night’s Moon. Clerics and scribes will immediately recognize the references, and, by studying the placement of the plaques in the chamber, will be able to infer that the present phase is the Hunger Moon. PCs inspecting the Hunger Moon plaque find it depicts a waxing gibbous moon rising behind a hanging gibbet. Atop the gibbet sits a two-headed crow.
Each plaque is worth 50 gp to collectors of esoteric oddities. If the plaques are melted down to conceal their origins, the raw metal is worth a mere 5 gp per plaque.
Area 1-4 Bower of the Abbotess p.8
Area 1-4 – Bower of the Abbotess
The chamber has an arched ceiling some 20 feet in height. The floor is of polished white stone, with winding veins of crimson. Deep purple tapestries hang on every wall, embroidered with black, gold, and silver thread.
A lavish bed rests at the back of the chamber, hung with silken sheets, satin pillows, and the white fur of some great polar beast. A meditation pillow rests before a simple shrine: a polished marble crescent depicting the gibbous moon.
During the night the abbotess is found in area 1-9, offering up sacrifices to Máni. During the day she retires to her bower.
The curtains are embroidered with wicked sigils, diabolic signs, and sinister intimations. Searching behind the heavy curtains reveals two hidden passages: one to the south and north respectively.
PCs inspecting the shrine discover that the marble crescent is set upon an iron plate concealing a hidden vault. The plate’s latch is protected by a poison gas trap; opening the latch without first rotating the marble crescent triggers the trap. All targets within 10 feet must succeed at two separate saves. First, a DC 13 Fortitude save or take damage and slip into a deep torpor for rounds. Second, a DC 10 Will save or be overtaken by a suicidal melancholy that compels the PC to kill himself before the next full moon. The melancholy can be cured by an appropriate quest of the judge’s choosing.
The vault contains a polished wooden sword stand (intended for the Falx) and two simple copper coffers. The first coffer contains 527 gp; the second contains 291 sp and a false bottom concealing four platinum ingots (the equivalent of 100 pp).
Area 1-4a Reliquary of the Moon p.8
Area 1-4a – Reliquary of the Moon
The narrow passageway opens into a small room hung with a bizarre collection of religious implements. Elaborate censers, a collection of curved daggers, shelves laden with cones of wrapped incense, silver-threaded robes and habits, scarlet fascias embroidered with the sigils of demons, crimson stoles, and several copper rods.
Amid the jumble of implements you spy a simple teak box secured with a latch.
This small chamber is home to the religious implements sacred to the cult. All serve a role in the cult’s worship of Máni, but some may see use only once in a decade or more. All are meticulously cared for, polished and cleaned to a high sheen, with nary a trace of wear.
The teak box is 16 inches long, 6 inches wide, and 3 inches deep. The latch is locked and may be picked (DC 15). The plate’s latch is protected by a poison gas trap; opening the latch without first rotating the marble crescent triggers the trap. A close inspection of the plate (DC 15 Find trap check) reveals the trap, but disarming it is far more challenging (DC 25 Disable trap check). The target must succeed on a DC 15 Fortitude save or be overcome by an intense chill ( to Agility, damage) and an irresistible desire to offer himself up in service to the goddess Máni. The Agility loss is regained at the rate of 1 point per day, but the urge to serve Máni can only be lifted by dedicating oneself to another deity (who will inevitably have its own agenda for the PC).
The box contains seven gems set within silver medallions,
each gem cut to resemble a phase of the moon. There are a total of eight divots; the missing eighth gem is being employed in the ritual in area 1-9. Each piece of jewelry is worth 100 gp; a complete collection of all eight is worth 1,000 gp.
A secret door is hidden in the north wall of the chamber. PCs inspecting the wall discover a narrow crack between two stones, scored as if by a blade or metal rod (which can found amid the collection of implements). The secret door can be pried open with any dagger or short sword.
Area 1-5 Path of the Moon p.8
Area 1-5 – Path of the Moon
A platform is set at the peak of the ziggurat. Four sentries stand watch in the moonlight, glaives at the ready as they gaze out over the smoke-laden city.
PCs seeking to gain the top of the ziggurat unnoticed must employ either guile or stealth; the sentries sound their horns as soon as they spy assailants scaling the sloped walls. Armed with crossbows and glaives, the eunuchs fight to the death in defense of the ziggurat’s peak and its secret. If the alarm is raised, the eunuchs in area 1-1b lower the gate, and all the guardians within the temple withdraw to 1-9 to defend the the high priestess and her devotees. For her part, the high priestess cannot rush the rite, and must wait for the appointed time (midnight) to conclude the ritual.
A yawning pit is set in the center of the platform, descending through area 1-5a to 1-9. Set around the pit are four iron bars, each some 4 feet in height and topped with a polished silver mirror. The mirrors are used to reflect and direct the moonlight into the mirrored shaft (area 1-5a), and the iron bars and mirrors are readily adjusted to capture the light of the moving moon. If all the eunuchs are slain and there is no one to correct and adjust the mirrors, the ritual in area 1-9 is perforce delayed until the moon is directly above the temple (roughly midnight).
Eunuchs (4): Init ; Atk glaive melee () or crossbow ranged (); AC 16; HD ; hp 19, 16, 15, 12; MV 30’; Act ; SP wolfpack (+1d to hit when 2 or more eunuchs attack the same target); SV Fort , Ref , Will ; AL C.
Area 1-5a Mirrored Shaft p.8
Area 1-5a – Mirrored Shaft
The shaft plunges straight into the heart of the temple. The walls of the shaft are plated with sheets of silvery metal polished until they shine like mirrors.
The sheer walls of the chimney are nearly impossible to climb without aid (DC 25). Ropes can be anchored on the mirror posts or secured by anchoring spikes in the ziggurat walls.
The chimney descends 40 feet before opening into area 1-9. It is another 20 feet down to the platform in the center of the chamber.
The sheets are masterfully wrought so that any light is both reflected and focused. When the full light of the moon shines into the shaft the effect is blinding. PCs caught within the shaft must attempt DC 15 Reflex saves or be blinded for rounds. Regardless of the save, anything obstructing the shaft casts dramatic shadows into area 1-9.
Area 1-6 Sewer Grate p.8
Area 1-6 – Sewer Grate
A rough hole is cut into the ceiling of the sewer pipe. The shaft climbs 15 feet before terminating at a rusty iron grate. The flicker of torchlight hints at a chamber beyond the grate.
PCs climbing to the grate from below (climb DC 10, or by aid with rope and grapple) discover that the grate is locked on the far side; further, the grate is sticky with gore. Dried blood and bits of flesh and intestine hang from the iron bars. Picking the lock (DC 13) requires the thief to reach up through the grate
and into the room above. Alternatively, the grates can be torn free of their mooring with a Herculean DC 20 Strength check.
The temple uses the sewers to dispose of corpses, and the denizens of the sewers have come to expect these meals. The thirteen plague rats lurking in the chamber above regard hands craning through the grate as an invitation to sup.
At the first sign of disturbance of the grate, the ravenous rats pour down onto the unfortunate PC below. They cling to the PC, clawing and biting any exposed flesh. Every round make a single attack roll against any PC within the chamber. For every point equal or above the PC’s AC, the rats inflict damage. PCs in the chimney must succeed on DC 13 Will saves or plummet back into the sewers below.
Every PC suffering damage from a plague rat must make a DC 13 Fortitude save at the end of the adventure or contract a disease at the judge’s pleasure.
Plague Rat Swarm: Init ; Atk escalating bite (special); AC 10; HD ; hp 26; MV 25’; Act special; SP bite all targets within Area 1-6, escalating bite ( dmg for every point attack roll exceeds or equals target’s AC), disease (DC 13 Fort save, see above); SV Fort , Ref , Will ; AL N.
Area 1-7 Dissection Chamber p.9
Area 1-7 – Dissection Chamber
This narrow chamber stinks of death. A large wooden butcher block runs along the southern wall. Cleavers, bone saws, meat hooks, and knives adorn the walls. The gore-ridden floor sucks and clings to your boots, and weird white worms crunch underfoot. A stained, patch-work curtain hangs over a doorway in the rear of the chamber.
This chamber is where Master Bellows dismembers corpses of sacrificial victims. It is also where he castrates those who would join the ranks of the temple eunuchs.
The chamber is lit by a pair of torches that sputter and sway with the slightest breeze. Unless the party takes extraordinary pains, they alert Master Bellows (in area 1-7a) to their presence.
Area 1-7a Master Bellows p.9
Area 1-7a – Master Bellows
The small chamber holds a simple straw mattress, made up with threadbare covers. A plain brazier glows dimly to one side, offering warmth and faint light to the sparse chambers.
Master Bellows lurks in the shadows just inside the chamber, cleaver and meat hook in hand. He waits for the PCs to enter before attacking. If the PCs don’t venture into the chamber, Master Bellows ambushes them in area 1-8.
Master Bellows resembles nothing so much as a walking cadaver. His stringy black hair hangs in clumps, his sallow skin clings to his bird-like bones, and his long, nervous fingers dance about like spider legs. He fights with a skill born of years of butchery, wielding both cleaver and meat hook to great effect. Master Bellows attacks with both weapons each round. On any round that the meat hook strikes a target on a roll of 17 or better, his attack with the cleaver automatically scores a critical hit.
The butcher-surgeon has served the temple for decades, disposing of bodies and castrating the eunuchs. If the PCs are disguised as devotees, they may be able to fool him for a short while, but subtle clues and missteps will quickly raise his suspicions. Fanatical in his devotion to Máni, Master Bellows cannot be bribed or frightened into submission.
He keeps his meager treasure hidden behind a loose stone set into the wall. Dwarves readily notice the stone as do other PCs carefully searching the south wall. The stone is easily worked
free. Hidden within the niche are 35 sp, lovingly arranged in stacks, a moon hand-carved from bone, and a simple opal wrapped in a leather scrap. The opal is blessed by Máni and grants its owner a bonus to Luck checks.
Master Bellows: Init ; Atk cleaver melee () and meat hook (); AC 13; HD ; HP 24; MV 30’; Act ; SP improved critical hit (automatic crit with cleaver following 17+ meat hook attack roll); SV Fort , Ref , Will ; AL C.
Area 1-8 Lift Shaft p.9
Area 1-8 – Lift Shaft
The murky passageway reveals open stone stairs that climb the west wall, rising into darkness. A lift rests on the north wall, suspended by chains some 15 feet off the floor.
A high-pitched, rhythmic chanting echoes from somewhere in the darkness above. The lift is used for transporting bodies from the sanctuary above; the flagstones beneath the lift are caked with dried blood and bits of gore.
The stone steps are slick and worn with age. Torches are set in the wall running along the stairs, casting flickering light over the chamber.
If Master Bellows manages to evade the PCs in area 1-7a, he follows the party onto the stairs, ambushing them from behind. Attacking with surprise, he attempts to hook the last PC in the marching order with a successful attack, using his second action die to hurl the target off the steps. The target must succeed on a Strength check versus Master Bellows () or be hurled to the ground below.
Area 1-8a Lift p.9
Area 1-8a – Lift
A turnstile stands atop the platform. A pair of rusty chains runs from the turnstile through iron hoops set in the ceiling and down to the lift below. The turnstile is used to raise and lower the lift. A simple grate of iron encrusted with gore, the lift is used to transport bodies from the upper temple to the lower dungeon.
Area 1-9 Sanctuary of Máni p.9
Area 1-9 – Sanctuary of Máni
Area 1-9 and the rite taking place therein doesn’t wait for on the PCs. Tentative or overly cautious parties might find themselves stymied if they wait too long to act. To help judges track the various moving parts, the encounter’s timeline is summarized here. Note that the abbotess is driven to complete the ritual; whether or not the PCs intercede, the ritual must be completed.
Summary of Encounter: At midnight, the moon casts its light into the heart of the temple. The ritual reaches its climax, blinding the congregation (and potentially, the PCs). With the devotees blinded, a false goddess is released from a hidden compartment within the altar, and the Argent Falx materializes in her hands. The false goddess presents the sword to the abbotess, then – as the sanctuary goes dark – the drugged maiden falls to her doom. The abbotess and her handmaidens retire with the blade, and the devotees are ushered from the temple.
In order for the PCs the steal the Argent Falx, they will have to act quickly and decisively. Just how the party attempts the heist, and whether or not they succeed, depends entirely up to the PCs and their cunning.
Once the players enter, read or paraphrase the following:
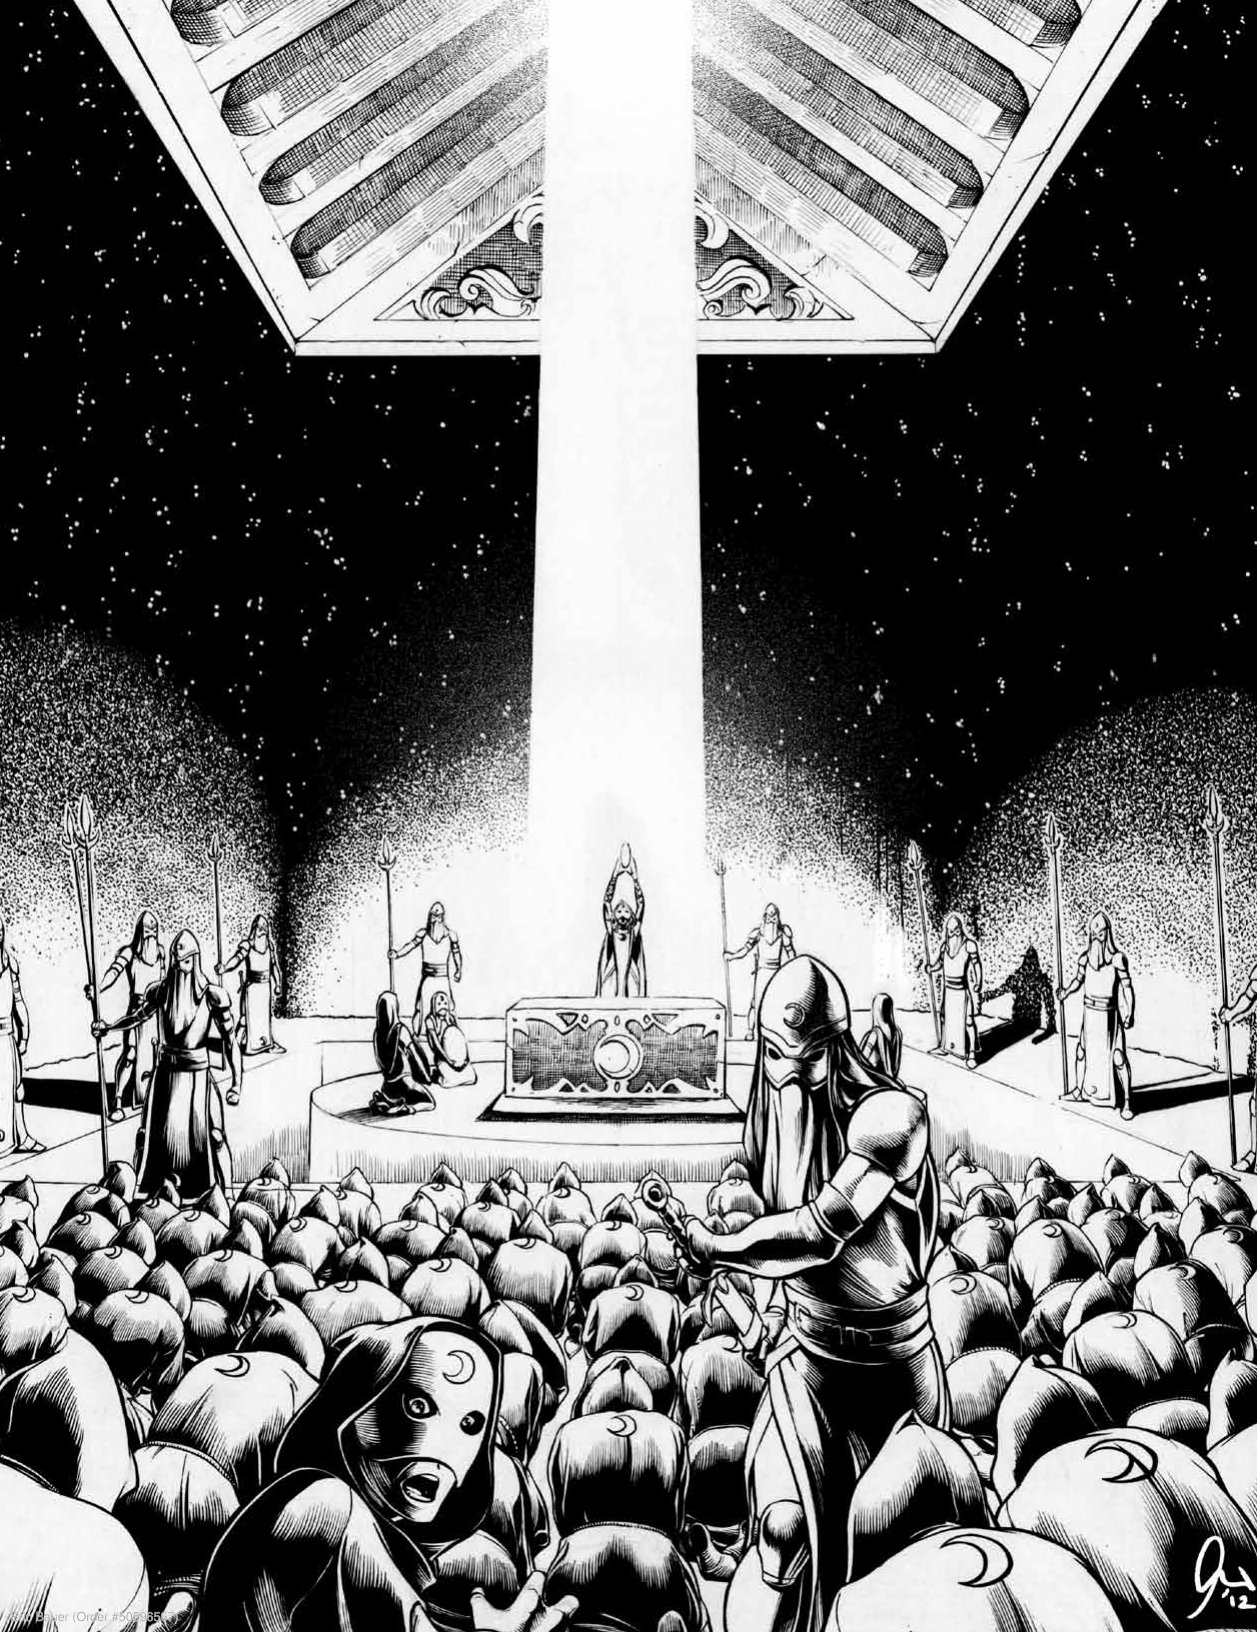
An enormous, vaulted temple opens before you. The floor of the temple is crowded with masked, chanting cultists. The devotees push and crowd each other for a view of the pit dominating the center of the chamber. The dark walls sway like opaque, gaseous clouds, speckled with stars.
A stone platform extends out into the center of the pit. Resting atop the platform is a pale marble altar. Hints of moonlight shine down from above, casting a soft glow over the sinister rites.
Towering temple guards glower over the crowd as masked priestesses cross towards the central platform, bringing the chanting to a fever pitch.
With the coming of the full moon, the fevered cultists hope to receive the blessing of their fickle, ever-changing goddess. As the moon rises above the temple, the rite builds to a fever pitch, the cultists wailing and howling on bended knee. While the priestesses and devotees are focused entirely on the ritual, the ten eunuchs and their captain keep a close watch over the proceedings. If the PCs are hidden among the worshippers but don’t follow along with the wailing devotion, the eunuchs immediately identify the heathens and remove them by force, casting them into the pit.
The rite takes place atop the platform in the center of the chamber. The pit surrounding the platform is 150 feet deep. It is 10 feet from the lip of the platform to the surrounding ledge; leaping the gap without a running start requires a DC 13 Strength check to catch the lip of the platform. It takes a round for the PC to pull himself onto the platform. If the cultists are cleared away to permit a running start, the gap is easily cleared—unless the PC rolls a 1 or less on a Strength check, he vaults to the far side.
The altar conceals a secret chamber. A young girl draped in opalescent robes hides within, drugged into a dull torpor and awaiting apotheosis. A thorough inspection of the altar reveals a clever mechanism that causes the face of the altar to fall away and the base of the hidden chamber to rise swiftly to the level of the altar.
Though not immediately evident in the swirling chaos, three of the temple’s four walls are covered in thick, black tapestries. Each hangs from ceiling to floor and is speckled with silver beads. Though incredibly cumbersome, the curtains can fetch as much as 3,000 gp in total.
Moon Reaches Apex: As the moon reaches its apex in the sky, read or paraphrase the following. Note that PCs are free to take action at any point during the rite.
Four masked handmaidens cross the temple floor towards the central platform, swinging smoking censers on long chains. Tendrils of incense crawl and writhe over the open pit. Suddenly, all is lit from above as pale moonlight pours down, washing over the cultists.
Four faceless priestesses circle the platform, mirrors cradled in their arms, collecting and reflecting the moonlight at the altar.
A final priestess places a glimmering jewel within the cascading beams, setting the gem ablaze from within!
Gem Blinds Congregation: A moment later, the gem flares with searing rays, blinding everyone facing the central platform (Reflex save, DC 15, or blindness for rounds). The abbotess’ eyes are closed and the eunuchs are turned away, but the four handmaidens and cultists are all blinded for 3 rounds.
While the congregation is blinded, the abbotess trips the latch on the altar. The lid of the altar slides away and the radiant “goddess” emerges into the moonlight.
While there is nothing divine about the “goddess,” what happens next certainly bears the mark of the gods. As the ritual reaches its climax, read or paraphrase the following:
A searing light blossoms from the jewel, erasing all sight. When the light dims, you see a shining goddess atop the altar. She glows with moonlight, radiant locks pouring down her back. The goddess raises her arms in exultation, and the moonlight condenses into drops of quicksilver that rain down on the platform. The silver rain quickly coalesces in the goddess’ hands, forming a curved blade: the fabled Argent Falx!
The scene appears magical, but some elements are mere legerdemain. The false goddess raises her hands in exultation, glowing in the reflected moonlight. A milky white sickle sword appears in her hands. This is the fabled Argent Falx: the sickle sword capable of severing the bonds of death, and the PCs’ goal.
False Goddess Disappears: The false goddess holds the blade up before the adoring worshippers, then presents the blade to the abbotess. At the abbotess’ signal, eunuchs atop the ziggurat place a cover over the Path of the Moon, momentarily shrouding the temple in darkness. Her role complete, the “goddess” calmly steps off the platform, plummeting to her death in the darkness below.
As the torches are relit, the eunuchs move to surround the high priestess. They quickly escort her back to her bower, where she places the blade within the altar-vault (see area 1-4).
With the completion of the rite, the eunuchs usher the remaining devotees from the temple, close the great gate, and retire to their barracks. Throughout the remainder of the night and the next day, a crew of five guards patrols the temple. The handmaidens and abbotess retire to area 1-4 to hold a brief, solemn prayer giving thanks to Máni before retiring to their beds.
The Heist: Just how they manage to seize the Argent Falx and escape the temple is entirely up to the PCs. The would-be thieves must plan and execute the heist within a narrow window of opportunity. Creative players are sure to come up with any number of wild plans that will need to be adjudicated on the fly. As an aid to judges, here are some of the most likely tactics:
• Violence: The most direct means of obtaining the Falx requires no small amount of daring. PCs forcing their way onto the platform must fight their way through at least three eunuchs, the high priestess, and all four handmaidens. The devotees immediately panic, trampling one another in their haste to escape through area 1-1a. In order to evade pursuit, PCs will need to escape via the sewers (area 1-6) or up through the Path of the Moon (area 1-5).
• Stealth: There are several opportunities for cunning PCs to gain the blade by stealth. If the PCs hide in the wings of the temple (areas 1-3, 1-4, or 1-4a) and wait for the ritual to reach its conclusion, the abbotess brings the Falx directly to them. However, if the PCs wait too long and the Falx is placed within the vault in area 1-4, they quickly discover that hesitation is its own punishment.
• Deception: Successfully masquerading as handmaidens (or better, eunuchs) affords PCs the chance to come tantalizingly close to the blade. How and when the PCs make the snatch determines how much blood must be shed in their flight from the temple.
• The Ransom: PCs can easily seize one of the devotees and demand that the abbotess surrender the Argent Falx. Unfortunately, though the cultists plead desperately for their lives, the abbotess and her eunuchs give no thought
to death in service of Máni. Rallying the temple to her defense, the abbotess commands the mob and the handmaidens to cast the PCs into the pit as offerings to their goddess. In the confusion, the abbotess and her handmaidens make a hasty retreat from the temple.
• Scorched Earth Expedition: It is not unlikely for the PCs to try to cut their way in and out of the temple. Unfortunately, this is also the least likely means of gaining the of her handmaidens, the surviving priestesses flee the temple. Retiring to the street before the temple, they summon the men-at-arms in the service of their patrons. Once suitably arrayed (with a force of no less than 100 mercenaries and blackguards) they scour the temple in search of the PCs.
In the advent of general melee, Potiphar and his eunuchs fight blindly to the death. The bulk of the devotees flee before the PCs, unless rallied by the high priestess with a successful morale check ( vs. DC 15; for every point of success, five cultists are rallied). The abbotess and her harem of handmaidens are not afraid to shed blood in the defense of the temple but withdraw in order to protect their blade or the high priestess.
Finally, those that anointed themselves with the sacred oil in area 1-1a are unable to take direct action against the priestesses. (Anointed PCs can still battle the Mánistales and devotees.)
There is the slim chance that the PCs recognize the false goddess for what she really is: nothing more than a simple (though beautiful) commoner. It is six hours before the torpor wears off and the girl can hold a conversation. She is Satia, the daughter of a wicked crime boss based in the Devil’s Thumb. Her father, Evold Oathbreaker, heartily rewards PCs that return his daughter and offers an even greater bounty if the PCs are willing to capture his daughter’s kidnappers for an audience with the godfather. A series of adventures in itself, this hunt sends the PCs throughout every ward in Punjar, ending at the citadel of House Cainegont.
Finally, should the PCs somehow succeed in stealing the without slaying any cultist or losing one of their own, their skills and audacity is enough to cause even the god of thieves to smile. For the god’s delight, the PCs receive a + bonus to Luck.
Argent Falx of Máni. Indeed, if the PCs slay the abbotess or any
Argent Falx
The Argent Falx of Máni, ceremonial two-handed sword (falx): Int 5; AL C; bane: un-dead (19-20 crit threat range); communication: simple urges; special purpose: free souls from death; special powers: resist death (wielder receives bonus to recovering the body checks), spell-like abilities (spell check: +wielder’s personality modifier) blessing 1/day, detect evil 3/day, turn un-dead 1/ day. Appearing on the full moon, the Falx slowly fades from existence, vanishing completely by the new moon.
The Abbotess: Init ; Atk Argent Falx of Máni melee (); AC 16; HD ; hp 27; MV 30’; SP spellcasting (spell check , spells known: (level 1) blessing, darkness, holy sanctuary, paralysis, word of command; Act ; SV Fort , Ref , Will ; AL C.
Handmaidens (4): Init ; Atk scimitars melee (); AC 15; HD ; hp 15, 14, 12, 10; MV 30’; SP moon curse 1/day (target must make DC 15 Will save or suffer -2d to all actions the following round); Act ; SV Fort , Ref , Will ; AL C.
Potiphar, captain of the Mánistales: Init ; Atk scimitar melee (); AC 18; HD ; hp 40; MV 30’; Act ; SP feint (successful attack causes no damage but target’s AC drops to 10 and Potiphar’s crit range improves to 15-20 for subsequent attack on same target); SV Fort , Ref , Will ; AL C.
Eunuchs (10): Init ; Atk glaive melee () or crossbow ranged (); AC 16; HD ; hp 17 each; MV 30’; Act ; SP wolfpack (+1d to hit when 2 or more eunuchs attack the same target); SV Fort , Ref , Will ; AL C.
Devotees (): Init ; Atk fist or dagger melee (); AC 10; HD ; hp 4 each; MV 30’; Act ; SV Fort , Ref , Will ; AL C.
The “Goddess” (drugged state): Init ; Atk fist melee (); AC 8; HD ; hp 2; MV 20’; Act ; SV Fort , Ref , Will ; AL N.
Interlude: Flight from the Temple
Unwilling to take the battle into the streets, the abbotess and her eunuchs give up the chase once the PCs win free of the temple. However, if the adventurers should leave any trace or clue, it is only a matter of time before the abbotess has her revenge.
With forethought and a little luck, the PCs have already scouted out their next step. If not, or if the PCs are incautious, they may draw unwanted attention to themselves. For the next week the streets are awash with thief takers hunting for the PCs.
There is a base 25% chance the thief takers find the PCs. This should be modified +/- 5% for precautions taken by the PCs (or that PCs fail to take). Additionally, judges should feel free to use the thief takers to prod the PCs into action.
Gruff, filthy men, the thief takers live on the edge of the law, one step removed from their prey. Girded in boiled leather and rotting hides, the rogues wield rusted, nicked blades in combat.
The thief takers stalk the PCs, waiting for an opportune moment to strike. They aim to kidnap the heroes, bearing them to the temple for the gentle ministrations of Master Bellows. Cowards and bullies at heart, the thief takers flee if they lose more than a third of their number in battle.
Thief Takers (9): Init ; Atk short sword melee () or dagger melee (); AC 13; HD ; hp 10 each; MV 30’; Act ; SV Fort , Ref , Will ; AL C.
The Charnel Pits
With the Carnifex only recently released from her godprison beneath Punjar’s dusty streets, there is no established church dedicated to the goddess of death. Instead spontaneous shrines appear throughout the neighborhoods of Old Punjar wherever the downtrodden and castoffs of the city’s lower class are moved to call upon a higher power.
Thieves, slaves, and beggars will all know where to find the shrine dedicated to Punjar’s patron of the outcast and untouchable: at the head of an alley leading to an abandoned crematorium and charnel house.
The charnel house has a horrific history. For decades the charnel house was tasked by the Overlord with disposing of the dead of Punjar’s lower class. Crime lords employed the house’s services when it became necessary to make enemies “disappear,” and if the bodies forced into the ovens fought for their freedom or screamed aloud as the flames devoured their coffins, no one was the wiser.
The charnel house was run by Ratvik Thirdson, an outcast of the noble House Tormanu. Better known as Ratvik the Mad, he was the victim of twenty generations of inbreeding and decadent pleasures. Given to strange predilections and foul desires, Ratvik was obsessed with creating his own court, fashioned after the court of the Overlord.
Over the course of many years, Ratvik hand selected his court of ministers and advisors from the bodies delivered to the charnel house. Some were mummified, others reduced to skeletons then carefully reassembled with gold and silver wire, and others were merely mannequins, formed of rude homespun canvas and stuffed with the ashes of the dead. Ratvik consulted these ministers before every decision, and on dark, moonless nights he hosted wild revels with his court of the damned.
But no court is complete without its queen. Unsatisfied with the quality of the corpses delivered to his door, Ratvik spent years scouring the Old Smoke for a woman of inestimable beauty. He found his would-be queen in the guise of a simple fishwife named Moira.
A scant twenty years of age, Moira was already a mother when Ratvik the Mad stole her away. When she refused to join his court, Ratvik had her burned alive. With smoke searing her lungs, Moira cursed Ratvik to eternal un-death before succumbing to the flames and becoming un-dead herself.
Today the charnel pits are suffused with Ratvik’s wicked spirit and the ghosts of a hundred other souls unable to pass Moira’s ghost to reach the lands of the dead. Driven beyond the point of insanity, Ratvik lashes out at intruders, inflicting as much torture and anguish as possible.
To this day, Moira’s family has maintained a simple shrine to the Carnifex at the head of the alley, in the hopes that their offerings to the goddess of death might speed their mother’s spirit to restful peace.
With the arrival of the PCs, the Carnifex has finally answered their prayers.
Player Start: Ash Alley
Surrounded by rotting tenements and shrouded in perpetual darkness, with raw sewage pooling underfoot, there is nothing to distinguish the alley from any of the hundreds like it that infest the Old City.
But your sources all concur: this alley once led to the charnel house of Ratvik the Mad, whose bloody lusts haunt the poor of Punjar to this day. Somewhere within—so the stories aver—stand the gates to the Realms of the Dead, awaiting those foolish enough to throw them wide.
With the filth sucking at your boots, you take your first steps into darkness.
Inside the alley, the PCs encounter the shrine dedicated to the Carnifex:
A simple shrine stands against the alley wall. A crude stone and mud mosaic depicts a two-headed raven. Several partially burned candles rest before a humble wooden bowl.
Several ravens take flight as the PCs near the shrine, cawing angrily as they alight atop the tenements. The wooden bowl contains sweetmeats, bits of jerky, a bouquet, and worn copper coins—offerings to the Carnifex.
PCs lighting a candle in respect to the Carnifex receive a +2d bonus to a single roll of their choice. This blessing can only be received by a PC once and should be shared with the players only after the PCs leave the area.
If all the candles are lit and a PC makes an offering of 50 gp or more, the PC receives a special dispensation from the goddess: the next time the PC bleeds out after being reduced to 0 hit points or less, the PC falls unconscious instead of dying. Assuming the body can be recovered, when the PC is inspected, he awakens with a single hit point. No Luck check is required and neither ability loss nor grogginess penalties occur.
If the PCs spend more than 10 minutes at the shrine, a young woman appears at the head of the alley. Slight of frame, emaciated, and dressed in filthy rags, she is the great-granddaughter of Moira. Sakia fears that the PCs are defiling the shrine and warns them off in a tremulous voice. Kind overtures quickly set her at ease, and if asked, she relays the history of the wretched charnel pits and her great-grandmother’s shrine.
Sakia: Init ; Atk fist or dagger melee (); AC 10; HD ; hp 4; MV 30’; Act ; SV Fort , Ref , Will ; AL C.
Areas of the Map
Area 2-1 Omens of Woe p.14
Area 2-1 – Omens of Woe
The alleyway ends before a rotted wooden stairway. The stairway pitches down multiple flights to stained flagstones below. Sewage dribbles down the stone wall, filling the air with foul effluvia before pooling in the darkness below.
Priests and clerics entering the area are immediately overcome by an intense melancholy. Terrible acts took place here; the charnel house and surrounding areas are saturated with wickedness. Devotees of gods are innately aware that their magic is weak here; all attempts to turn unholy suffer a -1d penalty.
Descending the stairs, the PCs discover the corpse of a crow. Partially devoured, the body flaps weakly, as if trying to take
to the air. On closer inspection, the PCs realize the corpse is simply being dragged away by a small black rat.
Area 2-2 Slough and Grate p.14
Area 2-2 – Slough and Grate
A trough of dark sewage runs down the center of the alley. The sewage runs beneath a stone arch, threading an enormous grate that spans the width of the entire alley. A single door reinforced with iron bands exits the alley to your right.
Show the players handout A. The door to area 2-3 is locked but readily picked (DC 13). The door bursts open from within, accompanied by a thundering shout: “Be gone!” PCs standing before the door must succeed on a DC 15 Reflex save or take damage and be knocked back into the slough.
The slough of sewage runs beneath the grate to area 2-4. PCs willing to brave the filth can slip beneath the gate, but see below for complications to those disturbing the trough. Exceptionally strong PCs can bend apart the iron bars with a DC 20 Strength check, permitting passage.
PCs disturbing the slough awaken the tormented spirits that saturate the charnel pits. Phantom blue skeletal hands erupt from the slough, seizing characters and hauling them beneath the fetid waters. Characters seized by the skeletal hands can catch hold of the iron grates with a DC 15 Strength check, but a second DC 17 Strength check, made either by the PC or his allies, is necessary to break free of the phantom hands.
Those failing to escape by the end of the second round vanish over the lip of the charnel pits (area 2-4), only to reappear as courtiers in Ratvik’s Court of the Damned. See area 2-5 for details on the fate awaiting those unfortunate souls borne away by the phantom hands.
Phantom Skeletal Hands (10): Init ; Atk grapple melee (); AC 12; HD ; hp 7 each; MV 30’; Act ; SP undead traits, condemnation (on second round of grapple, DC 17 Str check or transported to cloth doll confinement in area 2-5); SV Fort , Ref , Will ; AL C.
Area 2-3 Place of the Scrivener p.14
Area 2-3 – Place of the Scrivener
The walls of the small chamber are decorated with ornate stone carvings depicting fierce demons herding the damned towards a fearsome, leering toad-god. One by one, the carven figures are driven into the toad-god’s gaping maw.
A simple wooden desk sits in the center of the chamber surrounded by stacks of ledgers. A quill pen rests in an inkwell atop a pile of tomes beside a small mortar and pestle.
A moth-eaten, patchwork curtain hangs over a doorway set in the far wall, waving softly in the darkness.
This simple chamber was once home to the scrivener responsible for recording the identities of the dead that passed through the gates of the charnel pits.
Upon entering the chamber, a ghostly scrivener appears before the PCs, hunched over the high desk. The scrivener smiles a toothless grin and welcomes the PCs, asking for the names of the newest corpses. The scrivener records the names given (or the absence of names, “Oh, more J. Bloggs, I see!”), then holds up a tin pail filled with teeth and a pair of bloody pliers. He shakes the pail expectantly and gives the PCs an eager, knowing grin.
The scrivener aims to collect one tooth from each character. He can be duped if the PCs have other teeth to offer. If the PCs
refuse to give up their teeth or try to bypass the scrivener out of ignorance, the phantom makes a growling demand: “Teeth.” If this is ignored, the phantom erupts with fury, transforming into an enormous, gibbering monstrosity armed with a massive pair of brutish pliers and proceeds to take teeth by force.
If the scrivener succeeds in overbearing a target, treat the target as prone the following round. After dealing 10 or more damage to any one PC, the phantom has successfully won its trophy and vanishes from sight.
An open ledger rests atop the desk. The names and occupations in the ledger are recorded in a rust-colored ink; wizards (and thieves, succeeding on a DC 12 Forgery check) readily identify human bone and blood as the ink’s base. Skimming the last hundred entries reveals the entry: PCs tendered their names, their names and occupations are recorded in drying ink in the ledger.
Phantom Scrivener: Init ; Atk great pliers melee (); AC 16; HD ; hp 23; MV fly 40’; Act ; SP un-dead traits, tooth-taker (10+ dmg to one target with pliers results in stolen tooth and retreat); SV Fort , Ref , Will ; AL C.
Area 2-3a Beyond the Veil p.15
Area 2-3a – Beyond the Veil
Faint mists drift about the floor of the small chamber, condensing on the moldy walls and pooling on the flagstones. Moldering cotton sheets hang from rotten wooden shelves set along the walls. In the rear of the chamber a set of worn stone steps rises into the gloom.
The chamber was used to store bodies prior to cremation. The bodies were wrapped in cotton shrouds and doused in thick oil to stave off flies and vermin before being carried to the cremation ovens (areas 2-7a through d).
This terrible place is awash with tormented souls trapped by Moira’s vengeful watch. Clerics innately sense that the souls are unable to pass into the afterlife, but are unable to divine the reason, save that something refuses to allow the souls to pass.
Anyone disturbing the cremation shrouds on the shelves unleashes a seething tide of black beetles. The size of coins, the beetles scurry for cover and darkness, their carapaces cracking underfoot. The beetles are the physical embodiments of trapped souls; close inspection of the ridged carapaces shows that each is uniquely fashioned in the shape of a screaming face. If a PC has died in the course of the adventure, he also has a beetle here, marked with ridges in the likeness of his screaming face.
The cotton shrouds, wooden shelves, and floor are saturated with oil and easily set aflame. Characters caught within the burning chamber suffer damage per round and must make a DC 5 Fortitude save each round or succumb to the smoke. When the check fails, the target is unconscious and suffocating, losing hit points per round. The chamber burns for rounds; the flames do not spread through the charnel house.
PCs ascending the stairs are assaulted from above. Seething purple-black mists issue from within the moldy plaster lining the walls, coalescing into a dense cloud of rolling darkness.
On a successful attack the cloud envelops a target, hoisting him into the air.
Moira, fishwife. Finally, whether or not the
Characters caught up in the cloud can escape with a DC 15 Strength check. On the following round the cloud automatically tears and rends the target for damage. On the third round the PC vanishes, reappearing as a courtier in Ratvik’s Court of the Damned. See area 2-5 for details on the fate awaiting the unfortunate soul.
Subsequent PCs caught up in the cloud are merely cast down to the base of the stairs for damage. Note that PCs carrying torches or lanterns when they are cast back into the chamber accidentally set the chamber aflame.
The cloud dissipates once dealt 45 points of damage. Alternately, the cloud can be dismissed by a cleric succeeding on a DC 30 turn check.
Ossuary Cloud: Init ; Atk grapple melee (condemnation, DC 15 STR to escape); AC 15; HD ; hp 45; MV fly 45’; Act ; SP un-dead traits, immune to non-magical weapons; condemnation (first grappled target: dmg on second round, transported to area 2-5 on third round; subsequent grappled targets: damage as dropped down stairs); SV Fort , Ref , Will ; AL C.
Area 2-4 The Charnel Pits p.16
Area 2-4 – The Charnel Pits
The ditch of open sewage empties into a gaping pit that stretches down, out of sight. The pit is roughly 70 feet long and 30 feet wide and fashioned of worked stone at the lip that quickly recedes to reveal craggy walls. Strange purple mists writhe in the darkness below, curling up just below the lip of the pit.
The left wall of the pit is punctuated by a trio of platforms set into the wall, each opening to an archway. On the right is a single platform, lower than the others, also opening to an arch.
The pit is an enormous rift of unknown depth, a gaping wound cut in the flesh of the earth. For decades Old City dwellers have used the pits to dispose of their dead, dumping the ashes and bones of cremated corpses into the seething mists.
PCs can exit the area via the locked, iron-bound door to the north (pick lock, DC 10 or DC 15 Strength check), through the open arch to 2-4a, down the steps to area 2-6, or up to the bridge above (DC 10 Climb sheer surfaces check).
Daring PCs can also attempt to climb to any of the exposed platforms (DC 13). However, climbers are exposed to the foul, seething mists that sting lungs and eyes. Climbers can protect themselves by breathing through moistened cloth, but unprotected characters must attempt a DC 17 Fortitude save or suffer a hallucination:
Hallucination
1 The PC stands before mighty Death seated atop his great stone throne. The god leans forward and blesses the PC with his touch.
2 Blue flames race up and down the PC’s limbs. The PC must succeed on a DC 15 Will save or panic, falling from the wall in fright.
3 The PC sees a slight woman, bathed in a fiery light, standing before a great gate of scorched iron. She refuses to let the PC pass, transforming into a shrieking banshee wreathed in flames.
4 The PC sees his friends wrapped in cotton shrouds, doused in oil, and cast into roaring ovens. Screaming in agony, their bodies are reduced to skeletons that claw at the PC, dragging him into the flames.
5 The PC is in a mist-shrouded tavern playing at cards. One by one, four cards are turned over, with Death trumping all.
6 An unending, seething tide of corpses claw their way out of the mists below. On a failed Will save (DC 13) one seizes the PC’s ankle, dragging him down into the mists.
7 Judge’s choice. This can be one of the hallucinations above or one specifically tailored to the judge’s campaign.
The hallucination lasts rounds. Unless otherwise noted, the PC must make a successful climb check each round or pitch from the pit wall. Those falling into the swirling mists are never seen again.
PCs reaching any of the northern platforms find that each is barred with an iron gate. The gates are all locked, but easily picked (DC 10). Alternately, they can be bent asunder by a Herculean DC 20 Strength check.
Area 2-4a Ruined Guard Chamber p.17
Area 2-4a – Ruined Guard Chamber
A trio of skeletons lie against the far wall. Armored in ruined chain mail and bearing polearms, the inanimate forms are all blackened with soot.
The walls, floor, and ceiling of the chamber are blasted clean, as if scoured by an intense, searing heat.
This chamber once housed the charnel house’s guards. The guards were destroyed by Moira’s vengeful fury before Ratvik could harness the power of the charnel house’s damned.
The skeletons do not animate, though traces of their souls still lurk about, seeking release. If the PCs inspect the skeletons, they hear soft, haggard voices whispering: Free us. If the PCs lean close to the skulls, they hear the words: The hell-witch wards the gates of death. None may pass. And then finally, free us.
The skeletons, armor, and weapons are all brittle and ruined from the heat. There is nothing else of interest in the chamber. If the skulls or skeletons are disturbed, three mortuary beetles (similar to the ones found in area 2-3a) scuttle away.
Area 2-5 Court of the Damned p.17
Area 2-5 – Court of the Damned
Lit by flickering red candles, the chamber before you is home to a hellish court.
A long table sits in the center of the chamber, covered in crimson cloth and set for a lavish meal. Around the table sit a dozen-odd courtiers, each more bizarre than the last.
Several skeletons, their bones held together with copper and silver wire, sit with goblets raised in mid-toast. A pair of desiccated corpses leans close for a tender kiss. Bulky, shapeless forms covered in canvas and stitched with patchwork faces leer with frozen smiles. In the back of the chamber, a skeletal jester and a trio of desiccated troubadours wait eternally to entertain the court.
A robed mummy is frozen at attention beside a pair of lavishly carved chairs at the head of the table. All seem to await the master’s arrival.
Ratvik handpicked this odd assemblage of corpses to serve as his royal court. His work ground to a halt when he was unable to secure the affections or the corpse of Moira to serve as his queen.
If any of the PCs were stolen away in area 2-2 or area 2-3a, they awaken here bound, gagged, and sewn inside a canvas
doll but otherwise untouched. If multiple PCs were abducted during the course of the adventure, there is one shapeless canvas scarecrow for every captured PC. Captives can do little more than grunt and rock in their anchored chairs. Escaping from the bonds requires a DC 17 Strength or Agility check (one check can be made per round). Once a PC has snapped or slipped the bonds on one hand, it takes another full round to free himself completely.
As the first PC enters the chamber, the frozen tableau comes to un-life. The troubadours play a wild, cacophonous tune, the jester prances around the table filling goblets with wine, and the robed mummy Mnom-Mothot bids the PCs to take places at the table, insisting that the feast is about the begin!
If the PCs take their seats at the table, the jester serves them wine, then doles out the first course: a greasy soup thick with chittering mortuary beetles (as found in area 2-3a). As the jester circles the table, ladling the horrific soup into bowls, MnomMothot declares that the feast cannot possibly continue: the master’s queen refuses to attend. Would the PCs be so good as to fetch her? Mnom-Mothot offers a key (to the locked gate outside area 2-7a) and gestures grandly in the direction of the ovens.
If the encounter devolves into combat at any point in the proceedings, the court fights savagely in the defense of Mnom-Mothot. The skeletons stab at the PCs with sharpened knives while the desiccated lovers grapple the PCs in amorous embraces and breathe their poisonous gasses into the PCs’ lungs. The jester leaps and prances madly about the chamber, while the troubadours gang up on a single PC, beating him senseless.
Mnom-Mothot moves to a bound PC, curved dagger in hand, and tears off the canvas hood, revealing the hero. He threatens to kill the hostage unless the PCs stand down. His goal remains the same: send the PCs into area 2-8 to “deal” with Moira. If the PCs press the fight, Mnom-Mothot flees to area 2-6, alerting his master.
Mnom-Mothot wears a dark amulet that can absorb up to three turn un-dead attempts; at his command the amulet can counter any turn attempt made within 30 feet. Apart from the dark amulet, the courtiers wear a variety of faux jewelry worth some 50 gp (but that can be sold to a duped buyer for ten times this amount).
Mnom-Mothot: Init ; Atk curved dagger melee (); AC 14; HD ; hp 20; MV 30’; Act ; SP un-dead traits, spellcasting (spell check , spells known: (level 1) cantrip, magic shield, magic missile (appears as searing black rays), sleep); SV Fort , Ref , Will ; AL C.
Court Skeletons (3): Init ; Atk knife melee ( plus poison); AC 13; HD ; hp 10 each; MV 30’; Act ; SP poison blade (-1d to action dice for one round, DC 10 Fort to resist), un-dead traits, half damage from piercing and slashing weapons; SV Fort , Ref , Will ; AL C.
Skeletal Troubadours (3): Init ; Atk strike melee (); AC 14; HD ; hp 17 each; MV 30’; Act ; SP dance macabre (1/day can command sentient target to dance for one round, as per word of command, DC 12 to resist), un-dead traits, half damage from piercing and slashing weapons; SV Fort , Ref , Will ; AL C.
Desiccated Lovers (2): Init ; Atk embrace melee (, Str check DC 15 to break); AC 13; HD ; hp 16 each; MV 30’; Act ; SP un-dead traits, kiss of death (Fort save DC 15, or dmg); SV Fort , Ref , Will ; AL C.
The Jester: Init ; Atk springing strike melee (); AC 18; HD ; hp 27; MV 40’; Act ; SP un-dead traits, can use springing attack on any target within 15’; SV Fort , Ref , Will ; AL C.
Area 2-6 Ratvik’s Retreat p.18
Area 2-6 – Ratvik’s Retreat
Note that the entrance to this chamber is both locked and sealed with molten gold that has spilled out over the floor. PCs will immediately note that the door is hot to the touch. The lock can be easily picked (DC 10), but the door must be beaten down with a DC 17 Strength check or destroyed (25 hp). PCs can also enter by risking the climb over the charnel pits (area 2-4) to the unprotected platform.
Once the PCs gain entry, read or paraphrase the following:
The heat in the chamber is nearly overwhelming, the air heavy with fumes of molten metal that sting your lungs with every breath.
A grotesque wooden throne stands at the rear of the chamber. Carved in the semblance of a squat toad-god, the throne is burnt down to little more than charcoal. Scattered around the throne are scores of weapons, scorched black with heat.
A robed skeleton sits atop the throne, adorned with a golden crown. Like the throne, the skeleton and its robes are singed and flame-bitten.
The throne stands amid immense mounds of glittering coins that spill out in every direction. Where they touch the floor, the coins have melted and then hardened into marbled pools of gold, silver, and copper.
At the sight of your companions, the skeleton bids you to approach.
This is where Ratvik the Mad is making his final stand, fending off Moira’s fury. Decade by decade, Ratvik is slowly losing the fight. If he is distracted by anything more than conversation, Moira’s spirit forces its way into the chamber, igniting an inferno (see below).
In a soft, rasping voice that sounds like crackling embers, Ratvik explains his plight: neither he nor any of the hundreds of other trapped souls can pass on into the afterlife so long as Moira guards the gates to the Realms of the Dead. Ratvik makes no claims to innocence but pleads that after so long for so many trapped souls the punishment no longer suits the crime.
Ratvik’s moment of lucidity is fleeting. If the PCs hesitate before leaving, twin coals flare brightly in the skeleton’s eye sockets and Ratvik decrees that since he cannot die the PCs must join him in un-death. With a wave of his skeletal hand,
Ratvik commands the PCs to kill one another.
Should the PCs refuse his order, Ratvik the Mad directs the weapons scattered about the chamber to do his work for him. The blackened weapons fly from the floor, attacking at his will and defending him against attacks. Unfortunately, while distracted by the PCs, Ratvik cannot hold back Moira.
Moira’s Revenge: With Ratvik distracted by the PCs, the raw fury of Moira’s anger fills the chamber. Crackling bolts of electricity shoot through the chamber, limning the PC and Ratvik in ghostly blue flames. The temperature soars, searing the skin and lungs, threatening to incinerate PCs and Ratvik alike.
Round One: PCs girded in metal armor take points of heat damage.
Round Two: As above, and PCs wielding weapons with metal hafts or pommels take points of heat damage.
Round Three: As above, and clothing is set aflame; characters take points of fire damage.
Round Four Onward: As above, and all creatures within the chamber must succeed on DC 15 Fortitude saves or take points of heat damage. The pools of coins begin to soften.
The effects are cumulative. The raging heat ends with the destruction of Ratvik’s physical form or when the PCs flee the chamber—the remnants of the ruined door fly back into place, reinforced by flying coins and weapons, barring return.
Treasure: Though there is a regent’s ransom in precious metals littering the chamber, relatively few of the coins remain untouched by the all-pervasive heat. An inspection of the piles reveals the coins in the heart of the piles are fused into a solid slab of precious metal. PCs can skim off the untouched coins, collecting sp, cp, and gp. Finally, the PCs are able to find pp; all the platinum coins are untouched thanks to the metal’s higher melting point, but many of the coins sank, becoming embedded in the molten mass of lesser coins.
If the PCs can conceive a plan capable of recovering the pools of solidified metals, the total mass is worth some 5,000 gp. (Unfortunately, after the PCs pass through area 2-8 to the Realms of the Dead, the ruins surrounding the charnel pita collapse, burying the chamber in tons of rubble and rendering the treasure unrecoverable.)
Ratvik the Mad: Init ; Atk flying weapons ranged (); AC 15; HD ; hp 52; MV fly 40’; Act ; SP un-dead traits, cannot be turned while in the charnel pits; SV Fort , Ref , Will ; AL C.
Area 2-7a through 2-7d – The Ovens: An iron gate blocks the corridor. Through the thick, rusted bars you can make out a long passageway lit by a hellish glow. On the left is a series of seething cremation ovens; on the right, matching platforms extending out over the charnel pits.
Through the haze of heat and floating ash, you can make out an endless series of ghostly blue phantoms marching from the furnaces and across the platforms before plummeting into the charnel pits.
The iron gate is locked but can be picked (DC 10) or torn from its bolts with a DC 20 Strength check. The key resides with Mnom-Mothot in area 2-5. The area description should be adjusted accordingly if the PCs succeed in entering by the platforms extending over area 2-4. The gates barring these platforms all share the same stats as the first.
Characters daring to get close enough to inspect the phantoms see that all are urchins, fishwives, gong farmers, beggars—the souls of Punjar’s lowest caste that were cremated here but are now unable to pass through to the afterlife.
The phantoms ignore the PCs, continuing their endless march. Characters reaching out to touch the translucent phantoms feel a hint of cold and passing melancholy, but otherwise suffer no effects.
The cremation ovens seethe with crackling embers but don’t present any threat to the PCs … yet. This changes once the PCs disturb Moira’s resting place (area 2-8). When this comes to pass, the phantoms sink to their knees, wailing in terror, and the furnaces gout fiery embers at Moira’s command. As an attack action, she can cause up to two of the four furnaces to erupt in a single round. Choose the furnaces at random, assigning a 25% chance to each. Any PC caught within 10 feet of the furnace must make a DC 13 Reflex save or take points of fire damage and be hurled 10 feet to the south. PCs with the misfortune of being driven through an open gate onto the platforms above the charnel pits must attempt a DC 5 Luck check or fall to their dooms.
Area 2-8 Moira the Fishwife p.19
Area 2-8 – Moira the Fishwife
Fallen bricks and debris litter the ground before a pair of partially collapsed furnaces. The heat is impossibly intense, but it is darkness not light that radiates from within. A feminine form limned in crimson flames stands silhouetted before the lapping tongues of darkness.
This is where Ratvik imprisoned the young fishwife, and where—his advances spurned—he burned her alive. But Moira’s passion and fiery curses have proven stronger than Ratvik’s evil or madness; none of the charnel house’s dead can pass until Moira has been appeased.
Despite her fury, the spirit can still be reasoned with, and astute PCs are sure to come up with creative solutions. She can be convinced to end her curse if presented with evidence of Ratvik’s destruction (his golden crown is ideal) or by word of her descendents (demonstrating that her sacrifice was not in vain). She can also be dismissed with a DC 28 turn check (judges are well within their rights to ask players to roleplay the exorcism). Finally, a very persuasive PC (personality check, DC 20; again, well roleplayed) can convince her that she has tortured herself enough, and that it is simply time to move on.
However, if the PCs are callous or cruel, they reap the hellish fruits of her torment. A hot wind bellows from somewhere within the darkness, and PCs glimpse the gates of death just before Moira’s form erupts into a roaring banshee. Once her
ire is roused, Moira’s sole aim is to immolate the PCs, condemning them to her fiery fate.
The banshee leads off combat with a shrieking gout of flame that extends 20 feet down the hall ( fire damage; Reflex save, DC 10 for half damage). In subsequent rounds she can use her searing touch against melee combatants or randomly trigger the furnaces in the hall (see area 2-7a through d for descriptions of this ranged attack).
Whether by guile or blade, PCs winning over Moira see the flames of darkness shrink and finally die, revealing a crackling bed of embers leading down a misty passage to a towering basalt gate. Emblazoned with a single skull, clerics and wizards immediately recognize this as the gate to the Realms of the Dead. The gate is bound by a slim silver chain that is impervious to any force, save the Argent Falx.
With the chain severed, the PCs may step through the grim portal and be instantly transported to Death’s realm.
Moira: Init ; Atk Searing touch melee (); AC 10; HD ; hp 40; MV fly 40’; Act (can be two touches or touch + oven flame); SP un-dead traits, gout of flame 1/day (see above); SV Fort , Ref , Will ; AL C.
The Realms of the Dead
You and your companions are enfolded in gray mists, like boundless funerary shrouds. Just as it seems as if the mists are endless, a crow caws from the gray void, and the mists part, revealing a towering stone throne.
A squat, bearded giant sits atop the throne, girded in a chalky white hauberk, a greatsword resting across his lap. A veiled concubine kneels on one side of the throne, and behind her the blind, tattooed crone whose portents spurred your quest.
If the PCs came to free a key personality (or resurrect one of their own), he is standing silently behind the throne, bound in silver shackles. Additionally, if any PCs have died in the course of the adventure, they, too, stand behind the throne, also bound in silvery chains.
There is no encounter map of the Realms of the Dead, as there is no place for the PCs to go. No matter which way they turn or how far they flee, the PCs inevitably return to Death’s throne. Even divine aid or the blessings of a patron is of no use here. The PCs have entered Death’s kingdom, where even gods fear to tread.
Eris, the god’s demoness concubine and vicereine, stands to approach the PCs, asking them their business. Even if the PCs do not answer truthfully, she smiles knowingly behind her veil. Eris shares that while her master will not willingly part with his wards, he will gamble the souls of the dead—so long as the PCs are willing the stake one of their lives for every soul they wish to rescue.
At a single gesture from Death the Witch of Saulim steps forward, placing her deck of tarot cards atop a pedestal of skulls that appears from the mists. The vicereine proposes the simple game of Death’s Trump, a game familiar to any warrior, gambler, or thief.
Before dealing, Eris offers the PCs a chance to leave without their prize. An archway of skulls appears behind the PCs—the portal back to Punjar. If the PCs soldier on, she smiles devilishly and deals.
The rules are simple. Eris cuts the deck, leaving four cards face down. The PCs choose two cards, leaving two for Eris. The cards are turned over, one by one. Death trumps any single card, and a pair beats a single Death. If the PCs lose the hand, they can double down for the chance at another deal, provided they have more lives to wager. The judge is encouraged to use the handouts for play, having the players make their PCs’ picks.
Played fairly—with only the four original cards and no possible pairs—the PCs have only a 50% chance of winning any given hand. However, armed with the card given to them by the Witch of Saulim, the PCs can cheat, turning the odds in their favor.
Cheating requires a DC 15 pick pockets check. A failed check indicates the sharp was unable to find a window to hand-muck the deal, but wasn’t caught cheating (save for a natural 1; see below). On a successful check, the PCs were able to swap their own card into their hand, permitting a pair of lesser cards, or the draw of Death (provided the PCs chose Death in the first encounter). If the PCs sub in a second Death card, they can still tie if Eris also manages to draw the Death card, requiring another ante and deal.
A natural 1 on the pick pockets check means the thief was indeed caught trying to cheat Death. Death gives a roar and erupts from his throne. The PCs have one and only one round to flee through the portal. If the PCs dally, even to whisk away their allies, Death strikes them down with his greatsword (au-
tomatic hit against targets; Fortitude save, DC 20 or instant death; on success, a mere damage).
If the PCs win the souls of the dead, whether by luck or by sharping, Death snarls, the Witch of Saulim grins smugly, and Eris sprouts horns and bat’s wings. The slain character steps forward, permitting the PCs to use the Argent Falx, separating the silvery chains. Prudent PCs will likely take this opportunity to exit via Eris’ portal, but those daring to wager again play against Death himself:
The god strides forward, and the pedestal, cards, and PCs grow to match his gigantic proportions. Death cuts four cards and permits the PCs to draw first. However, cheating before the god of Death is no easy matter, and rogues must succeed on a DC 20 pick pocket check to safely hand-muck the Death card. Death’s wager is a single resurrection: the next time the PC dies he will return to life but will thereafter owe Death one year and one day of service. For their part, the PCs must again wager their souls.
Conclusion
Fleeing through Eris’ portal sends the PCs tumbling into the streets of Punjar. Read or paraphrase the following:
It is midnight, and the fat lamps flicker with crimson light. The scene is eerily normal—raucous sounds echo from nearby taverns and inns, cats hiss from oily alleyways, painted ladies and men beckon from shadowed eaves, and all seems right with the world. As you and your companions fight to regain your bearings, you hear hear a singular caw and turn in time to see a flying two-headed crow cross the moon.
The ABBOT OF THE WOODS
A level 1-3 DCC RPG adventure By Harley Stroh • Cartography: Doug Kovacs • Illustrations: Stefan Poag
Introduction
The Abbot’s Hoard is a tale known to all would-be treasure hunters: rebuking the decadent cities of man, a high priest led his followers into the wilderness to seek a life free of vice and sin. They bore with them a treasure train of priceless relics: holy fonts chased with silver and gold; gem-encrusted croziers; liturgical books bound in plates of platinum and sewn with golden wire; censers of carved gold; and five sacred reliquaries, proof against the dooms that stalk every mortal man.
The tales all end there. The Abbot and his congregation vanished, never to be seen nor heard from again. And to this day, no treasure hunter has been cunning or courageous enough to return with the secrets of the Abbot of the Woods.
The adventure is designed for 5 to 8 players with 1st to 3rd-level characters. 1st-level PCs should be sure to travel with a retinue of hirelings. In playtests the hirelings served as a ready pool of potential 0-level PCs; as adventurers were slain by the horrors lurking within the abbey, courageous (or desperate) new PCs arose to take their place.
Background
The lure of the abbey is primarily one of looting and plunder: when the Abbot and his followers vanished into the wilderness, they carried with them a godhoard of silver and gold. Every boastful drunkard and winestained mercenary can recount at least one fanciful tale of the treasure’s fate, but no one has produced so much as a single silver candlestick. It stands to reason that the hoard remains undiscovered – or unclaimed.
Learned souls whisper of another, less terrestrial treasure hidden amidst the ruins. Alchemists, scholars of the occult, and their ilk, all affirm the belief that the Abbot had secured a means of immortality. Theories hold that he led his people into the wilds so that he could complete the esoteric rite far away from the prying eyes of the Overlord, confirming upon himself the mantle of godhood.
If the PCs consider themselves better than base reavers, consider seeding your campaign with hints at the Abbot’s hidden purpose. Wizards will certainly have cause to discover the Abbot’s key to eternal life, just as clerics and witch-hunters will have reason to stamp out the Abbot’s heresy. Thieves and mercenary-minded warriors can expect the secrets to command a high price in the thronging Souk, for who among us doesn’t want to live forever?
It is a question, perhaps, that only the Abbot can answer.
The Abbot's Secret
For all its cosmological import, the story behind the abbey is tragically common. Approaching the end of his mortal coil, the Abbot turned his attentions to the question of eternal life. Scouring ancient texts of forbidden lore, he discovered what he believed he sought: a rite that would stave off each of the Five Dooms of Mankind.
But great magic requires great sacrifice. The Abbott led his people into the wilds, where he oversaw the construction of a chapel suited specifically to his purpose. Then, in the rock and stone beneath the abbey, the Abbot directed the construction of five reliquaries, each placed according to sacred ancient principles.
Finally, the Abbot commanded his people to complete the fell rite. His body was quartered; his four limbs and head were placed within the reliquaries and his torso – yet living – was set within the heart of the subterranean complex. His limbs and his head were each placed as an offering to a single doom. Captured by the individual offerings, none of the Five Dooms were able to reach the torso to claim the Abbot’s life.
In this way, the Abbot was able to secure immortality…after a fashion. He lives within the stones and mortar of the abbey. Undying, yet trapped without sight, sound, or sensation of touch, the Abbot’s soul has long since succumbed to insanity. Left alone, it will persist to the end of the universe, deathless and forever mad.
Of course, all this might change with the arrival of reavers bent on plunder. By removing parts of the Abbot’s body from its reliquaries, the PCs free the Abbot to both act and die. In a fit of frenzied madness, driven by the approach of death’s yawning gate, the Abbot will attempt to secure his life by reclaiming his relics, no matter who or what stands in his way.
For the judge’s reference, the reliquaries and their dooms are listed below. Frustrated at their inability to claim the Abbot’s life, each of the dooms has coalesced into a physical manifestation. These spirits are neither living nor dead, but rather the spirit realm made material.
• Madness – Area 2-1: A maelstrom of rotten wood and debris.
• Violence – Area 2-2: An enormous man-ape, with a protruding belly filled with the fruit of its sins.
• Disease – Area 2-3: A carpet of rats covered in weeping boils and surrounded by a miasma of rot.
• Hunger – Area 2-4: A mob of ghostly, hollow-eyed urchins.
• Age – 2-5: A withered crone, with leathern skin that hangs loosely from her old bones.
Animals are terrified of the spirits, doing everything possible to escape. Similarly, characters with 5 Intelligence or less are profoundly uneasy, suffering a -1d to all actions when in their presence.
The Abbey of the Woods
The remains of the ruined abbey squat atop a low, rocky scar in the heart of the forest. Dark woods press in from every side, and coniferous pines loom over the dense undergrowth of ferns, moss, and rotting deadwood. The air is preternaturally quiet and heavy with foreboding, as if even animals and insects eschew the forlorn ruins.
The abbey roof collapsed long ago. The few remaining rafters span the walls like a shattered ribcage. The abbey’s moss-covered stone walls are mostly intact, rising 16’ to 20’ in height. The stones composing the walls are carved in the semblance of horrified, screaming faces. Stacked atop one another, they form a wall of wailing, weeping souls caught in eternal torment. All the stones are covered in a fine, wet moss.
Adventurers readily note that eyes and mouths of the stones can be used as handholds, making the wall an easy climb (DC 7 Climb or Agility checks). On a fumbled check (any natural 1), a stone atop the wall rolls free beneath the climber’s weight, crushing the unlucky soul (DC 10 Ref save or damage). Characters inspecting the stones note that, in the place of mortar, the stones are growing connective tissue akin to tendons or muscle.
Climbing the walls invariably places weight on the wet moss; crushing or wringing out the moss releases not water, but blood, which dribbles down the tormented stone faces and soaks the climbers.
The abbey floor is overrun with a thick carpet of moss, punctuated by thin, scraggly grasses. As on the walls, blood pools wherever the moss is crushed or compressed. If tested by whatever terrible means the PCs conceive, the blood is revealed to be human. (Specifically, the undying blood of the Abbot’s devotees.)
The tunnels beneath the abbey were all carved by hand, displaying nothing in the way of craftsmanship or skill. Cut through solid stone and earth, the tunnels are shored up by wooden beams only where necessary. The walls of the tunnels are slick with what appears to be common slime. However, upon closer investigation, the slime is revealed to be congealed blood.
Player Start
You emerge from the woods at the base of a rocky ridge. The forest rises behind you like a verdant green wave, threatening to crash over you and your companions. Before you – atop the rocky ridge – squat the stone walls of the ruined abbey.
The ridge is scoured of all vegetation save a single twisted oak, hung with dozens of blackened goat skulls. A chill wind whistles through the forest, causing the hanging heads to rattle against the boughs.
The tree’s barren limbs arch 20’ out in every direction; in order to inspect or remove the heads, PCs must climb out onto one of the long limbs. At the first hint of the PCs’ curiosity, dozens of vultures flock to the tree, darkening the sky and croaking at the climbers with violent intent.
Characters removing skulls from the tree draws the ire of the vultures. Would-be thieves are attacked by vultures each; the avians present little threat to armored characters, and are quickly driven away by showy magic, fire, or physical attacks. However, characters in the tree must make DC 7
Ref saves or slip from their perch, taking damage in the resulting fall.
The skin of each skull is black with grease and polished by the elements. The forehead of each goat skull has been branded with a crude approximation of a pentagram.
Broken open, each skull spills out a pair of crooked fingers, two toes, and a congealed mass of dried muscle (readily identified by clerics, surgeons and barbers as heart tissue). Clerics, wizards, and their ilk recognize the primitive offerings as akin to an immortality ritual.
The skull rattles belong to the abbey’s adherents, who gave up their own flesh in imitation of their master. Their sacrifices were not entirely in vain: the un-dying blood of the devotees now saturates the moss in and around the abbey.
Areas of the Map
Area 1-1 The Sundered Gate p.27
Area 1-1 – The Sundered Gate
A pair of great doors, built of thick slabs of oak and banded in rusting iron, hang weakly from scorched hinges. Once the double doors were barred from the outside. Now the iron bar lies bent and warped on mossy ground.
Close inspection of the doors confirms initial impressions; the wood is blackened and singed, and the iron deformed from intense heat. Inspection of the bent, half-melted iron bar confirms suspicions that the doors were forced open from the inside.
A disc of hammered copper, roughly 1’ across, is set into the center of each door and secured with five silver nails. Beneath each disc is a crude brand, burned into the wooden beams. The brand depicts the runes of Madness, Disease, Age, Hunger, and Violence.
Removing either of the discs causes an icy wind to blow out from over the treetops, setting any remaining skull rattles (from Player Start) clacking. Foreboding clouds begin to gather overhead, blotting out the sun (or stars).
Characters dragging open the gates immediately spy a pair of blue apparitions, watching silently from the end of the nave (area 1-2): a tall, thin male in priest’s robes, and a lithe female in a long cloak and veil. Both make signs against evil, as if to ward off the PCs. The pair part and then vanish as the characters move into the nave.
Area 1-2 The False Altar p.27
Area 1-2 – The False Altar
The nave rises to a low stone dais, topped by a great mound of stones. Resting atop the stones are a serpentine dagger, a wooden chalice, and a blackened clay pot.
The mound of stones resembles an altar, but is actually an effort by the surviving acolytes to seal the entrance to the passages beneath the chapel. Careful investigators will note a draft of cool air whistling from within the stones.
The relics have sat untouched for years; the dagger is marred with dried blood, the wooden chalice is cracked and dusty, and the blackened clay pot is collecting moldering leaves.
The serpentine dagger inflicts damage but carries a foul taint from the hundreds of lives sacrificed in the name of the Abbot; every time its wielder misses an attack, the blade’s fumble range increases by 1. (If a character wielding the blade misses three times in a row, he would fumble on his next attack roll of 1 through 4.) On any fumble, the character also inflicts maximum damage upon himself.
The clay pot contains the black, fatty grease used to anoint the heads of the skull rattles. It causes any skin to shrink and harden like leather. Applied to a living creature, the grease permanently stains the skin charcoal black and grants the character a bonus to AC. There is sufficient grease to anoint two human-sized creatures.
The well is guarded by a pair of ghosts: acolytes who refused to abide the Abbot’s madness. The invisible spirits fight to prevent the PCs entering the well, animating the serpentine dagger along with any other weapons or objects not wielded or restrained by the PCs – a quarrel of bolts, for instance, provides a ready supply of weapons. Each ghost can animate up to 4 weapons at a time, attacking targets up to 10’ away; the ghosts will not pursue the PCs out of the altar room.
The ghosts can be turned, as per normal, or appeased by cautious PCs who aren’t too quick to resort to violence. If the characters attempt to parlay, the ghosts materialize in the forms of a translucent priest and nun. The pair pleads with the PCs to not free the Abbot. If the PCs can convince the ghosts of their intentions (left up to the judge’s discernment), the ghosts offer one bit of wisdom – the Abbot has sought immortality at the price of his own flesh, and so his flesh must be turned against him – before fading from sight.
If the PCs succeed in treating with the ghosts, the spirits return at the conclusion of the adventure to aid the party.
The Priest and Nun (2 ghosts): Init ; Atk animate object (dmg by weapon type); AC 10; HD ; hp 12, 14; MV fly 40’; Act ; SP un-dead traits, immune to non-magical weapons, invisible at will, animate object; SV Fort , Ref , Will ; AL N.
Area 1-2b The Well p.28
Area 1-2b – The Well
The well is covered with a makeshift lattice of branches and wooden beams, topped by a mound of stones. The well itself is 7’ across and descends 20’ to a sandy, stone floor. Twin passageways are cut into the walls of the well. Both passageways slope down steeply into darkness. The rune of Madness is cut into the west passage; the rune of Disease is carved above the east passage.
Area 2-1 Seat of Unreason p.28
Area 2-1 – Seat of Unreason
The broad passage is strewn with toppled, rotting pews and bits of fallen plaster. An elaborate stone throne, carved in the likeness of an enormous reclining demon, stands atop a low dais.
The throne serves as the reliquary for the severed head of the Abbot, the source of power for the spirit of Madness. The head rests within a locked funerary coffer built into the trapped maw of the throne. Meanwhile, the spirit of Madness and Unreason lurks within the nave, amid the rotting pews and fallen plaster.
At one time the ceiling of the chamber was plastered with a mosaic depicting a swirling maelstrom. Now much of the mosaic litters the floor, but a casual inspection of the ceiling reveals old bits of colored glass tiles.
Madness and Unreason: The spirit stirs as characters enter the nave, causing debris to rustle and spin about PCs’ ankles. Investigating the throne invites a cold wind to whistle down the nave; whispers can be heard on the wind, alternately warning the PCs to flee for their lives, and begging them to stay for all eternity.
The manifestations grow in intensity as the PCs investigate the throne, until debris swirls about the entire chamber. If the PCs sit upon the throne, or try to free the Head, a howling whirlwind fills the chamber (-1d to all actions; -2d to all ranged weapons), and takes the form of a towering humanoid composed of swirling plaster, rotting wood, and mud. These penalties persist until the spirit is defeated, the PCs leave the area, or the PCs succeed in capturing the Abbot’s Head.
An unholy being of Chaos, the spirit can be turned by clerics of Law. While the spirit cannot be destroyed, a successful turn attempt prevents it from attacking for 1 round.
Blows from the spirit of Madness engulf targets with flying debris. On a successful strike, the target suffers damage and must make a DC 13 Will save or find their mind “swept” into another PC, determined at random. The original PC’s body collapses, inert. The new, combined character has all the class abilities of both PCs, but can only use one set in any given round. (Essentially, two players must share one character; if there is a dispute as to what actions to take, the players must dice off as the competing voices rage inside the PC’s mind.) Any number of characters can be combined in this manner.
The spirit of Madness’s sole motivation is to cause disquiet amongst the PCs. Once the PCs win the prize free of the devil’s maw, the spirit’s strength is shattered. The maelstrom quickly disperses, leaving the air quiet and still. Any combined characters return to their original bodies, but will forever know the other’s innermost secrets.
Judge’s Note: To prevent boredom on the part of either mindswept player, it is encouraged that whenever one player is deciding an action, the other player makes the associated rolls. Consider awarding a Luck bonus for PCs surviving, especially well-played madness.
The Throne: The stone throne resembles a mighty porcine devil in repose, its arms thrown wide. The devil is disemboweled; to properly occupy the throne, a character must sit on the devil’s lap, within its empty ribcage.
The Abbot’s severed head is locked within the devil’s maw. The statue’s jaw is hinged and locked, with a large keyhole set in the devil’s grinning fangs. A DC 5 Find Trap check confirms what the PCs must already suspect: the statue is trapped so that the massive arms snap in towards the chest cavity. A second Find Trap check (DC 15) reveals that the devil’s mouth is also trapped. Neither of the traps can be disabled, but they can be avoided:
The maw can be safely opened with a DC 20 Pick Lock check. On a failed Pick Lock check, the maw still opens – but in the same instant, the statue’s arms enfold any character standing on the dais (DC 15 Ref save to avoid; characters seated within the chest cavity cannot escape). The following round, the arms hoist any captured characters into the open maw, which slowly closes, crushing metal, flesh, and bone. Captured characters have but one round to slip their bonds with a DC 15 Strength check; those failing to escape suffer damage and must make a DC 20 Fort save or be crushed to death.
Allies can aid their comrades by attempting to forestall the crushing jaws. Pinning the jaws open with spikes, weapons, jo staves, and the like merely delay the crushing jaws for a single round, granting trapped PCs an additional chance to escape.
The Abbot’s Head rests at the back of the maw. Exceptionally daring characters can try to snatch the head free, even on a failed Pick Lock check, with a DC 15 Agility or Pick Pocket check; on a failed check the PC is crushed in the maw as above.
The Head: Plated with hammered gold and encrusted with jewels, the Head is worth 500 gp for its raw materials alone. For those aware of its occult history, the Head is either beyond all monetary value or a thing of horror to be dreaded.
See area 2-6 for details on how the PCs can turn the relic against its master.
Spirit of Madness and Unreason: Init ; Atk fist melee ( plus mind-sweep); AC 13; HD ; hp 23; MV 30’; Act ; SP mind-sweep (DC 13 Will save to avoid); SV Fort , Ref , Will ; AL C.
Area 2-2 Reliquary of the Ape p.29
Area 2-2 – Reliquary of the Ape
The archway leading into the chamber is set with the runes for Violence and Revenge, which are readily deciphered by wizards and priests, and thieves succeeding on a DC 10 Read Languages check.
Broken flagstones and toppled pillars litter the roughhewn chamber. The air is choked with hanging dust and the tang of blood and sweat. The source of the destruction is clear: an enormous man-ape, slumbering against the far wall, its massive wrists and neck shackled by thick iron bands. Resting on the ape’s corpulent belly is a golden hand, set atop a rod of polished black stone. The deep rumble of the ape’s rhythmic breathing shakes the very stones beneath your feet.
The giant man-ape is the doom of Violence; the golden-tipped rod is the reliquary of the Abbot’s Hand. It is left to the judge’s discernment whether the ape is truly asleep or merely feigning slumber. As a guideline, if the PCs have taken pains to explore the tunnels with caution and stealth, there is a 60% chance that the ape-demon is asleep. However, if the PCs haven’t explicitly taken steps to silence their actions, the man-ape is awake
and hoping to lure foolish adventurers into its grasp.
If the ape is asleep, a thief can slip into the chamber and steal the Abbot’s Wand with a DC 15 Sneak Silently check and a DC 10 Pick Pocket check. If successful, the character succeeds in stealing the wand, causing the ape to awaken at the end of the round. If either check fails, the ape awakens and may take a surprise action before both sides roll for initiative.
Though shackled to the wall, the ape-man has enormous reach, able to snatch anything within 15’. On a successful attack, in lieu of inflicting damage, the beast can instead elect to seize the target (DC 15 Strength check to escape). A captured target is automatically hit in subsequent rounds.
The ape-man can also hurl stones at ranged targets. In the debris-strewn room there is effectively an unlimited amount of potential missiles, but magic or creative actions by the PCs could potentially sweep the area clean.
(The ape-man’s stats account for its bonds and inability to move about the chamber. If the spirit is somehow freed, use the improved bracketed stats.)
The beast’s belly breaks open when it is slain, spilling out small, bloodied ape-things. The size of halflings, with lanky arms that hang to the ground and covered in goredrenched fur, they scatter through the chamber, fleeing for the exits and savagely attacking anything blocking their flight. Roughly half flee through each exit. Those that flee to area 2-3 are later found dead, picked to naught but bones.
Those that escape to the north rally after rounds, and begin stalking the PCs. They creep along the walls and cling to the ceilings, hungrily stalking the PCs. Given the opportunity, they swarm a single PC, dragging the unfortunate soul to his doom.
The Abbot’s Wand: The Abbot’s severed hand was dipped in molten gold and set upon the tip of a polished granite rod. The relic is worth 250 gp, but students of the occult will pay a far greater amount. See area 2-6 for mechanics on using the Wand against the Abbot.
Spirit of Violence (giant man-ape): Init ; Atk slam melee (), bite melee (), or stone ranged (); AC 10 [15]; HD ; hp 43; MV 0’ [40’]; Act []; SP grab; SV Fort , Ref [], Will ; AL C.
Gore Spawn (): Init ; Atk bite melee (); AC 10; HD ; hp 4; MV 40’ or climb 30’; Act; SV Fort , Ref , Will ; AL C.
Area 2-3 Reliquary of the Rat p.29
Area 2-3 – Reliquary of the Rat
The stench of rotting flesh hangs in the greasy air, like a foul miasma that coats your skin, tongue, and lungs. The rough-hewn chamber is awash in a sea of rats. They swarm in and out of the chamber through hundreds of holes burrowed in the walls and floor. The rats cluster around a single severed foot, ornamented with jewels and platinum bands, feasting on the flesh like supplicants, before vanishing back into the swarm.
The rats are the spirit of Disease. The decorated foot is another of the Abbot’s reliquaries. If any of the gore spawn (from area 2-2) fled here, all that remains are freshly gnawed bones.
Upon closer inspection it is apparent that all of the rats are diseased: Open sores, puckering abscesses, oozing scabs, patches of bare flesh, stunted limbs, pus-filled eyes, and literally thousands of fleas. The flesh of the Abbot’s Foot is endless, regenerating as quickly as the rats devour the rancid meat.
So long as the PCs do not approach or disturb the Foot, the rats pay them no heed. However, when provoked, the rats are a ravening wave, eager to rend flesh from bone. Characters caught in the tide must make a DC 15 Ref save or take damage as they are swarmed by rats; further, anyone bit by rats must make a DC 10 Fort save or contract a divine wasting disease, suffering points of Stamina damage every day until magically healed.
The rats fear open flame; the Reflex DC to avoid being bitten can be reduced by 5 if the PC spends his attack fighting off the rats with a torch. Others can aid allies by hurling their torches or flasks of oil, or taking similar steps to ward off the rats.
The floor of the chamber is riddled with tunnels, and can no longer support the weight of human-sized creatures (even more so when laden with armor, weapons, and gear). Each round a character spends in the chamber, the PC must succeed on a DC 10 Luck check. On a failed check, the PC falls through the floor, sliding 15’ down into a hollow abscess beneath the chamber; moments later a flood of angry rats comes sliding after.
Knee-deep in diseased rats, showered by more rodents from above, in an ink-black pit with crumbling walls, the PCs are almost certainly doomed. It requires quick thinking and courage on the part of the character if they hope to escape with their lives:
• Rats! Each round, characters in the pits must succeed on DC 20 Ref saves to avoid being bitten; as above, open flame reduces the DC by 5, per source. (Standing amid four burning torches would nearly ensure a PC’s safety, though a natural 1 is still a failure.)
• Climbing: Attempting to ascend the crumbling walls without aid is nearly impossible. Characters must either succeed on a DC 25 Climb or Agility check, or catch a rope lowered from above.
• When in Doubt, Aim Lower: Exceedingly desperate PCs might attempt to collapse the entire chamber – a feat readily accomplished by cutting and hacking at the undermined foundation. The collapse triggers a second cave-in as the floor of the pit gives way, dropping PCs and rats alike down a long, rotten chute to area 2-5. The characters arrive in a shower of stone and fleeing rats, but otherwise unharmed. The spirit of Disease, displaced from its reliquary, withdraws.
The Hoof: The Abbot’s Foot is looped with platinum bands and set with precious stones. See area 2-6 for mechanics on using the Hoof against the immortal Abbot.
Spirit of Disease (Rat Swarm): Init ; Atk see above; AC 5; HD ; hp 100; MV 30’ or climb 30’; Act -; SP wasting disease (DC 15 Ref save or hp + DC 10 Fort save or Sta damage); SV Fort , Ref , Will immune; AL C.
Area 2-4 The Barren Fane p.30
Area 2-4 – The Barren Fane
The low hall is suspiciously empty, save for a humble wooden pedestal set with a simple wooden bowl. The pedestal is carved in the semblance of four gaunt men and women, reaching to the sky in desperate supplication.
The Arm of the Abbot is concealed within the pedestal; the door to the reliquary is cunningly carved and only discovered after a close inspection. The wooden begging bowl is of no significance.
The pedestal is secured with a simple tumbler (DC 10 Pick Lock check) that readily yields to a talented thief. Within the pedestal is a broken humerus encased in poured glass and then wrapped in tattered homespun cloth. Unwieldy and awkward to carry, the glass shatters with even a slight blow, destroying the relic.
Removing the relic from the pedestal causes a frigid wind to sweep through the hall, leaving scores of gaunt, blue beggar children in its wake. The ghost beggars turn to the PC as one, their hollow eyes wide with desperation. The ghostly forms are emaciated and gaunt, dressed in tattered rags.
Escape is as easy as destroying the relic. Shattering the glass sends a blast of icy air through the chamber; characters within the chamber must succeed on DC 15 Fort saves or suffer damage as they are blasted with ice.
Escaping with the relic is far more challenging:
The crowd of ghost-beggars refuses to let the PC pass. They cry out for alms, specifically food. Coins or other items have no worth to the beggars – they need food. A day’s worth of rations satisfies enough beggar-ghosts to move the PC a few steps towards the exit; it requires 20 days’ worth to exit the chamber. Other PCs can enter the fane, passing through the crowd without incident, but when they attempt to leave, each PC must buy his way free with food.
Judge’s Note: It is likely that the players’ character sheets have little or no record of their supplies. There is no shame in this: the PCs are reavers and heathen slayers, not accountants! If a character record sheet has no accurate tally of rations, roll to determine the PC’s true number of food stores. Increase or decrease the die according to the PC’s Luck modifier, so that a PC with a Luck would roll , and a PC with Luck would roll .
If the PCs will not (or cannot) appease the beggars, they must fight their way free. The beggars swarm any PCs within the fane; any successful attack drains a PC of points of Stamina, causing the PC to become more gaunt and emaciated with each blow. A character reduced to 0 Stamina falls into a deathless slumber and can only be roused by the destruction of the relic (or a suitable quest of the judge’s devising).
It takes five rounds for a PC to cut his way free of the fane. Any successful turn attempt, or appropriate mighty deeds, reduces this by one round. Up to 6 ghosts can attack a PC at a time, but multiple characters fighting back to back dramatically reduce this number.
If the PCs manage to escape with the relic, see area 2-6 for details on how the characters can turn its powers against the Abbot.
Spirit of Hunger (hundreds of ghost beggars): Init ; Atk touch melee ( Sta damage); AC 10; HD ; hp 5; MV 30’; Act ; SV Fort , Ref , Will ; AL C.
Area 2-5 Reliquary of Time p.30
Area 2-5 – Reliquary of Time
The air in this chamber is still and stagnant, stinging your lungs with every breath and causing your torches and lanterns to sputter and spit. The walls and ceiling of the chamber collapsed long ago, littering the shattered floor with mounds of rubble, massive boulders, and uneven rock shelves.
Cautious PCs looking for an entrance rune will spy a tumbled arch cut with the sigil for Age.
The Abbot’s reliquary is buried beneath several tons of fallen
stone. While there is no way to retrieve the relic, the lurking spirit is no less deadly. The chamber is saturated with the doom of Age; characters entering the place are immediately beset by its effects:
Round 1: Lungs sting and breathing is labored with the chamber’s dead air. Characters’ upper epidermis and hair begins to flake and die, leaving an ashen coating on the skin. Food and drink spoil and are ruined.
Round 2: Organic materials begin to age. Cloth tears and frays, leather is quickly worn down, wood dries and splinters. Characters must make DC 5 Fort saves or age years.
Round 3: Non-organic materials begin to age. Metal rusts, blades become nicked and dull, armor loses its sheen, chain links weaken and bend. Characters must make DC 10 Fort saves or age years.
Round 4: Non-living, organic materials are reduced to dust. Metal objects grow weaker (weapons fail in combat on an attack roll of 1-5; armor fails when hit by an attack roll of 15+). Characters must make DC 16 Fort saves or age years.
Round 5: Non-organic materials are reduced to dust. Characters must make DC 20 Fort saves or age years.
Round 6+: Characters must make DC 25 Fort saves or be reduced to dust. Characters succeeding on the save age years.
Stepping out of the chamber stops the progression but does not relieve any of the effects. Returning to the chamber starts the cycle anew at round 1.
It is a short distance across the chamber, but the fallen rubble complicates the traverse. Unimpeded, it takes 2 rounds to cross the chamber. However, each round a character must succeed on a DC 10 Agility check or slip amid the rubble, sliding towards one of a dozen crevices and pits. Immediately call for a DC 13 Ref save; on a failed check, the character scrambles free of danger, but loses a round.
If either the Agility check or the Reflex save are fumbled with a natural 1 through 3, the character slips, pinned beneath the rubble. To escape, the PC must succeed on a DC 20 Strength check or receive aid in the form of an ally lifting the stone free.
Trapped characters see a translucent blue crone creeping towards them on all fours, moving like a spider along the ceiling and walls.
The crone – the doom of Age – only exists to the trapped PC. Other PCs are unable to perceive or act against the doom. There is little chance of a lone character fighting off the doom, but characters are nothing if not miraculous. If a character does succeed in defeating the crone, the aging effects of the hall are immediately reversed, and the triumphant PC ceases forevermore to age. (The character is not immortal, and may even die of old age, but will look like his or her current age when the end comes.)
Spirit of Age (ghost crone): Init ; Atk bite melee () or claw melee (); AC 15; HD ; hp 25; MV 30’ or climb 30’; Act ; SV Fort , Ref , Will ; AL C.
Area 2-6 The Abbot p.31
Area 2-6 – The Abbot
The stone steps come to an end at the shore of an inky pool some 20’ across. The pool is fed by dark rivulets streaming down the walls, ceiling, and steps. It is difficult to guess how deep the pool is, or even if the submerged steps continue on.
Set in the center of the pool is a stone bier. A torso, bereft of arms, legs, or a head, rests upon a treasure mound atop the platform amid the lapping waves.
As the PCs have likely come to expect, the pool and rivulets is the un-dying blood of the Abbot’s acolytes. The pool is 50’ deep, the torso of the Abbot resting atop a carved monolith of stone.
If none of the relics have been removed from their places of rest, the torso is inert, trapped within its immortal coil. The characters – be they hesitant, fortunate, or just simply lucky – are rewarded for their exceeding caution. If the characters can gain the top of the bier, they are free to loot the remaining treasures of the Abbot without fear of reprisal. (See Hoard of the Abbot, below.)
However, in the likely case that the PCs have disturbed at least one of the relics, the Abbot has been freed from his self-imprisonment. His freedom comes at the cost of his immortality, but the PCs might not live long enough to know the difference. The PCs’ arrival sets into motion the following series of events:
A tremor shakes the chamber from above, causing the waves of blood to wash up over the torso and the treasure mound. Call for actions from the PCs. Moments later, a second tremor sends stones crashing down from above, collapsing the exit, and spilling an avalanche of rubble down the stone steps. Any PCs still on the steps must make DC 10 Ref saves or be knocked into the pool of blood.
At the start of the next round, waves wash over the platform, spilling the torso and all its treasures into the pool. Any characters atop the bier must make DC 10 Ref saves or be washed into the pool. A deep groaning fills the air, and the walls, floor, and ceilings tremble as a giant of the earth shakes free its surly bonds.
The Abbot has arisen. Bereft of a body, its spirit inhabits the abbey and its dungeons. With a final, stone-shattering quake, the Abbot sits free of the earth, a towering high god-thing composed of stone, earth, and the blood of its disciples.
All characters must attempt DC 10 Reflex saves. On a successful check, the PC is borne to the surface, riding astride the titan. On a failed check the character is also carried to the surface, but is pinned beneath crushing stones. To escape, the PC must succeed on a DC 20 Strength check or receive the aid of an ally.
The Abbot’s foremost goal is to regain its lost relics. On a successful attack it can elect not to inflict damage, but instead to seize hold of the PC. After cruelly examining its victim, it devours the character on the following round, casting PCs down its stone gullet to their doom.
Apart from flight, or incredible creativity, the PCs’ sole hope lies in the turning the relics against the Abbot. Each of the relics has the capacity to weaken the Abbot; together, they can render the god-thing helpless. Activating any one of the relics requires an action, and no single PC can activate more than one relic in a round.
The Head: A character bearing the Head may attempt a DC 15 Will save once per round. On a successful check, the character succeeds in dominating the spirit of the Abbot, impairing its actions by -1d for each point of the save equal or above 15. (A 15 save would result in a -1d and a 17 would result in -3d.) If the Abbot is defeated, the relic bestows its magic upon the bearer in the form of to his Intelligence and Personality scores.
The Abbot’s Wand: A character wielding the Abbot’s severed hand can attempt to direct the god-thing’s attacks. Any time the Abbot attacks, the character with the Wand may attempt to beat the roll with an opposing attack roll. (If the Abbot rolls a 14 to hit, and the PC with the Wand rolls a 15, the character wins.) If successful, the wand-bearer succeeds in altering the course of the attack, causing it to miss. If the Abbot is defeated, the relic bestows its magic upon the bearer in the form of to his Strength and Agility scores.
The Hoof: A character bearing the foul foot may elect to attempt a DC 15 Will save once per round. On a successful check, the character succeeds in reducing the Abbot’s speed by 5’ for each point of the save equal to or above 15. (A save of 15 would result in a speed of 55’ per round and a 17 would result in 45’ per round. If the bearer succeeds with a natural 20, the Abbot is rendered immobile, rooted in place for all time.) If the Abbot is defeated, the relic bestows its magic upon the bearer in the form of to his Luck and Stamina scores.
The Humerus: Once per round, the bearer of the relic can swing the bone in a wide arc. The god-thing responds in kind, stumbling through its motions, and dramatically increasing the chances of PCs scoring critical hits. If the wielder succeeds on a DC 15 Reflex save, all attacks against the Abbot that round are critical hits on a roll of 15 or better. If the Abbot is defeated, the relic bestows its magic upon the bearer in the form of to all to hit and damage rolls.
The god-thing has ten rounds to regain any of its lost relics. If the Abbot succeeds, its immortality is assured. However, if the PCs manage to survive 10 rounds, the forestalled dooms catch up to the Abbot. Each of the freed dooms strikes at once, collapsing the would-be god in a shower of stone, blood and gore.
The Ghosts: If the PCs came to peace with the ghosts in area 1-2, the ghosts now return to intercede on their behalf. Each may take one action, at the judge’s discretion, to aid the PCs. This can be as simple as lifting free a stone so that a PC can escape, or taking a blow from the Abbot so the PC remains unharmed. Each ghost may perform but a single action before vanishing, never to return.
Hoard of the Abbot: The hoard remaining atop the platform is but a fraction of the Abbot’s original treasure, yet characters managing to secure the treasure can come away rich men. (Note: the treasure is loose, with coins and gems spilling every direction. How the PCs attempt to scoop up the loot may be the final arbiter of how much they walk away with.)
The hoard is composed of x10 sp, x10 gp, religious items worth gp each (candlesticks, censers, and the like), and pieces of jewelry worth gp each.
Obviously, if the Abbot arises, the remaining loose treasure is lost, buried somewhere deep beneath the earth.
The Abbot of the Woods: Init ; Atk slam melee (); AC 10; HD ; hp 50; MV 60’; Act ; SP seize and devour; SV Fort , Ref , Will ; AL C.