4AD DW · p.3
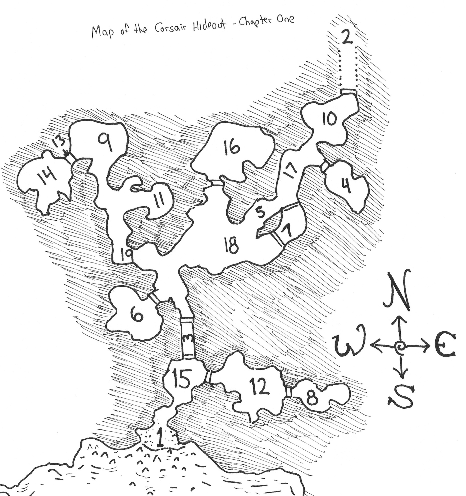
Open source p.3How to Play This Adventure This adventure for Four Against Darkness can be played in a couple of hours, and split over two separate sessions. It has been designed for beginning characters: most of your characters should be level 1 or 2. However, if two or more characters are level 3, increase the chance of wandering monsters to 2 in 6 and increase the number of all minions encountered by 1. The Four Against Darkness book is needed to play this adventure. This adventure is in two parts. The first is a programmed dungeon. The second is a random dungeon using the standard dungeon building tables found in Four Against Darkness, but replacing the room content tables with those from this book. In part one, use the Map of the Corsair Hideout. You’ll find the numbered locations in Chapter One. Do not start reading until your party is created and ready to go. Follow the layout of that map, decide which location you are going to visit, and read the entry corresponding to that number. You may search rooms only if instructed to do so by the numbered entry. Do not read the entries in advance! Read them only as you reach the room or area. Reading the entries in advance will spoil all the fun. Wandering Monsters When you trace your way back through the map, make a wandering monster roll once for each numbered location you move through. The chance to meet a wandering monster is 1 in 6. To determine what wandering monsters are met in Chapter One, roll . On a 1-3, use the Hideout Vermin table. On a 4-6, roll the Hideout Minion table.
Maps (1)
Sections (30)
How to Play This Adventure p.3
How to Play This Adventure This adventure for Four Against Darkness can be played in a couple of hours, and split over two separate sessions. It has been designed for beginning characters: most of your characters should be level 1 or 2. However, if two or more characters are level 3, increase the chance of wandering monsters to 2 in 6 and increase the number of all minions encountered by 1. The Four Against Darkness book is needed to play this adventure. This adventure is in two parts. The first is a programmed dungeon. The second is a random dungeon using the standard dungeon building tables found in Four Against Darkness, but replacing the room content tables with those from this book. In part one, use the Map of the Corsair Hideout. You’ll find the numbered locations in Chapter One. Do not start reading until your party is created and ready to go. Follow the layout of that map, decide which location you are going to visit, and read the entry corresponding to that number. You may search rooms only if instructed to do so by the numbered entry. Do not read the entries in advance! Read them only as you reach the room or area. Reading the entries in advance will spoil all the fun. Wandering Monsters When you trace your way back through the map, make a wandering monster roll once for each numbered location you move through. The chance to meet a wandering monster is 1 in 6. To determine what wandering monsters are met in Chapter One, roll . On a 1-3, use the Hideout Vermin table. On a 4-6, roll the Hideout Minion table.
A Call for Adventurers p.6
Lord Erid Orfeld is a wealthy merchant of Dorantia. From AnMor to Kardalok, the Orfeld Company has established a prosperous business with contracts in a variety of trades. Lord Erid has recently been investing in antiquities from before the Century of Rain and Fire. One such shipment had been waylaid in transit across the Sea of Storms near the coast of western Kardalok. Corsairs have captured the Orfeld Company’s cargo ship and absconded with the valuables in its hold. One particular relic, a golden statue of the Shark God, Tezany, is prized above all else. Lord Erid Orfeld has hired a party of four adventurers (your party) to track down the stolen relic and return it to the Orfeld estate in Dorantia. Your reward shall be 100 gold. The merchant suggests your party speak with the Atlis Coast Guard for clues on the investigation of this piracy, or you might talk with a certain associate of his named Murazzo who has many underground connections. Your party is then booked passage across the Sea of Storms to western Kardalok to the port city of Tezany’s Cove.
Tezany's Cove p.6
Tezany’s Cove is a large seaport, the capital of all trade in western Kardalok, and sibling to Dorantia in An-Mor. Enormous statues along the coast act like welcoming beacons to the harbor city. This multicultural hub is also home to the blue-skinned Atlis, survivors of the lost race of Atlanteans and defenders of the coast from their mutated cousins, the greenskinned Atlis known as Deep Demons. Your party has arrived in Tezany’s Cove. You were given two suggestions on how to proceed with finding Lord Erid Orfeld’s stolen cargo. You may speak with the Atlis Coast Guard, defenders of the shorelines of Kardalok; or you may speak with Lord Erid’s associate, Murazzo, who has many connections among underground networks. You may only choose one option.
Atlis Coast Guard p.7
In an outpost decorated in sea shells, pearls, and iconography from a bygone era, your party meets with a commander of the Atlis Coast Guard. She listens to the purpose of your visit and reveals her own investigations into the high seas crime. The corsairs that have taken Lord Orfeld’s treasure are a recent growing menace. They are now occupying a series of grottos a few miles south of Tezany’s Cove, hidden behind steep cliffs and jagged shoreline rocks. It is a known hideout for smugglers and bandits. The Atlis Coast Guard dare not risk a full attack at such a hazardous access, but perhaps a small band of adventurers could slip in easier. The Atlis commander offers you a reward of 100 gold for the successful capture of the corsair captain, alive, and an honorary position among the Atlis Coast Guard. Your party is given rope for your Quest and may proceed to the Map of the Corsair Hideout. You enter the map at section 1.
Murazzo p.7
After inquiring around for Lord Erid Orfeld’s associate in several taverns, your party locates the fellow. He is a well-groomed individual with expensive clothes, and many rough looking bodyguards. Murazzo listens to your tale with growing interest. He makes a counter offer to the one Lord Orfeld had made. For 200 gold, Murazzo wants you to bring the gold statue of Tezany the Shark God, to him. As well, the corsair captain must not live, as he had failed to turn over the treasures to the organization that had funded his ship and crew. If your party succeeds, you will be inducted into the guild of thieves, the society which Murazzo is the king. Murazzo has the adventurers escorted south of Tezany’s Cove to a secret entrance into the hideout of the corsairs. Your party is now on a Quest and may proceed to the Map of the Corsair Hideout, but may start at the secret entrance at section 2.
Room 1 — Rocky Shoreline p.8
Your party guides a small row boat onto the slim, rocky shoreline. Waves crash against the adventurers, threatening to throw them amongst the jagged rocks that dot the narrow beach. Each character must save versus the waves (which is level 3). Dwarves and Halflings roll at , barbarians roll at . Those who fail are smashed against the rocks, losing 1 life point.
Room 2 — Secret Entrance p.8
The secret entrance is a vertical shaft with a rickety ladder leading down. Characters may only climb down single-file. Choose the position for each character on their descent. Starting at the top-most character, roll a for each character. A character with light armor is at . One with heavy armor rolls at . Halflings roll at . If the total roll is a 1 or less, that character falls as a ladder rung broke free or their grip failed. The next character down will have a to their die roll due to the falling character above them. The penalty accumulates as more characters fall. Each fallen character loses 1 life point as they hit the bottom of the secret entrance shaft. The sound of their falling may also have alerted wandering monsters, roll 1 in 6.
Room 3 — Closing Walls p.8
The doors at either end of the tunnel slam shut then lock from the opposite side. A metallic grinding noise begins loudly. The walls are closing in! You notice a small hole next to the door ahead, large enough to fit your arm. Inside this hole appears to be the controls for this trap or how to unlock the doors. Choose a character and which hand to put into the hole. Roll . A rogue adds his level to the die roll. On a natural 1, the character loses 1 life point and their hand, and will no longer be able to use anything with that arm. On a 5 or 6, the walls stop and the doors open. A result of 2-4, the closing walls stop but the doors are still locked. You may attempt to bash the door as a level 5 (see p. 60 in Four Against Darkness).
Room 4 — Garbage Disposal (Green Slime) p.9
This room has been used for garbage disposal. A gelatinous green slime is feasting in the rear of the room, slowly dissolving skeletal remains and a few shiny objects and senses your warm presence.
Green slime, level 5 boss, 8 life, 2 attacks. The slime is hit at by the Fireball spell. Crushing weapons attack it at . Any character wounded by the green slime must save versus level 3 acid or lose 1 additional life.
Reactions: always fight.
Treasure: the green slime has x 10 gold pieces and one random magic item, determined by rolling on the Magic Treasure Table (page 34 in the Four Against Darkness book).
Upon defeating the green slime, the party gains one xp roll.
Room 5 — Iron Wall Trap p.9
An iron wall drops from the ceiling, blocking the tunnel. Each party member must roll versus level 3 trap. Halflings and elves roll at . Rogues add their level. A character failing the roll is trapped behind the falling wall. Follow the rules on splitting the party (see Four Against Darkness, p.44).
Room 6 — Sea Witch's Home p.9
This is the home of the corsairs’ sea witch.
Sea Witch, level 4 boss, 4 life, 2 attacks. All characters at the beginning of the battle must save versus a level 4 hex spell or be cursed, to their Attack and Defense rolls.
Reactions: 1-2 bribe ( gp), 3-5 fight, 6 fight to the death.
Treasure: The sea witch has a potion of healing, 3 bandages, and a random treasure, determined by rolling on the Treasure Table (p. 34, Four Against Darkness).
Upon defeating the sea witch, the party gains one xp roll.
Room 7 — Goblin Pirate Lair p.9
This is the lair of the goblin pirates.
8 goblin pirates, level 4 minions. They have a 1 in 6 chance of gaining surprise, thus acting before the party. If they do act before the party, roll on their reactions table.
Reactions: 1-2 bribe (5 gp per goblin), 3-6 fight.
Treasure: Roll twice on the Treasure Table.
Room 8 — Corsair Armory p.10
This room is an armory, guarded by corsairs.
6 corsairs, level 4 minions. Two have bows, which let them strike first if the party chooses to attack before rolling reactions. The bow users will forfeit their following attack, using their action to pull out hand weapons.
Reactions: 1-3 bribe (10 gp per corsair), 4-5 fight, 6 fight to the death.
Treasure: The corsairs have gold pieces. The room is filled with weapons. All characters can change their weapons if they want, within the limits of the weapons allowed to their class type. There is a 1 in 6 chance of finding a magic weapon, treat it as if 4 was rolled on the Magic Treasure Table (p. 34 in Four Against Darkness).
Room 9 — Corsair Captain at the Dark Lake p.10
The corsair captain is standing at the edge of a dark lake. He has just handed the gold idol of the Shark God to a green-skinned Deep Demon, who then dives deep into the subterranean pool. If a rogue is leading the party (he must be in the front rank of the marching order when the party enters the room), you catch the corsair captain unawares while he is dealing with the Deep Demon, giving you a attack bonus on your first turn. The Deep Demon still flees.
Corsair captain, level 5 boss, 4 life points, 2 attacks. On the captain’s first turn, he will attempt to summon aid. Roll a . On a 5 or 6, corsairs
arrive (6 corsairs, level 4 minions).
Reactions: always fight to the death.
Treasure: The corsair captain has x 10 gold pieces and one random magic item, determined by rolling on the Magic Treasure Table (Four Against Darkness p. 34). The party also gains one Clue.
Upon defeating the corsair captain, the party gains one xp roll.
Room 10 — Crates and Barrels p.11
This room is filled with crates and barrels. You may ignore this room or decide which character will search it, rolling on the Cargo Storage Table. Decide before looking at the table!
Room 11 — Dark Pool p.11
There is a dark pool of saltwater in this room. You may decide to ignore the pool or decide which and how many of your characters investigate it, rolling on the Dark Pool Table. Decide before looking at the table!
Room 12 — Corsair Barracks p.11
This room is used as a barracks for the corsairs. There are corsairs in the chamber. There is a 1 in 6 chance that the corsairs are sleeping. If a rogue is leading the party into this room while the corsairs are sleeping (he must be in the front rank of the marching order), you may take what treasure they have and leave without fighting.
Corsairs, level 4 minions.
Reactions: 1-3 bribe (10 gp per corsair), 4-5 fight, 6 fight to the death.
Treasure: There is x 10 gold pieces on a table in the barracks.
Room 13 — Locked Door p.11
This door is locked. A rogue may lockpick it (it’s a level 4 lock). If there is no rogue, or if he fails, the door can be bashed (see Four Against Darkness, p. 60), in which case the door is treated as level 4. Remember this might attract wandering monsters.
Room 14 — Corsair Captain's Room p.13
This room belongs to the corsair captain. At the foot of his bed is a locked chest (level 4 lock, bashed at level 5, see p. 60 in Four Against Darkness). If the chest is opened, roll three times on the Treasure Table (p. 34 in Four Against Darkness). On a desk in the corner are some scrolls and ledgers. You may leave it alone or decide which character will search it, rolling on the Captain’s Desk Table (p. 20). Decide before looking at the table!
Room 15 — Bandit Sentries p.13
Four bandit sentries are standing in this chamber.
Bandits, level 3 minions. They have 2 guard dogs, level 4 vermin. The guard dogs’ barking has a 1 in 6 chance of attracting wandering monsters at the end of the combat. Reactions (Bandits and dogs): 1 flee, 2-3 bribe (10 gp per bandit), 4-5 fight, 6 fight to the death.
Treasure: A total of x 5 gold pieces are carried by the bandits.
Room 16 — Makeshift Kitchen (Ogre Cook) p.13
This is a makeshift kitchen, with stockpiles of food provisions. An impressively fat ogre, apparently the corsairs’ cook, is stirring a large cauldron over a fireplace. He keeps a large cleaver and a rolling-pin handy.
Ogre cook, level 5 boss, 6 life points. Each hit from the ogre chef inflicts 2 life points of damage. If a fight occurs, at the start of the battle, the ogre cook will attempt to throw the contents of the cauldron. All characters must save versus level 3 scalding hot soup or lose 1 life point. Barbarians save at .
Reactions: 1 bribe (50 gp), 2-3 fight, 4-6 fight to the death.
Treasure: The ogre cook carries gold pieces. In the food storage area you find one potion of healing.
Upon defeating the ogre cook, the party gains one xp roll.
Chapter One — Ending the Chapter p.15
If you manage to exit the dungeon and bring the corsair captain back alive to the Atlis Coast Guard, select a character to make one xp roll. The commander will reward your party with 100 gp and each will receive a commendation from the Atlis Coast Guard. If you exit the dungeon and bring the head of the corsair captain to Murazzo, select a character to make one xp roll. Murazzo will accept your party into the guild of thieves, but the reward was for the gold idol of Tezany. Your characters are resting and all their wounds are healed. If a character lost a hand, they may replace it with a permanent light hand weapon, such as; a hook, blade, etc. If a character lost a leg, they may replace it with a peg leg, which has no game benefit but gives your character something to brag about. A character may also spend 300 gold pieces to have a lost hand or leg be regrown magically. If a character who lost a hand or leg is killed and then resurrected, his lost hand or leg will be regrown as part of the resurrection ritual.
Room 17 — Tunnel Junction p.15
There is a roughly hewn tunnel leading southwest. To the southeast there is a door made of driftwood. On the eastern edge of this chamber, there is a door of rotting planks. Northeast leads to a dark room.
Room 18 — Door Junction p.15
To the north is a wooden door with a large pull ring. The northeast is a natural looking tunnel. Directly to the east is a door made of driftwood.
Room 19 — Whirling Blade Trap p.15
As the party steps into the room, a trap is triggered. Whirling blades strike out from the walls only a couple feet from the ground. All characters must make a Defense roll versus a level 4 trap, or lose 1 life. Rogues add their level to the roll, Halflings add . If a character rolls a natural 1, they lose 1 life and their leg at the knee. Without a leg, the character must use a crutch (from a piece of driftwood nearby) and will not be able to use their hand on the side of the body the leg was lost.
Chapter Two — Avatar of the Shark God p.16
Your characters are in Tezany’s Cove, recuperating from their adventure into the corsair hideout. All wounds are healed and spells prepared. If you managed to bring the corsair captain back to the Atlis Coast Guard in Chapter One, you will learn that the gold statue of Tezany, which you have been sent to recover by Lord Erid Orfeld, is in actuality a magical artifact used to summon an avatar of the Shark God. The summoning ceremony is to take place in a sunken temple at the bottom of the sea. The Atlis Coast Guard employs several powerful wizards; they cast an enchantment on your party for them to be able to breathe and fight underwater as if they were on land. All their attacks and spells and even their lantern will work as normal, for at least this one trip. Your party is loaded onto a boat and taken out to sea where they dive down to meet their destiny. If you were working for Murazzo, he still wants that gold statue of Tezany. The offer is still available, 200 gold for your party to bring him the relic. His spies from the thieves’ guild know the location of where the deep demons have taken the gold idol, deep below the waves of the Sea of Storms. Murazzo leads you to his own cabal of sorcerers; they will enchant your entire party for this adventure, enabling them to breathe and perform as normal underwater. The cost for this enchantment is 100 gold. If your party is unable or unwilling to pay, Murazzo will take the cost out of the reward he has offered for the gold statue of Tezany. Then he loads your party on a ship and takes them off the coastline to plunge into the sea depths.
Chapter Two — Playing This Chapter p.16
Play this chapter as a random dungeon, using the standard dungeon generation found in Four Against Darkness, but with the following changes: • Instead of the Vermin, Minions, Boss, and Weird Monster tables found in Four Against Darkness, use the Aquatic versions provided in this adventure. • The final boss is listed under the Chapter 2 – Final Boss table, separate from the Aquatic Boss Table. • Instead of the Special Features, Special Events, Traps, and Magic Treasure tables found in Four Against Darkness, use the Aquatic versions provided. • The party can give up the dungeon if they are too beaten up to continue. In this case, read the “Ending the Chapter” section to see what happens next.
Chapter Two — Ending the Chapter p.17
This chapter ends when your party or the Avatar of the Shark God are killed. If the Avatar is killed, all your surviving characters may take his treasure (and the gold statue of Tezany). As soon as you escape through the dungeon, you make your way back to the surface and the boat that will take you to Tezany’s Cove.
Returning to Murazzo p.17
If you bring the gold statue of Tezany to Murazzo, select a character to make one xp roll. Murazzo gives your party the promised 200 gold reward (100 gold if your party did not pay for the water-breathing enchantment before the adventure). Each character is officially promoted to captains within the guild of thieves. You will know contacts in all the major cities of the civilized world and may go to them for assistance in future ventures. If your party quits the dungeon before killing the Avatar, they may regroup back at Tezany’s Cove and heal up. You may return to the undersea adventure, but you will roll for a new random dungeon. The Avatar will already be summoned and at full strength. You will not have to fight the cultists in the final fight. The gold statue of Tezany will always stay with the Avatar. If you wish to steal back the gold statue of Tezany from Murazzo and the guild of thieves, you may attempt to do so if you have a rogue in your party. Roll a . On a 1 the rogue is caught and murdered, the rest of your party is stripped of all money and magic items and dumped into the harbor. On a 2 the rogue escapes with the statue, sells it, and flees with the money, leaving your party forever. On a 3-4 the rogue barely avoids the guards used by the guild of thieves, no luck stealing the statue. On a 5-6, the rogue manages to take the statue and your party is able to sell it at the market for 200 gold.
Returning to the Atlis Coast Guard p.17
Guard If you return to the Atlis Coast Guard, select a character to make one xp roll. Each character is promoted to an officer within the Atlis Coast Guard and will always have free passage by ship from Tezany’s Cove to whatever destination they choose and may call on the Atlis as allies in future adventures. The Atlis ensure the gold statue of Tezany is drained of all potential magic energy before handing it over to your party. They will guide you to a ship back to Dorantia, where you may turn over the Shark God relic to Lord Erid Orfeld. The wealthy merchant then gives you the 100 gold as promised.