Beyond the Black Gate
Lv 5DCC 72 · p.1
Open source p.1Introduction
Remember the good old days, when adventures were underground, NPCs were there to be killed, and the finale of every dungeon was the dragon on the 20th level? Those days are back. Dungeon Crawl Classics adventures don’t waste your time with long-winded speeches, weird campaign settings, or NPCs who aren’t meant to be killed. Each adventure is 100% good, solid dungeon crawl, with the monsters you know, the traps you remember, and the secret doors you know are there somewhere.
Beyond the Black Gate is designed for 6 to 10 5th-level characters. The adventure can also be attempted by a smaller party of 6thor 7th-level characters and will prove no less challenging. The adventure rewards cautious play tempered with moments of brash courage. Those expecting to hack and cast their way to victory will need to be very lucky to survive. Stealthy exploration and thoughtful, creative play are the call of the day, for the terrible ice giants seek no quarter and offer none in return.
Adventure Background
In the mystic realm of the Thrice-Tenth Kingdom, the Horned King rules over dark, sullen woods and rugged peaks. On storm-ridden nights he and his black hounds sally forth, ranging across worlds on the Wild Hunt.
All this ended when the reign of the Horned King was brought low. Seduced by the daughter of the ice giants, now the king spends his days lazing atop his throne of bones. No longer does the Wild Hunt spread fear across the planes, and the black hounds bay in mourning for their lost king.
The Witches of Asur have hatched a plan to steal the Horned Crown from their love-struck master. A new Horned King must sit atop the chalky throne; the Wild Hunt must ride again.
Using all their arcane might, the witches draw the PCs into their clutches and bid them across the multiverse to the realm of the Horned King. There, in the icebound gloom of the Thrice-Tenth Kingdom, the PCs must pit their wits and brawn against the fearsome ice giants and their mighty thane. Stealing the Horned Crown from the brow of the king, the PCs must evade the ice giant’s reprisal to win their way home.
Adventure Hooks
The adventure begins with the PCs aboard the doomed ship Morro sailing north along a rugged coastline. The reasons for the PCs’ travels are of little consequence during the adventure, for the witches’ hex-wrought storm quickly dispels any hope of the PCs reaching their intended destination.
Judges should tailor the following adventure hooks to their own specific campaigns and PCs:
• A PC wizard has suffered a strange corruption: an azure thirteen-pointed star emblazoned on his forehead that flares whenever he casts a spell. The sigil marks the wizard as the property of the Witches of Asur, and only the dread crones can remove their mark.
• Rumors of an otherworldly power, the Horned King, begin to make the rounds in the circles of the city’s underworld. Legend has it that the Horned King has died, leaving untold treasures for the taking. The rogue daring enough to venture through the Black Gate will return wealthy beyond belief.
• A PC cleric receives an ominous dream of strange portent. A once-mighty king lingers on the verge of death, corrupted by poison and vice. Hounds bay in the darkness, mourning their master, and looming, dark shapes circle the throne. Awakening, the cleric knows he has been sent this dream for a reason: to save the Horned King.
• A blackbird alights on the PCs’ windowsill, a note tied to its leg. The note reads:
wealth and power beyond compare just reward to the brave sail north to the land of dark forests seek you the Witches of Asur
Rumors, Legends, & Superstitions
Depending on their training and social circles, PCs are likely to have heard intriguing bits of legend and folklore from the far north. Judges should roll for each PC or tailor and exaggerate rumors to best befit their home campaigns.
Wizards & Elves
Rumor
1 The Horned King is the master of the Wild Hunt. On stormy nights, he can be heard on the wind, his wild hounds chasing their prey to ground.
2 The Witches of Asur are hellish cambions, having lost their souls to the Horned King ages past. They weave terrible magics, can rend the fabric of the universe, and twist a man’s fate asunder. For all their coven’s wickedness, the Witches of Asur cannot tell a lie.
3 The Horned King rules from a realm known as the Thrice-Tenth Kingdom, somewhere beyond this mortal plane, yet intimately connected. Travel between the realms can only be accomplished with mighty relics or foul magics.
4 Many weird and alien cults originate in the far north. Something about the cold north winds and the strange polar lights works madness on men’s minds and souls.
5 The Crown of the Horned King bestows unimaginable power upon any who dare wear it. A wizard donning the artifact will surely be the most powerful in all the seven worlds.
Warriors & Dwarves
Rumor
1 Legend holds that mighty warriors—slain in the passion of battle—join the Horned King and his Wild Hunt. Do not fear death, for if you die with valor, you and the ballads of your deeds will live on forever in the Thrice-Tenth Kingdom.
2 The mystical place known as the Thrice-Tenth Kingdom is overrun by foul monsters of every sort. Giants stalk the dark woods, slaying all they encounter, and dread polar worms hunt the night. Even the mightiest of warriors pale before these terrors, for there are beasts that even the greatest sword cannot slay.
3 The Horned King takes the arms and armor of his prey as trophies to hang on the walls of his mighty keep. Any weapon or armor, mundane or magical, can be found within the dark stone walls of the Horned King’s citadel.
4 Beware the foul Witches of Asur. They take strong warriors for their lovers, and any they choose are never seen again. Blades are worthless against the demonic hags. The only defense against the witches is the morning sun; exposure to its brilliant rays turns the witches to stone.
5 The might of the Horned King is in his crown. Seize the crown and you become master of the Thrice-Tenth Kingdom. Then even the wolf and the mighty stag bend knee to your will, acknowledging you as the rightful master of the Wild Hunt.
Thieves & Halflings
Rumor
1 In the Thrice-Tenth Kingdom jewels litter the ground and the streams run with gold. Those brave enough to venture through the Black Gate are sure to return wealthy beyond imagining!
2 No one survives stealing from the Horned King. When you hear the black hounds on your trail and storm clouds cover the sky, you know your end has come.
3 Trust no one and nothing in the Thrice-Tenth Kingdom. Neither friend nor foe is what they appear.
4 The Horned King resides in an impregnable mountain fastness, defended on all sides. But stories hold there is a secret tunnel under the citadel, leading to the king’s throne room and his fabled treasure vault.
5 The crown of the Horned King makes any thief a master among men. Those that don the Horned Crown cannot be seen, tracked, or caught by even the fleetest huntsmen.
Clerics
Rumor
1 The Witches of Asur worship the Horned King with foul obeisance and wicked sacrifice. On stormy nights their spells weaken the boundaries between the two worlds, permitting the brave or foolhardy to pass across the planes.
2 The far north is home to the Cult of the White Worm. Damned souls worship a dread being that seeks to bring about an end to all creation. Only the most depraved creatures worship such a foul power, and they wreak havoc upon the lands.
3 The Thrice-Tenth Kingdom is a mystical place across many planes, yet tied to our own. It is home to strange monsters and terrible giants, and its ruler is the Horned King. To venture into the ThriceTenth Kingdom is to risk your very soul, for once there no patron, saintly or demonic, will answer your call.
4 The Horned King ranges across time and space, hunting holy man and criminal alike. He delights in running saints down like dogs, making them recant their beliefs and forsake their gods. To bring about an end to the Wild Hunt is to end an ancient terror that haunts our lands.
5 The Horned King’s weakness lies in his crown. Strip the crown from his brow and the master shall be laid bare at your feet. The disposal of the crown is another matter, for wicked relics are not easily destroyed.
’
Judge s Notes
The adventure takes place in two distinct settings. The first is on the forbidding coast of the Bay of Asur. Once a far-flung outpost of the empire, the coastline has succumbed to the wilderness and the influences of savage tribes. The Witches of Asur call this wild country home, reveling in its deep fjords, dark vales, and perpetually gray skies.
The second half of the adventure takes place in the ThriceTenth Kingdom. Cast across worlds through the Black Portal, the PCs arrive to discover a realm of brooding woodlands and rugged peaks, locked in the grip of perpetual winter. Home to the Horned King, master of the Wild Hunt, the Thrice-Tenth Kingdom is a study in sharp contrasts between the frigid cold of the somber land and the fiery passions of its inhabitants. It is a merciless realm, adhering to the principles of its master: culling the weak and offering only the promise of a valiant death to the strong.
Encounter Table
Area Type Encounter
1-5 C Familiars
1-6 C Baba Iaga The Twelve
2-2 C/P Mendax the Mad
2-3 T Avalanche
3-1 C 3 ice giantlings
3-2 C 100+ plague rats
3-3 C 3 “sleeping” giants
3-4b C 2 ice giants
3-4d C 2 ice giants
3-5 C 2 ice giant acolytes
3-6 P/C Hyperborean mists
3-7 C 3 ice toads
3-8 P 23 black hounds
3-10 P/C Lokim the Blind
3-11 C Asmundr Polar bear
3-12 C/P Faustfvor the Seething Vefreyja, the Ice Giant’s Daughter
Giant-Sized weapons
Characters in this adventure will have many opportunities to claim giant-sized weapons. Characters with 16+ Strength can wield giant-sized weapons at no penalty. Characters with 12-15 Strength attack at -1d with a giant-sized weapon. Characters with Strength 11 or lower cannot wield them effectively in combat.
Player Start
You awaken with a start to howling winds and the crash of monstrous waves against the boards. Torrents of icy water rush down the steps belowdecks and the ship lists with each wave. A storm is upon you, unlike any you have ever known!
The PCs emerge above deck to discover the ship beset by hammering waves and driving rain. Lightning flashes overhead, and nearby, atop towering sea cliffs, PCs can spy a hellish red glow. Dark storm clouds circle overhead, centered above the glow—the eye of the storm.
The captain is lashed to the wheel and calls for the PCs and crew to tie off, but his orders are drowned out by the howling storm. The PCs have just two rounds to tie themselves off before the next monster wave hits. On the third round and every round following, those not tied to the deck must succeed on a DC 10 Strength check or be swept overboard. Adjacent PCs can attempt a DC 15 Strength check to haul their fellows back from the inky waters.
On the fourth round, read or paraphrase the following:
Searing lightning forks overhead followed by a blast of thunder. In the flash of light, you see a towering wave rise above you, dwarfing the main mast. The captain fights vainly to turn the ship into the wave as all around sailors fall to their knees beseeching their silent gods!
PCs attempting to aid the captain in turning the ship must succeed on a DC 15 Strength check. PCs will feel a shuddering snap as the rudder breaks free of the ship on round five.
The towering black wave rises into the dark sky until it blots out even the lightning! Your ship rolls into the yawing abyss, screaming sailors slide overboard, and then there is a sickening crash as the ship smashes upon the rocks! Frothing, icy waves rush over you then recede. In the flash of the lightning you see stone cliffs towering above you, pocked with dark holes! Foam roils around your knees, and you know you have only moments before the next wave!
Desperate, you see only two possible escapes: a trio of dark, loathsome sea caves or climbing the towering cliffs!
The waters recede for an instant, giving the PCs but a single round to reach safety. Those that remain on the rocks at the end of the round are hammered by the next wave for points of damage and must succeed on a DC 10 Strength check or be sucked back out to sea. PCs encumbered by metal armor sink to their doom, but others pulled out to sea can make a bid for the shore by succeeding on a DC 15 Strength check.
With luck the PCs took equipment with them before going above deck. Any gear left below is lost beneath the frothing waters. Each PC can seize a single item of lost equipment with a successful DC 13 Luck check.
The captain vanishes beneath the waves (only to reappear in 1-6), but at the judge’s discretion sailors survive the wreck. Each has but hp and no gear save for a sharp knife ( damage); the judge should choose campaign-appropriate names for the surviving crew members, or select from the following list: Ormr, Thorfinn, Askell, Bolli, and
Sigfast. Finally, any lost PCs or hirelings also reappear in area 1-6.
There are but two ways to escape the waves: by scaling the towering cliffs or ascending through the sea caves.
Those attempting to scale the cliffs must succeed on no less than four climb checks (Strength or climb sheer surfaces check, DC 16) in order reach to 200-foot-high rim. If the PCs are fortunate enough to have rope, they can use it to ensure successive climbers don’t fall on failed checks.
PCs gaining the top of the cliff emerge outside the Fallen Chapel (area 1-4).
Those opting to investigate the sea caves enter through any of the locations marked 1-1.
Sea Caves & the Fallen Chapel
The sea caves were sacred to the northern tribes and employed in obscene worship of the Horned King. When the glittering armies of Crieste sought to subjugate the savage warriors, they erected a stone chapel above the caves, claiming the site for their own gods. The sea caves were used as a dungeon where savage chiefs and witches were tortured and executed.
Following the Interregnum and withdrawal of the occupying armies, the chapel descended into ruin, reclaimed by the wilderness. Now stags and boars wander where monks once held service, and swallows nest where stained glass icons once stood watch.
And with the beasts have come their devotees: the servants of the Horned King.
Except where noted, the sea caves have no natural light, which can prove a vexing problem for PCs fleeing from the wreck of the Morro. Judges should adjust area descriptions accordingly.
The natural stone passageways and chambers of the sea caves are worn smooth and littered with the occasional thread of seaweed or bit of driftwood.
Where the sea caves meet the fallen chapel, the natural caves give way to worked stone steps and chiseled icons. All that remains of the chapel are three ruined walls circling a stone altar. The entire ruin is covered in moss and vines, with grasses and saplings poking through the flagstones and sprouting in the cracks atop the crumbling walls.
Areas of the Map
Maps (8)
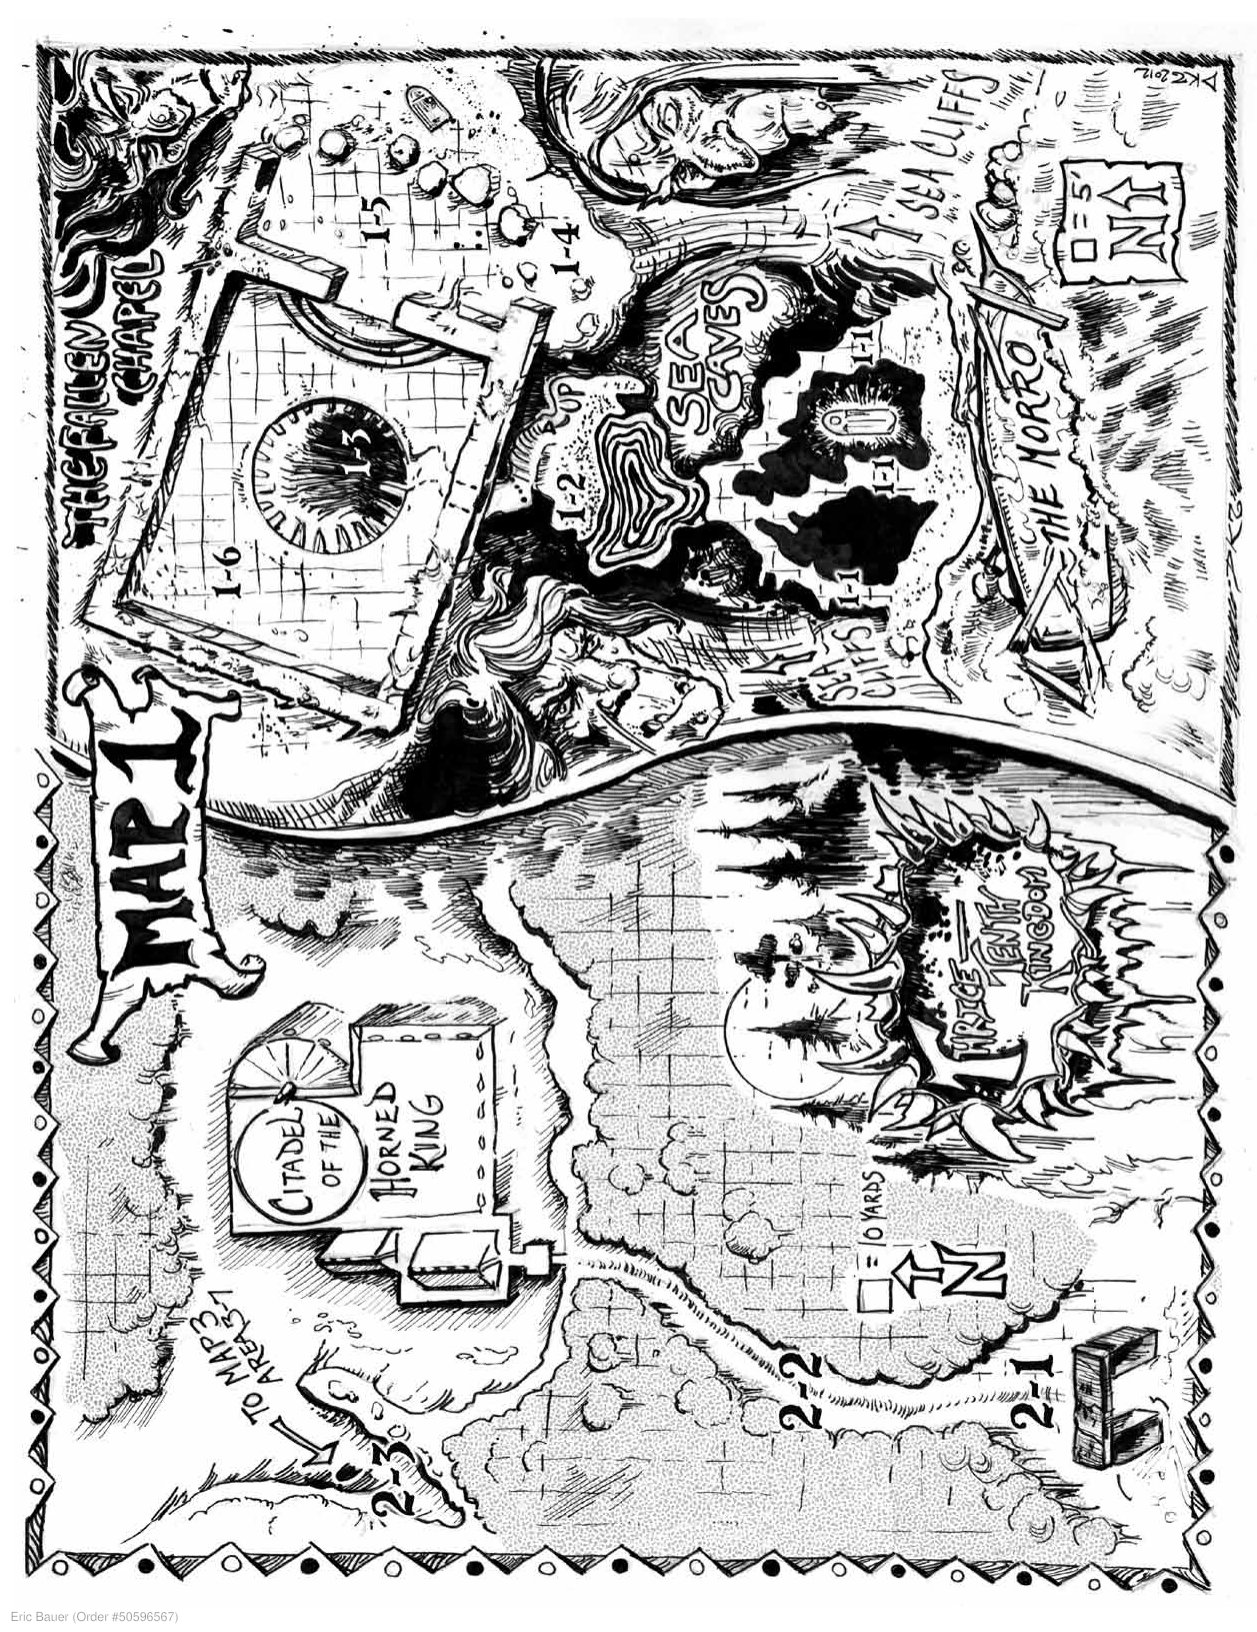
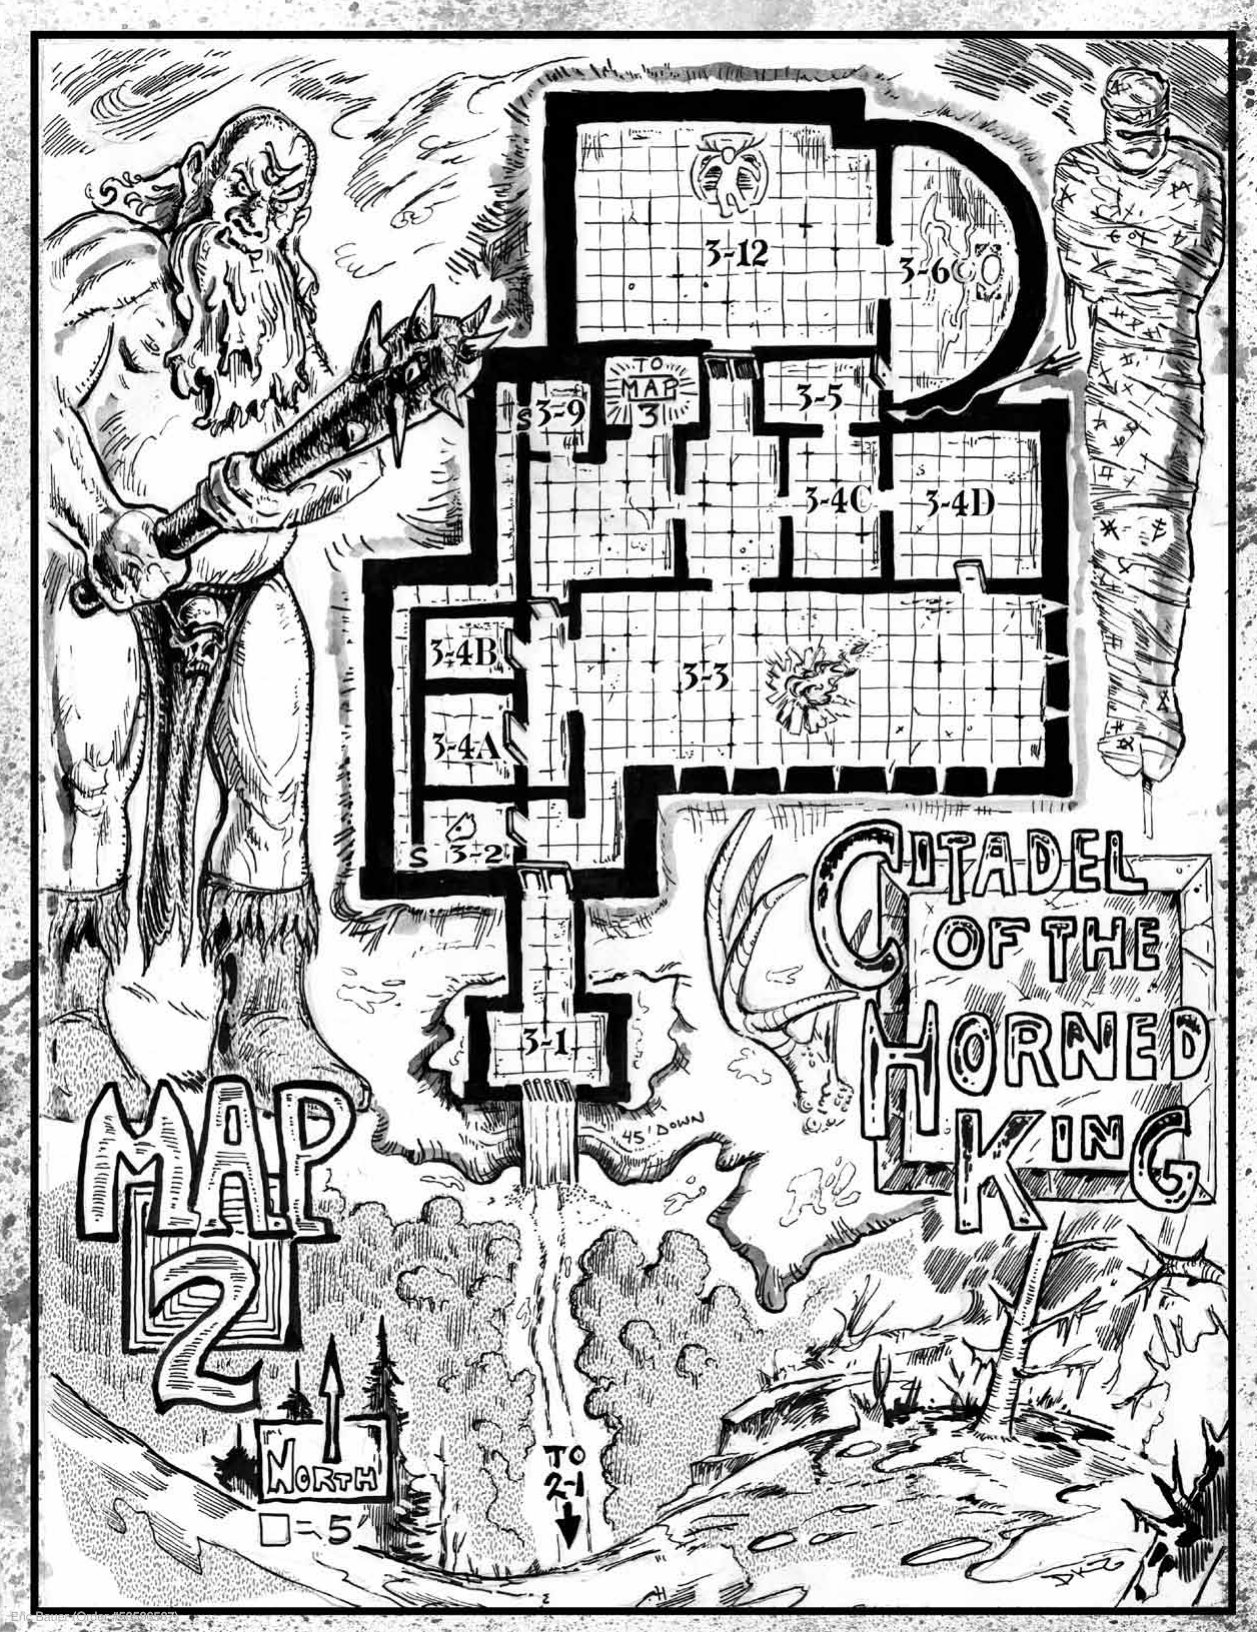
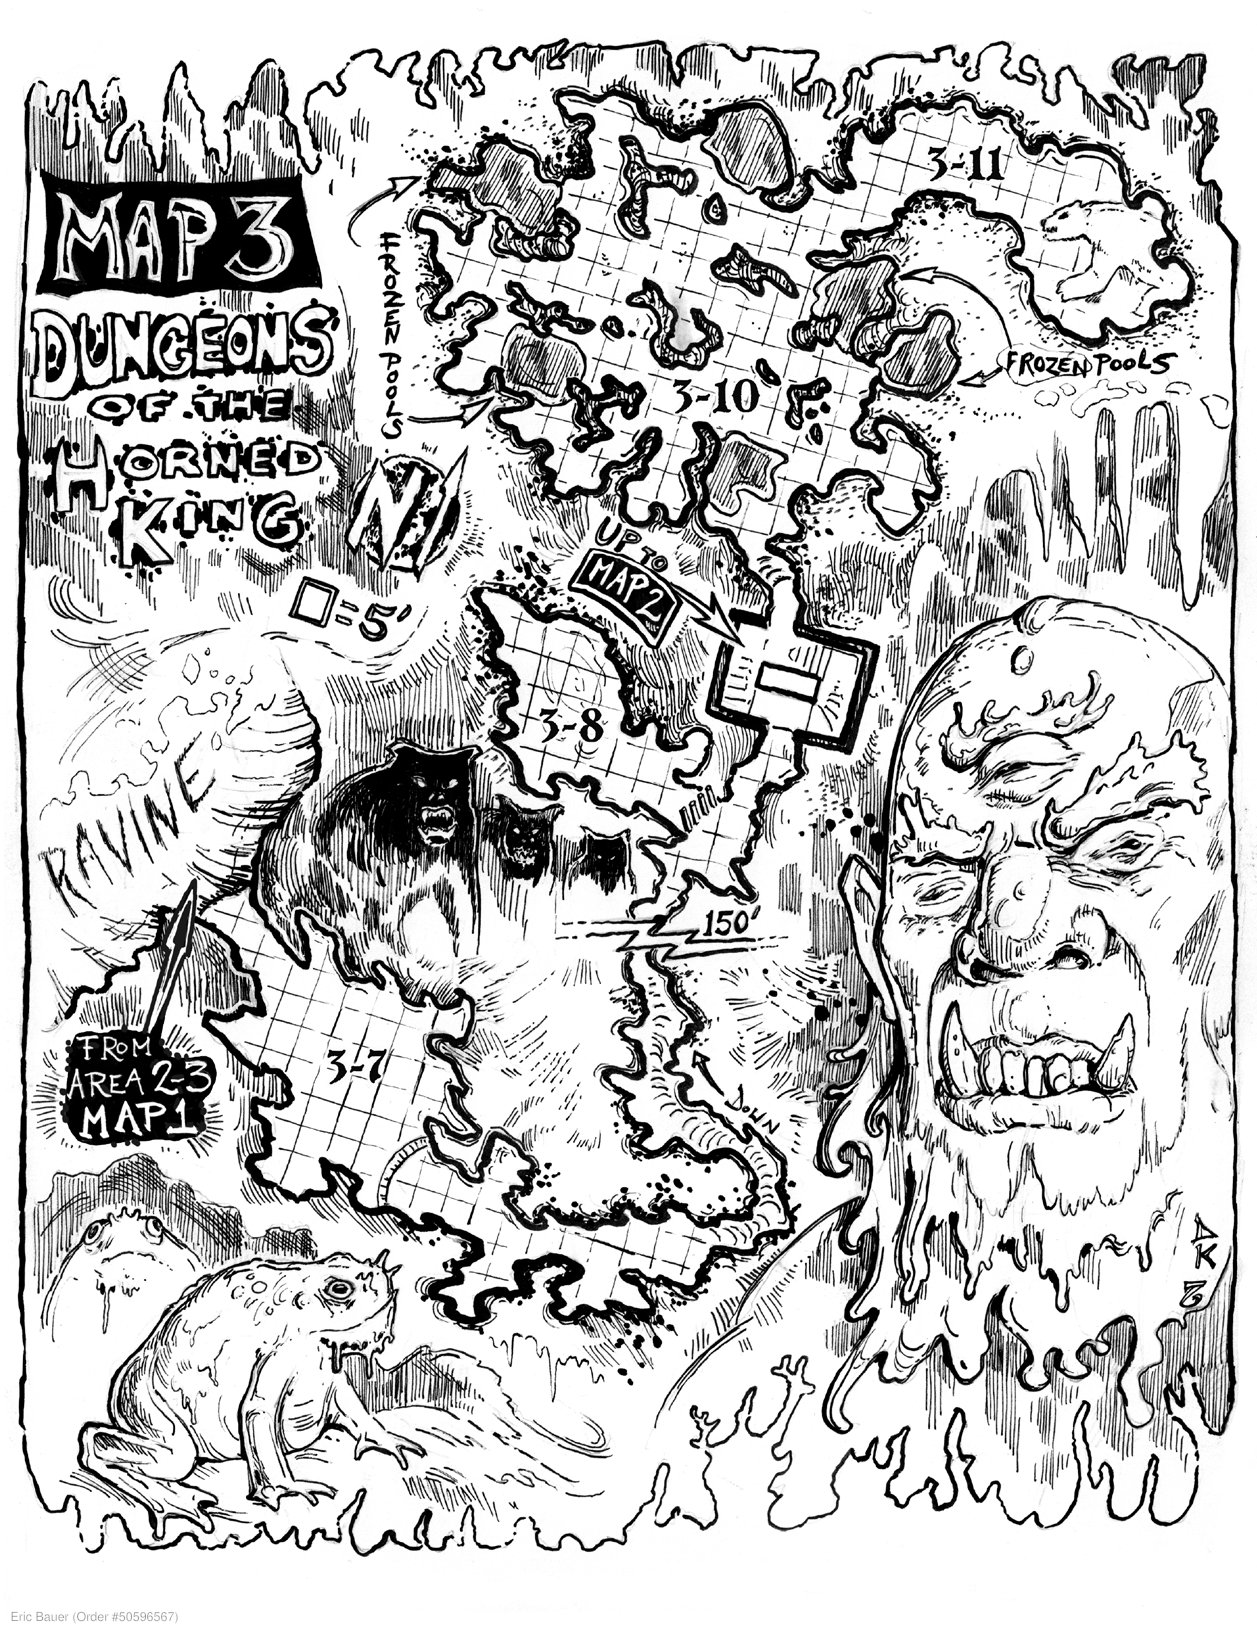
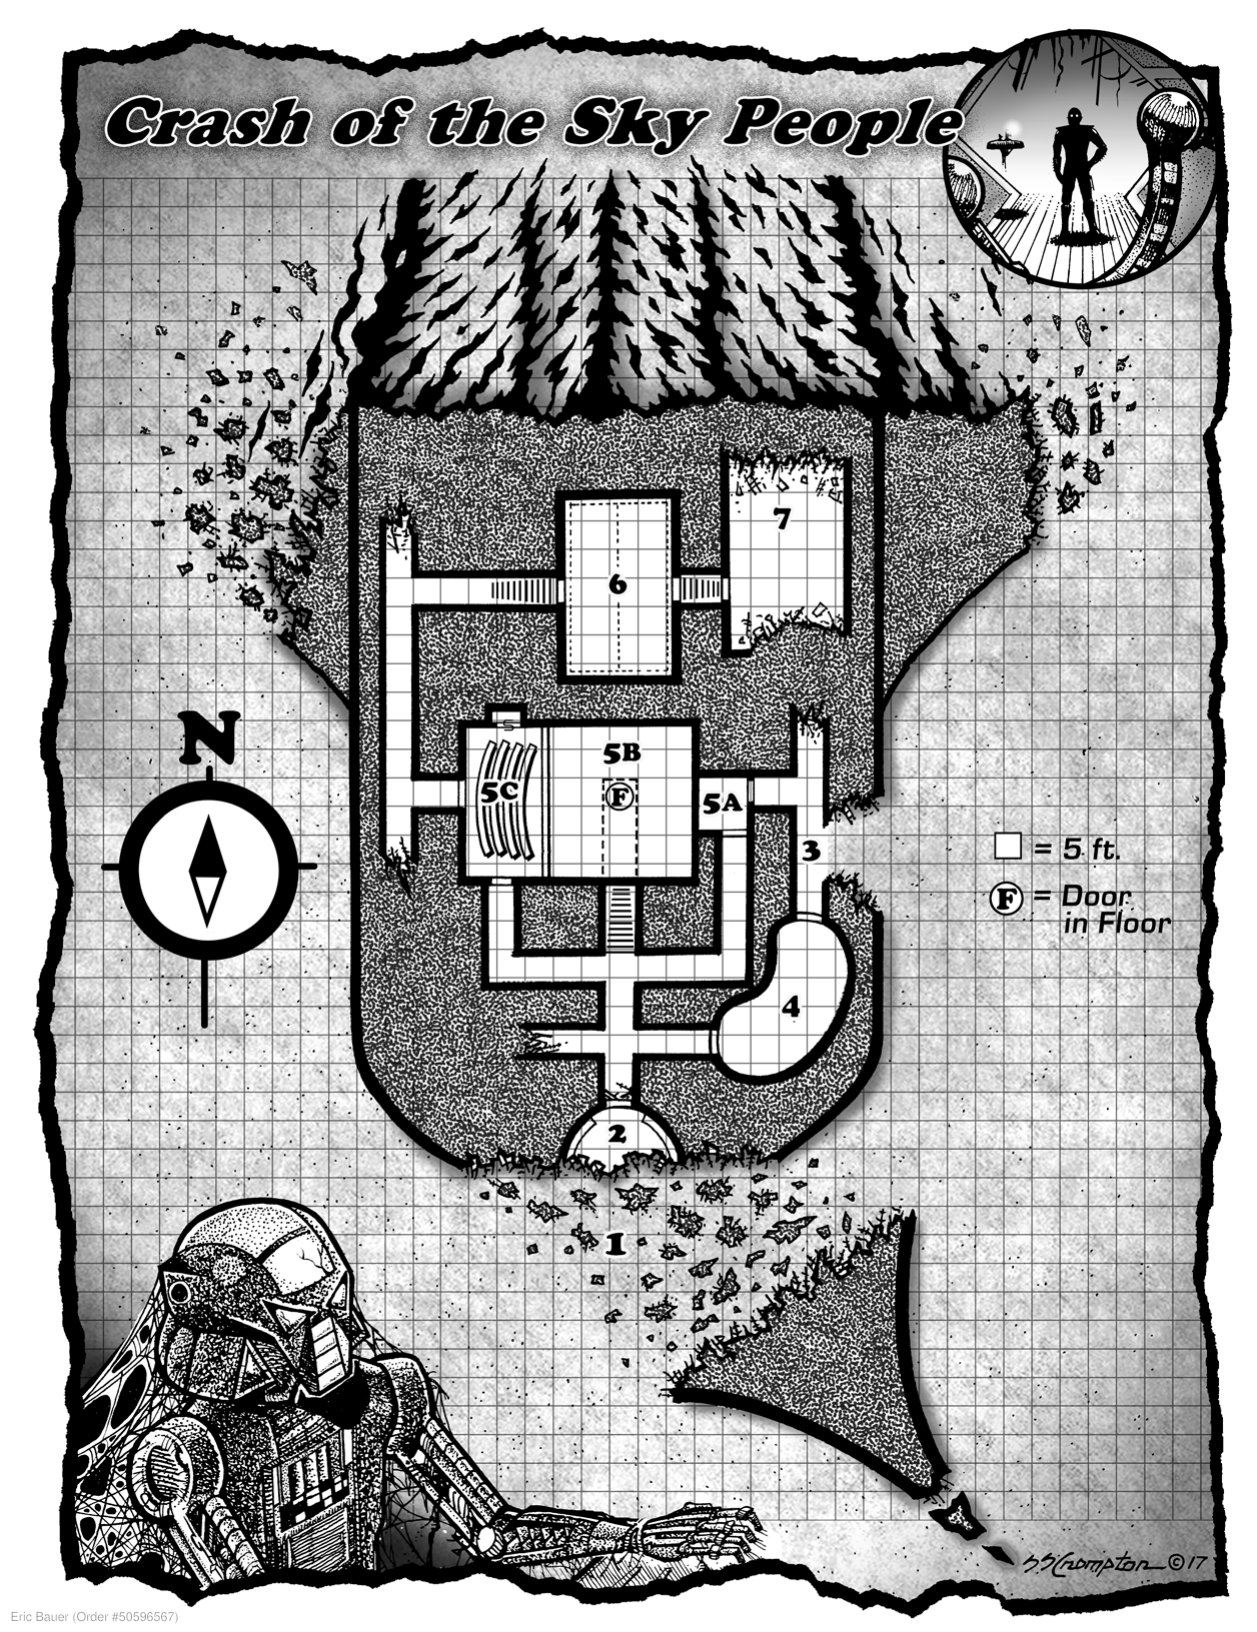

Bestiary (32)
Rooms (29)
Area 1-1 Entrance p.5
Area 1-1 – Entrance
The short, narrow cave has been worn slick by the pounding surf. Every thunderous crash sends another wash of ice-cold water rushing in, threatening to pull you and your companions further into darkness!
At the start of each round the lead PC must succeed on a DC 10 Luck check or be swept away by the waves, sucked into area 1-2. On a failed check, the second PC must also succeed on a like check or also be swept away. If the second PC is lost, the third must attempt a check, and so on, until one PC holds his place.
Area 1-2 The Grotto p.5
Area 1-2 – The Grotto
The small grotto is dominated by a pool of salt water periodically fed by rolling waves. Simple steps, carved into the flowstone, climb to a passage set in the wall barred with a rusted iron gate.
Strange implements litter the shore—manacles, shackles, skull vices, spiked chairs, thumbscrews, pokers, and brands—all succumbing to rust. Just beneath the surface of the pool you can make out a pair of sunken iron maidens.
This grotto was used to interrogate and execute servants of the Horned King. The implements were used for torture and are ruined by rust.
A large lockbox stands hidden behind a sheet of stone drapery. Both the simple lock and the lid of the box are frozen with rust and must be broken open. Inside the lockbox are seven candles wrapped in oilskin, flint and steel, a moldy journal once used for recording confessions, and three ceremonial daggers. The lockbox can be found with a DC 13 Luck check, or a simple search by characters with infravision.
The iron maidens are similarly frozen with rust and must be broken open. Each contains the skeletal remains of a drowned witch. Opening the maidens causes the skeletons to move with the washing waves, but they pose no threat to the PCs.
The first skeleton wears a torc of gold wire twisted in the shape of a dragon. The torc grants a magical bonus to AC to anyone fighting with a two-handed weapon. The second witch swallowed a copper ring prior to her death, and it rolls around on the base of the maiden. Wrought in the shape of a serpent, the copper ring grants a bonus to arcane spell checks by a caster who has taken the Horned King as his patron.
Like the maidens and the lockbox, the iron gate barring passage from the grotto is rusted shut. The gate is also barred on the far side, and requires a DC 16 Strength check to break open.
PCs electing to break down the gate may notice a large silver rat watching from the far side of the gate. A familiar of the leader of the coven, the rat scampers back to area 1-6 to warn its mistress of the PCs’ arrival.
Cautious and stealthy PCs will notice the sound of keening chants from above and a flickering crimson light reflected from area 1-3.
Area 1-3 Well of the Forsaken p.6
Area 1-3 – Well of the Forsaken
The area description assumes the PCs enter from the sea caves. Judges should adjust the description accordingly if the party approaches from the chapel.
The darkened pit is some 30 feet deep and wide. The walls of the pit are carved from stone, but the floor is concealed beneath a carpet of bleached bones, rusted armor, and ruined weapons. Wooden stairs once descended into the pit, but now all that remains are a jumble of rotten planks.
From above there comes a wild keening like a horde of banshees, and a hellish light that dances and flickers to the feverish tempo of loathsome drums.
Ascending via the rotted planks is easily attempted; however, the planks give way beneath unlucky PCs (Luck check, DC 5), pitching the unfortunate souls into the piled bones below for damage.
The bones belong to the bodies of monks and soldiers forced into the well and slaughtered by a horde of northern warriors led by witch-queens. Nearly all the arms and armor are ruined from rust, but a thorough search through the macabre collection reveals a long spear and shield.
Though seemingly untouched by rust, both the spear and shield are stained a dark crimson, as if perpetually drenched with blood. See New Magic (page 21) for details on both the Spear of Hrotti and the Shield of Saint Aethlstan
Area 1-4 The Fallen Chapel p.6
Area 1-4 – The Fallen Chapel
The ruins of the chapel sit atop a low hill at the heart of the spiraling storm clouds. Glistening with rain, the ruins are lit by flashing lightning from without and a hellish red glow from within. As you draw near, the tempo of the thunder reaches a deafening crescendo, then abruptly ceases, leaving only the sound of falling rain, faint chanting, and grim drumming from within the ruins.
Area 1-5 The Gathered Host p.7
Area 1-5 – The Gathered Host
A dozen or so strange animals are gathered atop the fallen stones of the ruined foyer: a large black goat, a cat, an enormous boar, a raven, a trio of toads, a large snake, a wide-eyed owl, and more. All watch you intently, their gazes never wavering.
Beyond the strange collections of animals, you can hear drums and chanting and see a glow coming from the sunken inner ruins.
The animals are all familiars of the witches within the chapel. Intelligent, they do not seek to engage the party, but rather part before them, allowing the PCs to pass. If attacked, the familiars retreat into the ruins (area 1-6).
While all the familiars fight to the death for the mistresses, most can only distract PCs. Statistics are only provided for those that offer a threat. Slaying familiars inflicts havoc on the witches in area 1-6. For every familiar slain, reduce one witch’s hp to 5, and remove the witch’s ability to cast 2ndlevel spells.
Goat: Init ; Atk gore melee (); AC 12; HD ; hp 4; MV 30’; Act ; SP immune to mind-affecting magic; SV Fort , Ref , Will ; AL N.
Boar: Init ; Atk gore melee (); AC 14; HD ; hp 10; MV 30’; Act ; SP immune to mind-affecting magic; SV Fort , Ref , Will ; AL N.
Owl: Init ; Atk talons melee (); AC 15; HD ; hp 3; MV fly 45’; Act ; SP immune to mind-affecting magic; SV Fort , Ref , Will ; AL N.
Snake: Init ; Atk bite melee ( + poison); AC 9; HD ; hp 2; MV 15’; Act ; SA poison (DC 15 Fort save or + dmg), immune to mind-affecting magic; SV Fort , Ref , Will ; AL N.
Vulture: Init ; Atk talons melee (); AC 14; HD ; hp 5; MV fly 40’; Act ; SP immune to mind-affecting magic; SV Fort , Ref , Will ; AL N.
Area 1-6 Witches’ Sabbat p.7
Area 1-6 – Witches’ Sabbat
The ruins are lit by hundreds of black candles set about the nave. The candles hiss and spit through the falling rain, casting a hellish crimson glow over the unholy proceeding.
At the heart of the nave, past an ominous pit, a seething cauldron rests upon a roaring fire. Twelve robed figures chant and croon in obscene worship while the thirteenth—a gaunt crone with sharpened teeth and burning eyes—raises her withered hands in exultation.
Behind the cauldron, three figures hang from thick beams: the captain of the ship and two sailors, struggling against their bonds.
The crone’s gaze falls upon you and your companions. With a skeletal finger, the hag beckons you closer.
Having successfully “summoned” the PCs, Baba Iaga is eager to bid them on her mission. Cackling with delight, the witch explains that she and her coven summoned the storm that brought the PCs to their shore, to serve her will.
(Note that if the party lost PCs or beloved henchmen to the wreck, the judge can substitute them in place of the captain and sailors.)
If the PCs listen to the witch’s entreaty, read on. Otherwise see To Arms!, below.
The ancient hag stokes the cauldron’s flames. The roiling steam takes the shape of a high, mountain citadel, surrounded by dark, wooded hills. A horned warrior, flanked by a dozen hounds, gives chase to a giant through the somber forest.
“The Horned King is our master and lord of the Wild Hunt. But now he lazes atop his throne of bones, thrall to the ice giant’s daughter. The black hounds bay in hunger, and once-bloodied trophies gather dust within the great hall. The king must be deposed; a new king must sit atop the chalky throne!”
The crone dips a chalice into the cauldron, scooping up a black, acrid brew.
“Get thee to the Thrice-Tenth Kingdom. Tear the crown from the brow of the Horned King and return through the Black Gate. Do this thing, and the Witches of Asur shall reward you mightily!”
The hag drags her crooked hand through the steam, dispelling the phantasmal image. “Drink! Drink and awaken in the ThriceTenth Kingdom!”
The witch’s chief threat remains unspoken. If the PCs do refuse the mission, the lives of the captain and his sailors are forfeit.
PCs drinking from the chalice are immediately overcome by darkness. They awaken in the Thrice-Tenth Kingdom, beginning in area 2-1.
To Arms! Should the PCs elect not to parlay, it is of little matter to the hag. Her sisters and their familiars all leap to Iaga’s defense, casting spells and fighting to the best of their abilities. Delighting in the bloodshed, Baba Iaga upends the cauldron, spilling the brew of oily ichors, boiled skulls, eyeballs, and tongues into the fire. A gout of searing steam fills the nave, obscuring all sight. When the steam clears, the PCs find themselves transported to the ThriceTenth Kingdom (area 2-1). The last thing the PCs hear is Baba Iaga crying out: “Bring me the Crown of the Horned King! Seize the crown and return in triumph!”
Baba Iaga: Init ; Atk spells or dagger melee (); AC 15; HD ; hp 23; MV 30’; Act ; SP spellcasting (spell check , spells known: (level 1) cantrip, charm person, invoke patron/patron bond (Horned King), slaying strike (see page 20), sleep, (level 2) scare, scorching ray, (level 3) fly; SV Fort , Ref , Will ; AL C.
The Twelve: Init ; Atk spells or dagger melee (); AC 13; HD ; hp 9 each; MV 30’; Act ; SP spellcasting (spell check , spells known: (level 1) cantrip, invoke patron/patron bond (Horned King), slaying strike (see page 20), (level 2) detect invisible, scorching ray; SV Fort , Ref , Will ; AL C.
The Thrice-Tenth Kingdom
Far-flung, across many worlds, the Thrice-Tenth Kingdom is a forbidding realm locked in the frigid grasp of eternal winter. The Horned King has surrendered his authority to the ice giant thane, and the clan of brutal giants reigns in what was once the king’s ancient fastness.
Neither judge nor players should mistake encounters with the ice giants to be “balanced.” With luck and teamwork, the PCs might triumph over one, two, or even three giants, but attempting to cut a red line of death through the clanhold is sure to result in the demise of heroes and hirelings alike. It is up to the players to judge the risk and reward of each encounter, for second chances are hard to come by.
The Thrice-Tenth Kingdom works weird changes on spells. Spells with a fire or heat descriptor (including mercurial magic) suffer a spell check penalty. Conversely, those with an ice or cold component receive a spell check bonus.
Finally, the powers of the Thrice-Tenth are jealous of their wards; foreign gods have no place here. While clerics will be able to regain spells, attempts to directly invoke patrons, gods, or other powers will fail.
Random Encounters
The ice-laden woodlands of the Thrice-Tenth Kingdom are perilous to wandering adventurers. The PCs are easily tracked, and the deep snow makes flight difficult or impossible. For every hour spent in the woods, roll . On a roll of 10 or greater, the PCs suffer a random encounter.
Woodland Encounter
1 Wolves (6): Init ; Atk bite melee (); AC 15; HD ; hp 13 each; MV 30’; Act ; SV Fort , Ref , Will ; AL N.
2 Giant Hunting Party (3): Init ; Atk spear melee () or missile fire (, range 40’); AC 15; HD ; hp 28 each; MV 40’; Act ; SP immune to cold; SV Fort , Ref , Will ; AL C.
3 Great Stag: Init ; Atk gore melee (); AC 14; HD ; hp 18; MV 40’; Act ; SV Fort , Ref , Will ; AL N.
4 - 5 Blizzard: A storm rolls over the woods, dumping feet of snow in a few hours. Sight is reduced to a mere 5 feet during the whiteout and attempts to navigate the storm require a DC 15 Intelligence check. Failure indicates the PCs have lost all bearings. PCs caught outside during the blizzard take points of damage every hour, and must make a DC 13 Fortitude save or succumb to hypothermia. These threats can be countered with quick action (finding shelter, starting a fire, etc.).
Areas of the Map
Area 2-1 The Black Gate p.8
Area 2-1 – The Black Gate
The darkness clears to reveal a world transformed.
You and your companions stand in a wooded clearing. Snow falls silently from a gray sky and hangs heavy on the boughs of dark trees. The air has a preternatural chill, stinging your lungs with every breath.
A pair of tall stones, capped by a third, stands in the center of the clearing, scorched as if by fire. On the far side of the clearing, a narrow trail cuts through the dark, sullen wood.
An ancient raven caws from atop the black stone gate, breaking the icy stillness, before taking to the air on its ragged wings.
The standing stones are the notorious Black Gate—a portal between worlds. Stepping between the stones transports the PCs back to their home plane, just inside the ruined chapel (area 1-6).
The snowy road is tracked with prints of hobnail boots. Each print is over 2 feet in length and nearly 7 inches wide. Hunters, woodsmen, and their ilk readily estimate that the tracks were left by giants over 16 feet tall.
Area 2-2 Mendax the Mad p.8
Area 2-2 – Mendax the Mad
You hear the raspy calls of ravens further up the road. As you draw nearer, you see dozens of the black-feathered carrion eaters clustered over a bloody corpse in the road. They turn their dark eyes on you, beaks bloodied and grisly.
If the PCs approach the corpse, the ravens take to wing to lurk among nearby trees. The corpse belongs to an enormous black bear, its missing head brutally severed from the shoulders. Steam rises off the freshly killed corpse, even as droplets of blood freeze in the snow.
The massive bear was felled by terrible wounds, and a broken spear is still wedged in its chest. The broad-headed spearhead and shaft are giant-sized, nearly twice as large as a normal spear.
A small, dark-haired dwarf watches the PCs from a nearby tree, emerging from hiding only as the PCs begin to examine the corpse. Mendax the Mad once served as jester in the court of the Horned King but fled before the onslaught of giants. He seeks to win back his place at court but cares not whether he serves the ice giants or the Horned King.
After months hiding out in the woods, Mendax presents a strange sight: his once-colorful clothes are now stained black with soot, his beard is tangled and knotted with twigs, and his hands are blackened with charcoal and frostbite. His desperate, haunted eyes haven’t changed: the craven, nasty thing will eagerly backstab any friend if it might earn him the esteem of his master.
Mendax hails the PCs from safety. If not met with violence, he cautiously climbs down from the tree, moving like a beaten whelp waiting for the next blow.
The cagey dwarf baits his hook carefully, at first only begging the PCs to share a bit of bear meat. Mendax confirms that giants killed the bear, taking its head as a trophy. Then the dwarf volunteers his story, claiming to wish nothing but a slow death to the ice giants. He knows of a “secret” entrance to the Horned King’s citadel but warns the PCs of the mighty ice giant clan. If pressed, Mendax grudgingly agrees to take the PCs to the citadel and show them the hidden ice tunnels (area 2-3) but only if they will protect him from the fearsome ice giants.
Mendax’s true aim is subtler. He intends to play the PCs as his pawns, betraying them the moment they encounter giants. If the giants win, Mendax will have proved his worth and earned a place in their court. If the PCs carry the day, the Horned King will rise again and Mendax will return to his place at the right hand of the king.
If attacked, Mendax flees to the best of his ability, circling towards the citadel in the hopes of alerting the giants and winning their gratitude.
Treasure: If the PCs kill Mendax, they find little of worth on his corpse. The dwarf’s prize possession is a jeweled short sword and seven black-gold rings presented to him by the Horned King and worn in his beard. The sword is worth 130 gp for the large ruby set in its pommel; each ring bears the rune of the Horned King and is worth 10 gp.
Mendax the Mad: Init ; Atk short sword melee (); AC 13; HD ; hp 22; MV 20’; Act ; SV Fort , Ref , Will ; AL N.
Area 2-3 The Ravine p.9
Area 2-3 – The Ravine
The snow-bound ledge ends atop a high ridge. Past the snow-laden windblown lip is a steep ravine. To your left, the ridge rises to form a rugged peak, capped with an enormous snowy cornice.
If the PCs are traveling with Mendax, he leads them down into the ravine, confident in his memory of the ice caves. If the PCs are traveling without the aid of the dwarf, locating the caves requires expert tracking and some small bit of luck. Huntsmen, elves, bounty hunters, and other expert trackers note faint indications of the caves on a DC 15 Intelligence check.
Snow has drifted over the ravine; PCs entering the ice caves are forced to tunnel through the snow. Unknown to Mendax, the ravine lies directly in the path of a potential avalanche. Disturbing the snow risks triggering a snow slide of epic proportions.
Roll , modified by Luck, for every character pushing through to the ice cave. On a roll of 1-5, the character triggers an avalanche. The PCs hear a low rumble building to a deafening roar. One round later, thousands of tons of snow funnels down the ravine, sweeping along boulders, trees and any characters unfortunate enough to be caught in the ravine.
PCs have two choices: leap clear of the ravine (Agility, DC 10) or into the ice caves (Agility, DC 15). Failing either check leaves the PC to be swept away by the wall of crashing snow.
PCs caught in the avalanche must attempt three DC 12 Fortitude saves. For every failed save the PC takes damage. Those that survive the avalanche are swept some 200 yards down the slope, where they can be pulled from packed snow; all others are never seen again.
The avalanche scours the snow from the ravine, revealing the narrow slit into the ice caves (area 3-7).
Citadel of the Horned King
Read or paraphrase the following as the PCs draw near the fortress of the Horned King:
The ice-ridden citadel stands atop a rugged ridge, cloaked by dark pines and laden with snow. Constructed of grim black stones and roofed with slate, the squat fortress seems born of the lonesome peaks, somber woods, and flat, gray sky.
As the PCs draw closer to the fastness, the absence of wildlife quickly becomes apparent. The snow is unmarked by animal tracks, and the air is silent and still. The sole evidence of life are the giant tracks leading in and out of the citadel, and a single crow, perched high atop a roof beam. The crow watches the PCs’ advance with a cocked head, caws twice, then flaps off into the woods.
Nearly all the rooms of the first floor are vaulted, rising to two stories in height. These pose no great difficulty to the giants, save having to duck beneath the tall, 10-foot doors. The exceptions are the secret doors and passageways; all are sized for tall humans. Giants forcing their way through the narrow corridors are reduced to one-third speed and suffer a penalty to AC and attacks.
Giants of the ThriceTenth Kingdom
The fell giants that inhabit the Thrice-Tenth Kingdom are grim beasts. They seem born of the nightmares of northern skalds and the dour, silent forests the giants call home. Towering like great, snowbound pines, the giants reign from dark, crude citadels and high alpine ice caves. They gird themselves in frozen hides, battered shields, and bits of chain and plate looted from the corpses of their foes. They prefer to use ranged weapons to soften their foes before closing for violent—and inevitably brief—melee combat.
Contrary to many of their kin, ice giants’ cunning matches their brutish nature. Though seldom truly intelligent, the giants are crafty, deadly opponents in battle, coordinating tactics with other giants and utilizing terrain to their best advantage.
Unique among giant-kin, ice giants have a third eye set squarely in their foreheads. Sages recount an apocryphal tale in which the first of the ice giant thanes stole an eye from a weaker brother, simultaneously creating the races of both ice giants and cyclops. The veracity of the tale will likely never be known, but it is true that both ice giants and cyclops regard one another with undying enmity, flying into a violent rage whenever the other is encountered.
Random Encounters
Encounters within the fortress of the Horned King are frequent. For every 10 minutes spent within the fastness, roll ; encounters occur on a roll of 10 or better. Battles lasting longer than 3 rounds risk drawing the notice of giants in adjacent chambers.
Note that no random encounters take place while the PCs are hidden within the secret corridors or in the dungeons beneath the citadel.
Fortress Encounter
1 Giantling: Init ; Atk spiked club melee (); AC 14; HD ; hp 18; MV 30’; Act ; SP immune to cold; SV Fort , Ref , Will ; AL C.
2 Giant Acolyte: Init ; Atk spells or mace melee (); AC 15; HD ; hp 20; MV 40’; Act ; SP spellcasting (spell check , first and second level cleric spells), immune to cold; SV Fort , Ref , Will ; AL C.
3 Giant Sentry: Init ; Atk morningstar melee () or spear ranged (); AC 15; HD ; hp 28; MV 40’; Act ; SP immune to cold, crit on 22+; SV Fort , Ref , Will ; AL C.
Finally, many of the citadel’s chambers remain unoccupied by the giants. If the PCs take sufficient pains to disguise their tracks, they can shelter in these chambers, hidden from the eyes of the ice giants. Well-hidden PCs roll for random encounters once every 6 hours.
Areas of the Map
Area 3-1 Gate House p.11
Area 3-1 – Gate House
The snowy trail rises to the base of the grim, ice-ridden citadel. A dark stone gatehouse stands apart from the citadel, connected by a bridge of stone. A drawbridge, white with frost, extends from the gatehouse to the trail.
Cruel guffaws of laughter and loud taunts erupt from inside the gatehouse.
If the PCs speak Giant, it is easy to discern the voices of two young ice giants within the gatehouse, teasing a third for his cowardice. Though the two larger giants are distracted, the third will immediately notice if the PCs try to cross the drawbridge.
Once aware of the PCs, the two larger giants force the third out onto the drawbridge and then drop the portcullis, daring the PCs (in Common tongue) to face their mightiest “champion.” The pair leaves their companion to fight on his own, laughing all the while.
The drawbridge is slick with frost, and it is a 45-foot fall to the base of the snowy ravine. The victim of any melee blow that inflicts 6 hp or more damage, must succeed on a DC 10 Reflex save or slip and fall from the drawbridge. PCs are permitted a second, DC 13 Reflex save to catch the lip of the bridge before falling to their doom. Due to their mass, giants do not need to attempt the check.
The defeat of the lone giant immediately sobers the pranksters. One takes three rounds to pull up the drawbridge, while the other stabs at any PCs caught between the drawbridge and portcullis. PCs leaping from the drawbridge onto the roof of the gatehouse can slide down the slick shingles, landing on the far side. Once the drawbridge is raised, the giants hammer on an enormous drum, alerting the citadel of attack, before retreating across the causeway to area 3-3.
Inside the gatehouse are 13 giant-sized javelins (treat as spears) and 3 broad-headed spears (treat as lances). A large sack hangs in one corner. Within are three legs of mutton, half a round of moldy cheese, and a large bottle of potent wine.
The largest of the giants wears a jeweled hoop in his septum. Removing the hoop is grisly work; the hoop is worth 150 gp.
Giantling Guards (3): Init ; Atk spear () or thrown spear missile fire (, range 30’); AC 10; HD ; hp 34, 28, 24; MV 40’; Act ; SP immune to cold, crit on 22+; SV Fort , Ref , Will ; AL C.
Area 3-2 Refuse Chamber p.12
Area 3-2 – Refuse Chamber
This chamber is filled to overflowing with offal, bones, hides, and skins. The air stinks of rot and disease.
The door to this chamber must be forced open, requiring a successful DC 20 Strength check. (Multiple attempts are appropriate and up to two PCs can aid an ally.)
The lazy giants use the chamber for all their waste. The result is a disgusting mix of bones, rotten meat, excrement, and dead bodies in piles rising nearly 4 feet from the floor.
The pile of waste is riddled with plague rats. Opening the door sends the rats fleeing to their nests beneath the pile, but disturbing the pile causes the rats to swarm.
A veritable tide of mottled black fur erupts from within the mound, covering the invading PC in a matter of moments. Every round, make a single attack roll against any PC within the chamber—for every point equal to or above the PC’s AC, the rats inflict damage. Further, each round the PC must make a DC 15 Strength check or be borne down to the ground by the weight of dozens of rats. Every PC suffering damage from a plague rat must make a DC 15 Fortitude save at the end of the encounter or contract a disease at the judge’s pleasure.
At the rear of the chamber is a secret door, concealed from view by the mounds of waste (DC 12 to locate). Adventurers entering the chamber and ascending the mound readily see the door, but opening it requires digging a clearing out of the waste or smashing down the door.
Plague Rats (100+): Init ; Atk bite (see above); AC 10; HD ; hp 2 each; MV 25’; Act ; SV Fort , Ref , Will ; AL N.
Area 3-3 Mead Hall p.12
Area 3-3 – Mead Hall
The stone arches open to a large mead hall. The high ceilings are supported by thick, wooden pillars, and battered trophies still hang on the walls, but the once proud hall is in chaotic disarray.
The great tables have been up-ended, benches smashed like kindling, and the center of the hall has been converted into an enormous fire pit.
Three enormous giants lie about the fire pit, snoring loudly, still clutching oversized casks of wine.
If the giants have raised the alarm, allies from 3-4b and 3-4d will have coordinated an ambush (see below). If the giants haven’t been alerted, the scene is as described, with three giants sleeping off the night’s revels. A thief, dwarf, or warrior striking a sleeping giant automatically scores a critical hit. However, if the crit fails to kill the giant, it jumps up with a roar and a shout, awakening its fellows.
Ambush: If the giants are alerted to the PCs, the encounter is radically altered. The three giants are only feigning sleep. They wait for the PCs to come within reach, then seize the adventurers on a successful to hit roll and hurl them into the fire pit. PCs cast into the flames take damage and are set aflame, taking an additional damage per round until the flames are extinguished.
At the sound of combat, two giants (from area 3-4d) enter through the northeast doors, and two giants (from area 3-4b) enter from the west arches.
In the heat of the battle, the giants offer the PCs one chance at surrender, eager to offer more sacrifices up to the White Worm.
“Sleeping” Giants (3): Init ; Atk morningstar melee (); AC 10; HD ; hp 35, 34, 31; MV 40’; Act ; SP immune to cold, crit on 22+; SV Fort , Ref , Will ; AL C.
Area 3-4a, b, c & d – Giants’ Quarters: The filthy chamber is in disarray, with dirty furs scattered about the hard stone floor. A simple stool and a few odd sacks are tossed in the corner. The entire place stinks of rotting meat and sweat, and you can see vermin squirming in the matted furs.
Area 3-4a through Area 3-4d are nearly identical; the judge is encouraged to add nuances distinguishing one from the next. Each houses two to four giants, many of which appear elsewhere in the adventure. Distinctions between both occupants and their belongings are listed below.
• Area 3-4a: Three giants, the gatehouse guards, reside here. The young giantlings have no treasure.
• Area 3-4b: Two giants, brothers, are found here, unless answering the call to defend area 3-3. They have amassed a collection of weapons, which stand in the corners of the chamber. PCs can find nearly any weapon, but most are of poor to average quality. The sole exceptions are three simple axes, with silver-gray heads and polished oaken handles: three of the fabled Throwing Axes of Narn (see page 21).
• Area 3-4c: Three giants reside here. Incorrigible drinkers and gamblers, they are “asleep” in area 3-3. Three bottles of potent wine hang in a rawhide sack beside the door. A set of bone dice rests atop the stool, beside the current pot: 7 uncut gems ranging in value from 100 to 600 gp.
• Area 3-4d: Four giants reside in these cramped quarters. Two are found here (unless answering the call to area 3-3), while the two others are found in area 3-5, preparing offerings for the White Worm.
Giants (4): Init ; Atk morningstar melee () or spear missile fire (, range 40’); AC 15; HD ; hp 37, 35, 32, 30; MV 40’; Act ; SP immune to cold, crit on 22+; SV Fort , Ref , Will ; AL C.
Area 3-5 Frozen Offerings p.13
Area 3-5 – Frozen Offerings
Beyond the towering portal you spy a strange workshop. The chamber is dominated by several man-sized bodies placed atop a makeshift table of planks. All the bodies are wrapped in cloth that has been inscribed with blue runes. Two giants look up from their work, pausing as they complete wrapping the final body.
You hear a pained gasp from the table and realize to your horror the mummies are still alive!
The giants are in the process of mummifying living captives, before presenting them as offerings to the White Worm (in area 3-6). The giants fight to escape the PCs, hoping to alert the rest of the fortress.
The seven captives are a mix of races, all former servants of the Horned King. The judge can use this opportunity to substitute in a new PC or to provide additional hirelings. Freed from their bonds, the captives willingly join the PCs against the giants in a desperate bid to free their master. As NPCs, each captive has a mere hp.
An inspection of the chamber reveals several rolls of white cotton, inscribed with runes exalting a creature/god re-
ferred to as the “White Worm.” A large jar adjacent to the worktable contains several pounds of azure pigment. Mixed with wine or water, the pigment grants a spell check bonus to spells involving runes or sigils. The jar contains sufficient pigment for 5 applications.
Giant Acolytes (2): Init ; Atk spells or mace melee (); AC 13; HD ; hp 29, 27; MV 40’; Act ; SP spellcasting (spell check , first and second level cleric spells), immune to cold; SV Fort , Ref , Will ; AL C.
Area 3-6 Shrine of the White Worm p.13
Area 3-6 – Shrine of the White Worm
The chamber is lit by luminescent mists that swirl and ebb with every breath. The mists glow oily purple and sickly yellow and drift towards you with an alien malevolence.
Through the ambient glow you can make out the source of the weird mists: a squat brazier that burns with blue flames. Just behind the brazier is an altar-block carved from ice. Atop the altar an enormous egg rests atop a pale fur.
Set around the altar and brazier are a dozen mummified forms covered in frost.
This shrine represents the giant’s efforts to birth the Hyperborean Wyrm, better known in the chronicles of madness and terror as the White Worm. The life-forces of the living mummies fuel the icy flames that burn the foul incense. The smoke of the incense, in turn, gives rise to the weird, glowing mists, creating the poisonous, otherworldly atmosphere necessary to coerce the egg into hatching.
The mummies are all frozen solid. Removing the icy wraps reveals faces locked in the grasp of terror. Removing all the mummies from the chamber causes the icy blue flames to shrink and die. The mists slowly fade and the white egg cracks, leaking a sickly green yolk.
PCs venturing into the chamber must succeed on a DC 15 Reflex save or come into contact with the foul mists. A failed save causes instant frostbite for damage. Any PC daring to rush at the egg before the mists abate risks his life: ten tendrils of mist take form, striking at the PC from either side. On a successful hit, a tendril grapples the PC, inflicting damage and freezing him in place. A tendril can be escaped with a DC 15 Strength check.
Whether cracked by violence, defeating the mists or removing the frozen mummies, the yolk of the White Worm is an incredibly potent substance. Daubing one’s skin with yolk sears a white pentagram into the skin; additional effects depend on placement:
Forehead: Intelligence, Personality Chest: Strength, Stamina Palm: Agility, Luck
Cautious wizards, thieves, and sages will know that mortal flesh can only safely come into contact with the yolk once (75% chance of knowing this legend). If a second daubing is attempted, the PC must succeed on a DC 20 Fortitude save or instantly die, his blood frozen in his veins. If a PC is daubed a third time, the Fortitude save increases to DC 30.
Mists of the North Wind (10 tendrils): Init ; Atk tendril melee ( plus grapple); AC 15; HD ; hp 9 each; MV 40’; Act ; SP grapple, immune to cold and charm effects; SV Fort , Ref , Will ; AL C.
Area 3-10 The Ice-Mirrored Hall p.14
Area 3-10 – The Ice-Mirrored Hall
The timeworn steps are covered in a slick coat of frost. The air grows colder as you descend, burning your lungs and eyes. Just as it seems the pain could grow no worse, the stairs open into a curious cavern.
The light from your torches and lanterns casts scattered reflections of the party into eternity. All around, sheets of hanging ice reflect and refract your slightest motion in a dizzying whirl of light and shadow.
The bewildering chamber is the result of hundreds of stalactites and stone draperies covered in slick ice. The entire chamber—ceiling, floor, and walls—is layered in ice, creating a maddening cavern of mirrors.
Pools of water litter the chamber and are indistinguishable from the ice-covered floor. The pools are not frozen solid; if weighted with more than 100 pounds, the surface ice breaks, spilling the PCs into the icy waters below. The pools range from 6 to 11 feet in depth (). Escape from a pool is readily accomplished with an ally on the shore; selfrescue can be accomplished with a DC 12 Strength check. Characters suffer a penalty to Stamina and Strength for each round spent in the icy waters. Those reduced to 5 or less Stamina or Strength slip beneath the icy waters and begin to drown. The stat damage is healed at the rate of one point, per stat, per half hour spent near a heat source.
Lokim, an aging ice giant warrior, lurks within the shadowed recesses of the chamber. Blind, the giant suffers a penalty to hit (already figured into his stats) but otherwise suffers none of the chamber’s debilitating visual effects (see below). The giant has memorized the chamber and cannot be lured into the pools.
Judge’s Notes: Without reliable visual references, PCs can find it exceedingly difficult to navigate the chamber’s weird environs. Judges are encouraged to track the heroes’ progress on the map, asking the players to call out left or right at junctures.
Melee combat proves as challenging as navigation. PCs are presented with a bewildering number of potential targets. On a successful melee attack, the attacker must also roll ; a 9 or better indicates he hit his intended target, and on an 8 or less he strikes a reflection.
The icy chamber makes it nearly impossible for PCs to use ranged weapons or spells effectively. As per above, ranged attacks must succeed on a roll of 11 or 12 on to score a hit.
Once a “true” target is located, it may be attacked without penalty. However, if the target moves more than 10 feet from its original location, the guessing game begins again. Lokim is aware of this tactic and stays in constant motion, striving to avoid dead ends where he can be cornered.
Finally, while the confounding maze of mirrors is enjoyable for combat, players need not be subjected to the PCs’ frustration more than once. If there are no threats lurking in the maze, assume that it takes PCs 10+ minutes to navigate the chamber their second time through.
Lokim, the Blind: Init ; Atk broadsword melee () or spear melee (dmg ); AC 15; HD ; hp 47; MV 40’; Act ; SP crit on 22+, immune to cold; SV Fort , Ref , Will ; AL C.
Area 3-7 The Crystal Caves p.14
Area 3-7 – The Crystal Caves
The narrow cave is suffused with a soft blue glow from light reflected off the icy walls, ceiling, and floor. Glittering stalactites and iced-over draperies hang from the ceiling like some chill fairy realm. A brittle silence pervades the caves.
A frozen river runs through the chamber, culminating in a 20-foot frozen waterfall at the head of the cavern. Only expert climbers can ascend the iced-over waterfall unaided (climb, DC 15) but once a rope is affixed, their companions may follow. Less skilled climbers can ascend the waterfall with the aid of pitons or spikes.
A trio of giant ice toads lurk silently atop the waterfall, lying in wait for the first climber. Once their position is given away, the toads leap down onto the remaining PCs.
Driven by hunger, the toads focus on smaller targets (dwarves, elves, or halflings), swallowing their target on a successful attack roll of 17 or better. Once swallowed, a target must make a DC 15 Fortitude save every round or be frozen solid. Finally, a successful bite from an ice-ridden maw numbs the target for 1 round (-1 die to action dice and spell checks, AC).
The toads have no treasure, but a search of the adjoining chambers reveals the mutilated corpse of an ice giant. The corpse is blackened with decay and is missing an arm (which was gnawed off by the toads). If the PCs hack open the giant’s frozen neck pouch, they find 6 polished blue opals worth 150 gp each.
Ice Toads (3): Init ; Atk bite melee ( plus chill); AC 15; HD ; hp 20, 19, 17; MV 35’; Act ; SP swallow on 17+, chill (-1 die to action dice and AC for 1 round); SV Fort , Ref , Will ; AL C.
Area 3-8 Warrens of the Wild Hunt p.14
Area 3-8 – Warrens of the Wild Hunt
Thick bars pitted with rust form a gate over the cave entrance. Within the cave you can see dozens of eyes, glowing like hellfire, and you hear a low, rumbling snarl of pent fury.
The gate is barred but not locked from the outside. Within are the hounds of the Wild Hunt: twenty-three ferocious black hounds, each the size of a lion, with massive jaws and enormous fangs. Intelligent supernatural beings, the hounds live to hunt, and only follow orders made by the wearer of the Horned Crown. Released from their cage, the hounds run down giant and PC alike with feral, snarling abandon.
In battle, the hounds fight as a pack. One or more hounds latch onto a foe with a successful attack roll, reducing the target’s AC by per hound and reducing the target’s speed by per hound, bearing the victim to the ground. The other hounds attack the disabled target with vicious, tearing bites. Escaping the jaws of a hound requires a Strength check of DC 15 + 1 per hound attached.
Any slain hound is reborn in the warrens on the next full moon.
There is no treasure within the warrens, but the largest of the hounds wears an iron collar studded with rubies (worth 230 gp).
Black Hounds (23): Init ; Atk bite melee (); AC 15; HD ; hp 15 each; MV 45’; Act ; SP pack tactics ( AC, ’ for each successful bite attack against same foe; DC 15 + 1 per hound Str to escape); SV Fort , Ref , Will ; AL C.
Area 3-9 Provisions p.14
Area 3-9 – Provisions
The frigid chamber is packed with snow and ice. Stuffed in among the snow are the bodies of several sheep, as well as what appears to be two corpses of very tall elves.
The giants use this ice cave to store their provisions, namely sheep and elves of the Thrice-Tenth Kingdom. All have been brutally clubbed to death.
In their thoughtlessness, the giants have also concealed a hidden door at the rear of the chamber. The giants are utterly ignorant of its existence.
Area 3-11 Gallery of the Wild Hunt p.15
Area 3-11 – Gallery of the Wild Hunt
You and your companions have followed the icy, twisting caverns to their end: a natural gallery, hung with stalactites, flowstone, pillars, stalagmites, and the like. Skulls, pelts, and various hunting trophies are littered haphazardly about the cavern floor.
Asmundr, the ice giant thane, is lurking in the rear of the chamber, along with his “pet” polar bear.
Hearing the battle in area 3-10, the ice giant thane has hurriedly collected the Horned King’s most valuable treasures into a great fur sack, casting the rest aside. The giant silently commands the bear to attack the PCs, and then attempts to break past the PCs in melee. (Note that even if the thane eludes the PCs, he is not immune to the visual effects of area 3-10.)
Treasure: In his great sack, the thane carries 3,000 gp in jewelry, 6 large gems worth 500 gp each, a great silver torc (100 gp), the skull of a white dragon, a baldric threaded with platinum and displaying a warhammer (1,500 gp), a ceremonial broad sword inlaid with rubies and emeralds (750 gp), a lance chased with silver (150 gp), and a recurve bow carved from oak and backed with dragon bone. The bow can only be strung or drawn by PCs with 17+ Strength but grants a +5 damage bonus and has triple normal range.
Scattered about the floor of the chamber are a number of skulls, hides, and pelts. While many have nothing more than sentimental value to the Horned King, thorough PCs discover the hide of an enormous lion and the skin of a black dragon.
Asmundr, the Ice Giant thane: Init ; Atk greatsword melee () or spear missile fire (dmg , range 40’); AC 18; HD ; hp 58; MV 40’; Act ; SP crit on 21+, immune to cold; SV Fort , Ref , Will ; AL C.
Polar Bear: Init ; Atk bite melee (); AC 16; HD ; hp 38; MV 35’; Act ; SP on 17 + maul for additional damage; SV Fort , Ref , Will ; AL N.
Area 3-12 Throne of the Horned King p.15
Area 3-12 – Throne of the Horned King
The massive bronze doors open to reveal a great throne room, obscured by strange mists. A gaunt, haunted figure, adorned in rich furs and horned crown, lazes atop a chalky throne of bone, watching a pale giantess dance, twirl, and spin in the center of the floor.
A giant, white salamander is curled around the giant throne, a long proboscis leeching blood from the Horned King’s pierced wrist. At the sound of your entry, the weird white salamander lifts its head, hissing malevolently at those that would dare to disturb the revels of the Horned King!
Once the uncontested master of the Thrice-Tenth Kingdom, the Horned King is nothing more than a shadow of his former majesty. The hunter-king’s skin is stretched tight across his frail bones, a drinking horn hangs limply in one hand, and his haunted eyes see naught but the dancing giantess. The Horned King is utterly numb to the world, and the giantess and salamander seek to ensure that nothing disturbs his reverie.
The white salamander moves swiftly to the attack, dragging its slithering belly across the cold stone floor to attack the PCs. The salamander joins battle by spewing an icy cone at the PCs—the cone is 30 feet in length and 20 feet wide at its apex. Any PC caught within the cone’s area of effect must succeed on a DC 15 Reflex save or take dmg and be stunned for 1 round. The following round, the salamander closes with any surviving spellcasters, relying on the giantess to handle the balance of the party. The salamander has can use its breath one more time for the rest of the encounter.
The giantess dances before her attackers, weaving a mesmerizing vision of veils, pale blue flesh, and flashing silver bangles. Any PC (of either gender) gazing upon the giantess must succeed on a DC 13 Will save or be transfixed by her otherworldly beauty. Bewitched PCs can take no action save to defend themselves. Each round thereafter the PC can attempt to throw off the enchantment by attempting the Will save.
Should the giantess deign to bestow a kiss upon the PC, the target must succeed on a DC 17 Fortitude save or be transformed into ice. The giantess must succeed on an attack against the target’s AC to hit, unless the target is willing or transfixed by her wicked dance. Pausing to kiss a target permits every other transfixed character the chance to make another Will save to break the trance.
If the foul, vampiric salamander is dealt more than 20 hp damage, it reverts to its true form: Faustfvor the Seething. The giant seer fights the PCs to the best of his ability, but abandons the Horned King if reduced to 20 hp or less. He flees with the lovely giantess in tow, rallying any other sur-
viving giants. Failing this, they retreat into the wilderness, returning to their clanhold.
The Horned King: Once a great warrior of terrifying mien, the Horned King presents no threat to the PCs. With Faustfvor and the giantess gone, the king stirs from his long, dreamless stupor. The gaunt king struggles to rouse himself, leaning on his greatsword to stand.
The Horned King staggers towards the PCs, and the howl of a hundred wolfhounds fills the air. Raising the greatsword high, the king hisses through desiccated lips, “The pack bays. They call for blood! Call forth the hunt!”
A single strike, with intent to inflict harm, is sufficient to slay the master of the Wild Hunt. As the lifeless body falls, the Horned Crown rolls across the floor. A thunderous crack sunders the air, shaking the entire castle, as the crown separates from the Horned King’s brow. Any surviving giants in the citadel hurry to the throne room to investigate the king’s death.
If the PCs elect not to strike the King, he calls for the PCs to kneel. One by one, the Horned King knights kneeling PCs in his service, granting each a permanent bonus of Luck points. As the last of the kneeling PCs is knighted, the surviving giants rush into the chamber, even as the Horned King vanishes from sight.
Treasure: The walls of the throne room are decorated with the heads and pelts of dozens of creatures, ranging from the exotic to the mundane. The six finest pelts are worth x 1,000 gp each but are cumbersome to transport. Additionally, astute wizards and clerics can glean 7,000 gp worth of exotic spell components from the trophies adorning the walls.
Faustfvor (salamander form): Init ; Atk bite melee (); AC 15; HD ; hp 54 (special); MV 40’; Act ; SP changes to giant form (different stat block, below) after taking 20 points of damage, breath weapon 2/day, immune to cold, crit on 20+; SV Fort , Ref , Will ; AL C.
Faustfvor the Seething (giant form): Init ; Atk spells or spiked mace melee (); AC 13; HD ; hp 54; MV 40’; Act ; SP crit on 21+, spellcasting (spell check , all first, second and third level cleric spells), immune to cold; SV Fort , Ref , Will ; AL C
Vefreyja, the Ice Giant’s Daughter: Init ; Atk fist melee (); AC 14; HD ; hp 34; MV 40’; Act ; SP freezing kiss, immune to cold, mesmerizing dance; SV Fort , Ref , Will ; AL C.
Conclusion
PCs fleeing the citadel are quickly overtaken by surviving giants. Escape requires quick thinking and creativity as much as flashing blades. The giants do everything in their power to stop the PCs and recapture the Horned Crown.
Arriving in the clearing (area 2-1) the PCs discover the Black Gate glowing with a weird phosphorescence. Seething violet mists drift about the clearing; the mists part for the PCs but quickly reform to obscure the sight of any pursuers.
Stepping through the gate transports PCs back to their home world. PCs tumble through darkness to emerge inside the chapel (area 1-6). All of the witches and their familiars have left, save for the dread Baba Iaga.
The wicked crone demands the Horned Crown. If the PCs refuse or simply don’t have the crown, she howls with fury, swearing revenge. The hag transforms herself into a raven and flies into the dark night. An illusion lifts, revealing the witches’ hostages to be dead, having drowned in the shipwreck.
If the PCs present Baba Iaga with the crown, she thanks them for their service, and presents each with a gift wrapped in rags, drawn from within the folds of her dark robes. The judge should roll on the following table or select a gift best suited for each PC.
Baba Iaga’s Gifts
1 The gold-plated skull of an arch-wizard. Placed atop a staff, the skull permits wizards or elves to cast spells through the skull, increasing the caster’s action die by one step. Only one spell can be cast through the skull per round.
2 Five arrows tied together with quill pen and ink stone. Inking an arrow with the name of its target grants the archer a bonus to hit, inflicting an automatic critical hit.
3 A heavy bronze torc. When worn by a warrior or dwarf, the torc grants the wearer a DC 15 Fortitude save against any critical hits.
4 The signet ring marking the PC as the ruler of a fiefdom. The location and size of the fief should be decided by the judge.
5 A dagger bearing the PC’s family crest. Wielded by a spellcaster, the dagger grants a bonus to spell checks when coated with the blood of an enemy. After attempting a spell, the blood.
6 A shield emblazoned with the holy symbol sacred to a cleric’s or warrior’s faith. When carried into battle, the shield grants to all saving throws.
7 A simple whetstone capable of producing incredibly sharp blades. Any blade sharpened by the stone inflicts an additional die of damage on its first hit. (A blade’s razor edge is quickly lost, but can be regained with another sharpening.)
8 A treasure map leading to an artifact coveted by the PC. The map calls out, obliquely, threats and dangers.
9 A ring with a cat’s eye jewel. The ring grants the PC “nine lives.” Any time the PC is slain, a life is used up and the PC is discovered (by allies or foes) to be unconscious but alive with hp. After all nine lives are spent, and the PC dies a tenth time, his soul is forever lost to the Cat Lord.
10 A dragon egg.
11 A silken tabard emblazoned with the PC’s coat of arms. Worn openly, the tabard grants the PC a Personality bonus and ensures that up to 50 henchmen or hirelings need never check for morale so long as they are in sight of the PC.
12 A scroll case. Bound within, on the skins of humanoids, are three spells of the judge’s choosing.
Regrettably, even presenting the hag with the Horned Crown does not restore the sailors to life. Having presented the PCs with her gifts, the hag transforms into a raven and wings off into the darkness.
thirsty blade must be renewed with fresh
THE HORNED KING
The Horned King rules from the Thrice-Tenth Kingdom, venturing across the multiverse on his Wild Hunts. A solemn and grim lord, he delights only in the hunt, testing his martial prowess against the deadliest foes. A patron of the old ways, the Horned King bestows his blessing upon heathen witches, barbarian shamans, and warriors that exalt the wild savage hidden within.
Invoke Patron check results:
12-13 Hounds bay on the shrill wind, striking fear into the hearts of the hunted. One target within the caster’s sight must make a DC 12 Will save or succumb to paralyzing terror. If the target fails the save, it cowers in the shadows, too terrified to move. Unintelligent creatures flee for their lives. The effect lasts rounds or until the creature is forced into action (such as by being attacked or threatened).
14-17 The wolfish demeanor of the predator overtakes the caster, infusing his soul with the spirit of the Wild Hunt. The caster can unerringly track creatures (Luck check, DC 5) through the most harrowing of conditions for 24 hours (or until the power is dismissed). Henchmen are unnerved, suffering a morale penalty for the duration of the effect.
18-19 A long, haunting howl fills the air, followed by driving wind. The caster knows the location and most direct route to one living target within 50 miles. (The caster is not inherently aware of perils in the path.) If the caster reaches the target within 24 hours, the target suffers a penalty to AC and saves for the duration of the encounter.
20-23 The Horned King sends six hounds to assist the caster. They appear from a cloud of darksome soot or billowing snow. They remain for rounds, before vanishing back to the Thrice-Tenth Kingdom. Hound: Init ; Atk bite melee (dmg ); AC 15; HD ; hp 15; MV 45’; Act ; SV Fort , Ref , Will ; AL C.
24-27 The caster and his allies are chilled by a driving wind, and the howls of hounds erupt all around. All enemies within 50’ must make a DC 15 Will save or succumb to paralyzing terror. Targets failing the save cower in the shadows, too terrified to move. Unintelligent creatures flee. The effect lasts turns or until a creature is forced into action (such as by being attacked or threatened).
28-29 Spear of the Horned King. A shimmering spear appears in the caster’s hand; the silvery tip of the spear is marked with the sigil of the Horned King. If the spear does not taste blood before the next moonrise, it vanishes. If the spear is used in battle (either melee or ranged combat as a javelin) the target must attempt a DC 20 Will save or be struck instantly and permanently dead. This ability is available only once in a caster’s lifetime. If this result is rolled again, the result is treated as 24-27, above.
30-31 Crown of the Horned King. A scintillating aura rings the caster’s brow, sparkling gray and silver. During the span of the next 24 hours, the caster has the ability to summon up to hounds to serve his will. If sent on the hunt, the hounds can track any being across the multiverse, finding their prey within rounds. The hounds remain 24 hours before vanishing back to the Thrice-Tenth Kingdom. Hound: Init ; Atk bite melee (dmg ); AC 15; HD ; hp 15 each; MV 45’; Act ; SV Fort , Ref , Will ; AL C. This ability is available only once in a caster’s lifetime. If this result is rolled again, the caster may choose the Spear of the Horned King (as above) if it is available; otherwise, the Horned King is unable to assist the caster.
32+ Mark of the Horned King. The caster places the mark of the Horned King upon a target within sight. On the next moonrise, the target receives a DC 25 Will save. On a failed save, the Horned King and his hounds appear and carry away the target. This ability is available only once in a caster’s lifetime. If this result is rolled again in the future, the caster may choose the Crown of the Horned King or Spear of the Horned King (as above) if either is available; otherwise, the Horned King is unable to assist the caster.
Patron Taint: the horned king
When patron taint is indicated for the Horned King, roll on the table below. When a wizard has acquired all six taints at all levels of effect, there is no need to continue rolling any more.
Roll Result
1 The caster is overtaken by the call of the hunt. If a foe retreats, the PC must make a DC 10 Will save. On a failed save, the caster gives chase for rounds. The second time this corruption is rolled, the Will save DC increases to 15.
2 The caster takes on the attributes of the Horned King’s minions. The first instance results in wide antlers, then a thick coat of fur, then a elongated muzzle, and finally fangs and claws.
3 Only the strong survive in the Thrice-Tenth Kingdom, and the caster cannot tolerate weakness among his pack. If, after a combat, a fellow character hovers at 1 hp or is unconscious, the caster is overcome by the powerful desire to finish off his ally (DC 10 Will save, or slay downed character).
4 Following a victorious battle, the caster must make offerings to his grim patron. The caster is driven to make an altar, totem, or marker of some sort, adorned with the grisly remains of the vanquished. This is unique to each servitor of the Horned King, and can vary from a simple head impaled upon a staff, to bloody offerings burnt atop a pyre. There is a slim chance (1% per caster level) that the Horned King is pleased by the offering, granting his servant a bonus to Luck. If the caster should fail to make an offering, there is a similar chance (1% per caster level) that the Horned King is displeased, withdrawing his patronage until the caster can make worthy amends.
5 The caster is driven to care for his entire adventuring party (now regarded as a pack). Any attack on a fellow PC, henchman, or hireling is treated as an attack on the caster. The caster employs whatever force needed to eliminate the threat.
6 The caster refuses to accept the authority of any party member who has not bested him in combat. The battle need not be to the death but the caster is driven to use every tool at his disposal in an effort to win. If the caster is defeated, he will follow the new pack leader to the very gates of Hades, but if the caster wins the bout, he assumes leadership of the pack.
Patron Spells: HORNED KING
The Horned King grants three unique spells, as follows. Only the first is described in this volume.
Level 1: Slaying Strike Level 2: Name of the Quarry Level 3:
Slaying strike
Level: 1 (Horned King) Range: Touch (one melee weapon)
General Invoking the malefic Wild Hunt, you dedicate a chosen weapon to the slaying of a specific creature, your quarry. You must have personal knowledge of the quarry but do not need a physical trace; mere knowledge is enough. If the chosen weapon is used against another target before striking the quarry, the enchantment is discharged, without effect. If the caster attacks his quarry and misses, the spell is not discharged. Unless noted otherwise, the indicated weapon can only be wielded by the caster. A caster may possess only one such weapon at a time.
Manifestation Roll : (1) an apparition of the Horned King appears before the caster, blessing the chosen weapon; (2) dozens of silent phantom black hounds rush past the caster, disappearing in pursuit of his quarry; (3) a mournful horn sounds in the distance; (4) a horned crown appears on the caster’s brow as he assumes a grim and ominous mien.
1 Lost, failure, and patron taint.
2-11 Lost. Failure.
12-13 The caster’s next strike to the quarry inflicts an additional + caster level damage. If the caster fails to strike the target within 3 rounds or before the quarry is slain, the spell discharges on the caster, inflicting 1 point of damage.
14-17 The caster’s next strike to the quarry inflicts an additional + caster level damage, and the quarry’s actions suffer a penalty until the end of the next round. If the caster fails to strike the target with the enchanted weapon within 5 rounds or before the quarry is slain, the spell discharges on the caster, inflicting 1 point of damage.
18-19 The caster’s next strike to the quarry inflicts an additional + caster level damage, and the quarry is knocked prone. If the caster fails to strike the target with the enchanted weapon within the next hour or before the quarry is slain, the spell discharges on the caster, inflicting 1 point of damage.
20-23 The caster’s next strike to the quarry inflicts an additional + caster level damage, and the quarry loses its next action. If the caster fails to strike the target with the enchanted weapon within the next day, or if the quarry is slain, the spell discharges on the caster, inflicting 1 point of damage.
24-27 The caster’s strike to the quarry inflicts an additional + caster level damage. Additionally, the quarry loses its actions next round. If the caster fails to strike the target with the enchanted weapon in the next day or before the quarry is slain, the spell discharges on the caster, inflicting 1 points of damage.
28-29 The caster’s next strike to the quarry inflicts an additional + caster level damage. Additionally, the quarry is struck unconscious for rounds (divine, un-dead, and powerful extraplanar beings are immune to this effect). If the caster fails to strike the target with the enchanted weapon in the next week or before the quarry is slain, the spell discharges on the caster, inflicting points of damage.
30-31 The caster’s next strike to the quarry inflicts an additional + caster level damage. Additionally, the quarry falls into an unconscious stasis, and cannot be roused for years (divine, un-dead, and powerful extraplanar beings are immune to this effect). If the caster fails to strike the target with the enchanted weapon in the next year or if the quarry is slain, the spell discharges on the caster, inflicting points of damage and leaving the caster in an unconscious stasis from which he cannot be roused for weeks.
32+ The caster charges a melee weapon with the slaying strike. This weapon may be wielded by a character other than the caster. The weapon’s next strike to the quarry slays the target. If the weapon fails to strike the target in the next 100 years or before the quarry is slain, the spell discharges, slaying the caster and any character possessing the enchanted weapon.
Call of the Wild Hunt
Duration: Varies Casting time: 1 round Save: Varies
New Magic
The Horned Crown: A simple iron crown, adorned with tall, bone-white antlers, marking the wearer as the master of the Wild Hunt. Once per month the wearer of the crown must stalk and slay creatures equal in HD to his level. If this requirement is not fulfilled, the crown loses its powers until donned by another potential king.
The crown grants the wearer a terrifying mien and a bonus to his Personality score. If a PC wills it, the mere sight of his visage forces NPCs to attempt morale checks. The wearer can track creatures without fail and is granted 45’ movement.
Additionally, the crown permits the PC to cross into alternate prime material planes once per 12 hours. When crossing planes, the Horned King may be accompanied by up to 20 additional creatures.
Once per month, the wearer of the crown can summon and command black hounds. Summoned hounds follow their master for up to 24 hours or until dismissed.
Finally, the wearer of the Horned Crown is immortal unless slain in the Thrice-Tenth Kingdom. Otherwise, if reduced to 0 hp, the wearer vanishes, reappearing in the Thrice-Tenth Kingdom on the rise of the next full moon.
Spear of Hrotti: This broad-headed spear glows a faint, electric blue. Wielded against creatures of chaotic alignment, the spear grants a bonus to hit and damage and inflicts critical hits on a roll of 17 or better. Once, and only once, the spear can transform into a black thunderbolt, inflicting damage to all targets within a 20’ radius.
Shield of Saint Aethlstan: The Shield of Saint Aethlstan grants a bonus to both AC and Will saves. Additionally, the wielder is rendered immune to charm or similar enchantments. Once per owner, and only once per owner, the shield can intercede, preventing an attack. This power can be declared after the attack’s damage and any critical effects are resolved. Finally, this power can be used to prevent an attack on another within 5 feet. Either use of the power destroys the shield’s enchantment.
Throwing Axes of Narn: The legendary collection of throwing axes of the axmen of Narn, potentially numbering nine in all. The more axes brought together, the more powerful
This printing of DCC#72: Beyond the Black Gate is done under and is Copyright 2000 Wizards of the Coast, Inc (“Wizards”). All identity by the owner of the Product Identity, and which specifically version 1.0 of the Open Gaming License, and the System Reference Rights Reserved. excludes the Open Game Content; (f) “Trademark” means the logos, Document by permission from Wizards of the Coast, Inc.Designation of Product Identity: The following items are hereby designated as 1. Definitions: (a)”Contributors” means the copyright and/or trademark names, mark, sign, motto, designs that are used by a Contributor to identify itself or its products or the associated products contributed Product Identity in accordance with Section 1(e) of the Open Game owners who have contributed Open Game Content; (b)”Derivative Material” means copyrighted material including derivative works and to the Open Game License by the Contributor (g) “Use”, “Used” or License, version 1.0: Dungeon Crawl Classics, DCC RPG, Mighty Deed of Arms, spell check, Luck check, spellburn, mercurial magic, translations (including into other computer languages), potation, “Using” means to use, Distribute, copy, edit, format, modify, translate and otherwise create Derivative Material of Open Game Content. (h) corruption, disapproval, all spell names, all proper nouns, capitalized modification, correction, addition, extension, upgrade, improvement, compilation, abridgment or other form in which an existing work “You” or “Your” means the licensee in terms of this agreement. terms, italicized terms, artwork, maps, symbols, depictions, and illustrations, except such elements that already appear in the System may be recast, transformed or adapted; (c) “Distribute” means to 2. The License: This License applies to any Open Game Content that Reference Document. reproduce, license, rent, lease, sell, broadcast, publicly display, transmit or otherwise distribute; (d)”Open Game Content” means the contains a notice indicating that the Open Game Content may only be Used under and in terms of this License. You must affix such a notice Designation of Open Content: Subject to the Product Identity game mechanic and includes the methods, procedures, processes to any Open Game Content that you Use. No terms may be added to designation above, such sections of creature statistics as derive from and routines to the extent such content does not embody the Product or subtracted from this License except as described by the License the SRD are designated as Open Gaming Content. Identity and is an enhancement over the prior art and any additional itself. No other terms or conditions may be applied to any Open Some of the portions of this book which are delineated OGC originate content clearly identified as Open Game Content by the Contributor, and means any work covered by this License, including translations Game Content distributed using this License. from the System Reference Document and are copyright © 1999, 2000 Wizards of the Coast, Inc. The remainder of these OGC and derivative works under copyright law, but specifically excludes 3.Offer and Acceptance: By Using the Open Game Content You indicate Your acceptance of the terms of this License. portions of these book are hereby added to Open Game Content and, if so used, should bear the COPYRIGHT NOTICE “DCC #72: Product Identity. (e) “Product Identity” means product and product line names, logos and identifying marks including trade dress; artifacts; 4. Grant and Consideration: In consideration for agreeing to use this BEYOND THE BLACK GATE, copyright © 2018 Goodman Games, creatures characters; stories, storylines, plots, thematic elements, dialogue, incidents, language, artwork, symbols, designs, depictions, License, the Contributors grant You a perpetual, worldwide, royalty-free, non-exclusive license with the exact terms of this License to all rights reserved, visit www.goodman-games.com or contact info@goodman-games.com” likenesses, formats, poses, concepts, themes and graphic, Use, the Open Game Content. DCC#72: Beyond the Black Gate is copyright © 2018 Goodman photographic and other visual or audio representations; names and descriptions of characters, spells, enchantments, personalities, 5.Representation of Authority to Contribute: If You are contributing original material as Open Game Content, You represent that Your Games. Open game content may only be used under and in the terms of the Open Game License. teams, personas, likenesses and special abilities; places, locations, environments, creatures, equipment, magical or supernatural Contributions are Your original creation and/or You have sufficient rights to grant the rights conveyed by this License. OPEN GAME LICENSE Version 1.0a abilities or effects, logos, symbols, or graphic designs; and any other trademark or registered trademark clearly identified as Product 6.Notice of License Copyright: You must update the COPYRIGHT The following text is the property of Wizards of the Coast, Inc. NOTICE portion of this License to include the exact text of the
the collection grows. The axes grant unerring accuracy, permitting attacks on targets that might otherwise seem impossible. If a target’s AC is already lower than indicated by the collected axes, use the lower (worse) AC.
If three axes are held, targets are treated as AC 20 (or lower). The wielder may hurl two axes per round, inflicting + Str bonus per axe.
If five axes are held, targets are treated as AC 15 (or lower). The wielder may hurl three axes per round, inflicting + Str bonus per axe.
If all nine axes are held, targets are treated as AC 10 (or lower). The wielder may hurl three axes per round, inflicting + Str bonus per axe.
Note that thrown axes do not return and must be retrieved. Thus, as the axe-thrower hurls his missiles, he sees their powers diminished.
COPYRIGHT NOTICE of any Open Game Content You are copying, have written permission from the Contributor to do so. modifying or distributing, and You must add the title, the copyright date, and the copyright holder’s name to the COPYRIGHT NOTICE 12 Inability to Comply: If it is impossible for You to comply with of any original Open Game Content you Distribute. any of the terms of this License with respect to some or all of the Open Game Content due to statute, judicial order, or governmental 7. Use of Product Identity: You agree not to Use any Product Identity, regulation then You may not Use any Open Game Material so including as an indication as to compatibility, except as expressly affected. licensed in another, independent Agreement with the owner of each element of that Product Identity. You agree not to indicate 13 Termination: This License will terminate automatically if You fail compatibility or co-adaptability with any Trademark or Registered to comply with all terms herein and fail to cure such breach within 30 days of becoming aware of the breach. All sublicenses shall survive Trademark in conjunction with a work containing Open Game Content except as expressly licensed in another, independent Agreement with the termination of this License. the owner of such Trademark or Registered Trademark. The use of 14 Reformation: If any provision of this License is held to be any Product Identity in Open Game Content does not constitute a unenforceable, such provision shall be reformed only to the extent challenge to the ownership of that Product Identity. The owner of any necessary to make it enforceable. Product Identity used in Open Game Content shall retain all rights, title and interest in and to that Product Identity. 15 COPYRIGHT NOTICE 8. Identification: If you distribute Open Game Content You must Open Game License v 1.0 Copyright 2000, Wizards of the Coast, Inc. clearly indicate which portions of the work that you are distributing are Open Game Content. System Rules Document Copyright 2000 Wizards of the Coast, Inc.; Authors Jonathan Tweet, Monte Cook, Skip Williams, based on 9. Updating the License: Wizards or its designated Agents may original material by E. Gary Gygax and Dave Arneson. publish updated versions of this License. You may use any authorized version of this License to copy, modify and distribute any Open Game DCC#72: Beyond the Black Gate, copyright © 2018 Goodman Games, all rights reserved, visit www.goodman-games.com or Content originally distributed under any version of this License. contact info@goodman-games.com SECOND PRINTING 10 Copy of this License: You MUST include a copy of this License with every copy of the Open Game Content You Distribute. 11. Use of Contributor Credits: You may not market or advertise the Open Game Content using the name of any Contributor unless You
Crash of the Sky People
By Terry Olson • Editor: Rev. Dak J. Ultimak • Cartographer: Steve Crompton • Artist: Chad Sergesketter • Playtesters: David Baity, Jen Brinkman, Mark Collins, John Cooper, William Ferry, Jeff Goad, Thom Hall, Kristi, Matt, Emily Mundy, Rich Mundy, Stephen Newton, Phil, Maxwell Spann, John Stolp, Big Troy Tucker
This is an adventure for 4-8 level 3 PCs. It is designed to be run within four hours, and introduces a bit of “science fantasy” into the judge’s setting. The adventure features robots, rubbery constructs, a gravity-ball court, and a sky joust that rewards the victor with their own metallic wings!
Background
The infamous winged sky-pirates from the planet Tahlmohl have crashed! Their ship was blasted in two by a defending craft, and the “bow” half has fallen near the PCs. The pilots died, but not before activating a distress beacon that extends a green column of light into the sky. Some of the ship’s robots and constructs survived the crash, and they wait to be rescued by those Tahlmohlians that will surely answer the beacon’s call. In the meantime, who knows what alien riches sit in the wreckage, waiting to be plundered?
Encounter Table
1 C Guardian robots (5 or more)
2 T Bridge door
3 C Guardian robots (5 or more)
4 C/P Ybmug Technicians (5 or more)
5A, 5B P Change gravity to acquire stun gun
5C C Gravity-ball robots (4)
6 C Sky Joust!
7 C/P Interrogator bot, combination vault
Introduction
A flaming ball appears in the sky and plummets downward with a high-pitched hum. The flames extinguish, revealing a coppercolored craft that tries, but fails, to level off before crashing into the ground. A mushroom cloud of dirt and debris rises into the air, split by a column of green light extending vertically skyward.
The ship is sufficiently cooled from reentry by the time the party arrives. There are two easily-accessible entrances, areas 1 and 3. If PCs manage to climb the ship’s curved side (DC 15 climb sheer surfaces about 20’), they find two large doors on the roof above area 6; these are practically impossible to open by mundane means. Although the ship’s outside is mangled, much of its interior was protected by internal force fields, and shows little evidence of external trauma.
Unless otherwise mentioned, the ship’s areas are artificially lit with glowing ceilings, and doors slide open when touched.
Area 1 Bridge Entry p.25
Area 1 – Bridge Entry
The ship has plowed a trench into the ground, and its bow is torn open. Ten feet up, a chamber is exposed, with protruding bent metal and loose sparking wires. Redand-gold metallic humanoids patrol the wreckage, and see your approach. One shoots a ray of light from its chest, and scorches the ground ahead of you. It shouts in a strange mechanical voice, “FLEE!”
The “humanoids” are robots from the ship guarding this entrance to the wreckage. They allow PCs one round (10 seconds) to flee, and attack those that do not comply. They lack diplomacy programming, so attempts to parley are difficult (DC 15 Personality check). During melee, PCs may notice a switch on the backs of the robots’ necks (one Luck check per melee combatant). Flipping a switch disables its robot (mighty deed of arms, DC 15 pick pocket, or AC 18 for those without the previous two options). For larger parties, have one robot for each PC.
Guardian Robots (5 or more): Init ; Atk bash melee () or chest ray missile fire (, range 60’) or rocket fists missile fire ( special, range 30’); AC 13; HD ; hp 17, 14, 13, 11, 10; MV 30’; Act ; SP rocket fists (once per encounter may shoot fists as single projectile, but may not bash attack for rest of encounter), immune to mental effects, vulnerability (switch on back of neck); SV Fort , Ref , Will ; AL N.
Climbing to the bridge is easy (DC 7) because of the wreckage. However, climbers must make a DC 10 Reflex save or suffer 1 hp of damage from sharp metal.
Area 2 Bridge p.25
Area 2 – Bridge
This chamber’s door is trapped, so PCs must contend with it first if they approach from inside the ship (see below).
Four orange-skinned men sit dead in this chamber. Three are crushed against panels with crackling dials and shattered glass plates. The other is slumped over a wheel attached to a separate panel. He has retracted metallic wings attached to his fleshy back, but they are damaged beyond repair. From the ceiling, a threeinch, gray stone pyramid hangs from a thin chain, gently swinging back and forth.
The four Tahlmohlians tried to land the ship safely, but it was too damaged to do so. Each body has Tahlmohlian triangular electrum coins (worth 10 gp each). A searching PC who passes a Luck check finds a strange key on one of the bodies; this fits the weapon rack’s lock in area 5B.
The stone pyramid (the crew’s “good luck” charm) is unidentifiable. If the person touching it knows how to cast arcane spells, the stone turns from gray to blue; otherwise it turns red when handled. PCs may note that the pyramid swings back in forth in precise 1 second intervals, like a
frictionless pendulum. So, in addition to detecting wizards, the pyramid is an accurate timing device.
The door is trapped. Thieves inspecting the door note that two fingerprint-sized portions are frequently used, and, thanks to the wreckage, a wire is visible along the door’s top edge (DC 12 find trap). The trap is disabled by pressing on the door’s two worn spots (one finger each), or by cutting the wire (DC 12 disable trap). Pressing on the door in any other manner electrocutes the victim for shock damage. The trap remains armed unless the wire is cut.
Area 3 Easy Entry p.27
Area 3 – Easy Entry
A hole is ripped into the port side of the ship, with a metal beam forming a plank to the ground. Red-andgold metallic automatons attack from the ship’s hallway.
These robots guard the breached hallway, and have the same disable switch as those in area 1. As opposed to area 1, they give no warning shots. For larger parties, have one robot for each PC.
Guardian Robots (5 or more): Init ; Atk bash melee () or chest ray missile fire (, range 60’) or rocket fists missile fire ( special, range 30’); AC 13; HD ; hp 17, 14, 13, 11, 10; MV 30’; Act ; SP rocket fists (once per encounter may shoot fists as single projectile, but may not bash attack for rest of encounter), immune to mental effects, vulnerability (switch on back of neck); SV Fort , Ref , Will ; AL N.
Area 4 Engineering Room p.27
Area 4 – Engineering Room
The walls of this kidney-shaped room are covered with steel panels, buttons, switches, and flashing red lights. Small green stick-men look at a window on the floor, smiling and nodding their rubbery heads as if celebrating. Each wears an amulet with a glowing red gem. One extends its sole elastic appendage to a panel, and pulls down a lever. A faint hum begins as a yellow glow radiates through the floor’s window. Upon noticing you, the five gibber with high pitched voices and frantically point their single arms back the way you came.
These creatures are Ybmugs, intelligent synthetic constructs created by the Tahlmohls. They’re celebrating because they’ve just created a containment field around the engine’s nuclear fuel cell (see below). The Ybmugs prefer that the PCs flee, so they give the PCs one round to exit the chamber, or attempt to parlay – otherwise they attack. They understand common but cannot speak it (a comprehend languages spell check of 20 allows the caster to speak the Ybmug language). They try to convince the party that the ship will self-destruct. Role-playing judges are reminded that each Ybmug (initially) has only one arm.
The constructs can be a significant combat challenge due to their amulets. Each amulet begins with one charge, but when an Ybmug dies, its amulet’s charge transfers to the closest amulet worn by a living Ybmug. As an amulet gains more charge, its bearer grows larger and gains additional arms (and attacks). Parties that follow the gang-up-on-single-enemy strategy will find the battle becoming more and more difficult as remaining opponents grow in power. The easiest way to defeat them is to remove/destroy their amulets before killing them; this is accomplished with a suc-
cessful mighty deed against the creature, or by striking the amulet directly (AC 17 with 1 hp). If an amulet is removed with a killing blow (such as a deed) then the charge transfer does not occur. Without an amulet, an Ybmug reverts to 1-charge form. Note below that 1-charge or amuletless Ybmugs have a action die. For larger parties, have one Ybmug for each PC.
Ybmug Technicians (5 or more): Init ; Atk special; AC special; HD special; hp special; MV 30’; Act special; SP charged stats (stats depend on amulet’s charges, see table below), death throe (amulet’s charge transfers to closest amulet worn by living Ybmug, completely healing it, making it larger, and giving it one more arm); SV special; AL N.
Charges Stat Changes
1 4’ tall; Atk rubber arm melee (); AC 11; HD ; hp 5 each; Act ; SV Fort , Ref , Will .
2 6’ tall; Atk rubber arm melee (); AC 12; HD ; hp 10 each; Act ; SV Fort , Ref , Will .
3 8’ tall; Atk rubber arm melee (); AC 13; HD ; hp 15 each; Act ; SV Fort , Ref , Will .
4 10’ tall; Atk rubber arm melee (, range 10’); AC 14; HD ; hp 20 each; Act ; SP crits on 20 and 24; SV Fort , Ref , Will .
5 12’ tall; Atk rubber arm melee (, range 15’); AC 15; HD ; hp 25 each; Act ; SP crits on 20, 24, and 30; SV Fort , Ref , Will .
PCs looking through floor’s window see a pulsing black sphere (the nuclear fuel cell) surrounded by a glowing yellow shell of energy (the containment field). Moving the lever to the up position removes the containment field and stops the audible hum. Moving the lever back down restores the field and hum. The panels’ controls (besides the lever) have been disabled, so using them has no effect. If the field is disabled when the ship implodes, the nuclear fuel detonates and destroys the region (see conclusion). Otherwise, the field teleports the cell safely away (the judge may decide where) when the ship self-destructs.
Intact amulets are worth 50 gp each, though wizards versed in gem-magic will pay 10 times as much for them.
Area 5A Ball-Gravity Control p.28
Area 5A – Ball-Gravity Control
A chest-high panel stands in this black room’s center. It has 7 buttons lined in a row, and each button has a number of dots above it. The left-most button has one dot, its neighbor has two, and so on, with the right-most button having seven dots. The button with two dots glows white. A wall-sized window looks into a cubic golden room, which has another window on its opposite side.
The control panel changes direction of the ball-gravity in the training room (area 5B). Imagine the cubic room as a 6-sided die; the die’s faces correspond to the room’s sides.
1: West wall with audience window
2: Floor entry and belt rack (down)
3: South wall with ball portal
4: North wall with ball portal
5: Ceiling with weapon locker (up)
6: East wall with control room window
7: Randomly chosen from 1-6
Pressing the button beneath a certain number of pips lights that button and directs the training room’s ball-gravity toward the corresponding surface. For example, pressing the 1-pip button changes ball-gravity so that it is directed towards the west wall, rather than the floor. Only the ball and those wearing gravity-belts (see area 5B) are affected by ball-gravity, otherwise gravity is directed to the floor. As the ball-gravity changes, PCs looking through the window see the ball slide along the floor to an adjacent wall, or “fall” from the floor to the ceiling.
Area 5B Training Room p.28
Area 5B – Training Room
The judge may modify the description’s last sentence if PCs have changed the ball-gravity (see area 5A).
This golden room is almost cubic, with each surface faintly glowing. The left wall shares a window with a large audience area, and the right shares a window with a smaller chamber. The walls in front of and behind the floor’s entrance each have a one-foot diameter glowing blue portal in their centers. The ceiling has a rack holding swords, maces, and a metallic cylinder with a fingerlever. A silver sphere, 6 inches in diameter, rests on the floor, next to two sets of four silvery waistbelts that are clamped in place.
Here winged warriors train and compete, sometimes with weapons, and sometimes playing gravity-ball in two teams of four. Throwing the silver sphere through a portal rings a buzzer, updates the scoreboard in area 5C, and makes the ball appear in the center of the current “floor.” The portals only work for the ball. As mentioned in area 5A, once a PC wears a belt, she becomes subject to the current ballgravity. PCs that “fall” along a surface to an adjacent one must make a DC 14 Reflex save or take damage. PCs that fall to the opposite surface (e.g., ceiling to floor) take damage (given the room’s dimensions, gravity is a tad stronger than what PCs are used to). Climbing the chamber’s smooth surfaces is extremely difficult (DC 20).
The rack on the ceiling is locked (DC 14 pick lock, or use key from area 2); it holds 4 longswords, 4 maces, and a stun gun. When retrieved, the gun has + PC’s Luck modifier shots remaining. Although it’s simple to use (point and squeeze the trigger), it’s unfamiliar; treat it as a trained weapon but with a -1d attack penalty, e.g., attack rather than . Victims suffer shock damage, and must pass a DC 16 Will save or be stunned helpless for rounds. Range is 60’/120’/180’.
Area 5C Audience Chamber p.28
Area 5C – Audience Chamber
The judge may modify the following “Each shows the number zero” if the PCs have scored (see area 5B).
Rows of plush benches face a windowed wall that looks into a cubic golden chamber. Beneath the window are two dark glass plates, side-by-side. Each shows the number zero. A blue-andsilver automaton with hemispherical cup-shaped hands stands in each of the room’s four corners. The robots shout “INTRUDERS!” and attack!
The automatons guard the audience chamber and its secret stash (see below), though the ship’s crew often challenges them to a gravity-ball match (their cup-shaped hands are ideal for the game). During melee, PCs may note that these robots have a switch in a recessed chamber in the left armpit (one Luck check per melee combatant). Flipping a switch disables its robot (mighty deed of arms, DC 15 pick pocket, or AC 18 for those without the previous two options).
Gravity-Ball Robots (4): Init ; Atk cup-bash melee () or blinding flash; AC 12; HD ; hp 17, 14, 13, 10; MV 30’; Act ; SP blinding flash (once per encounter, eye rays blind opponent; DC 14 Reflex save or to attacks for 3 rounds), immune to mental effects, vulnerability (switch in left armpit); SV Fort , Ref , Will ; AL N.
There is a secret door on the north wall (DC 15 Intelligence check) that hides an alcove where the “pot” for the next match’s winnings are kept. This alcove contains 50 Tahlmohlian triangular electrum coins (worth 10 gp each).
Area 6 Sky Joust! The stairs ascend to a decked room with long scuff marks along the floor. A metal door is on the other side. Nearby, a large lever in the wall is pushed to its up position. The entire ceiling is comprised of two copper doors. p.28
Area 6 – Sky Joust! The stairs ascend to a decked room with long scuff marks along the floor. A metal door is on the other side. Nearby, a large lever in the wall is pushed to its up position. The entire ceiling is comprised of two copper doors.
If the PCs pull the lever down, the doors in the ship’s roof open. Read the following.
The ceiling’s doors open, revealing a sky filled with orangeskinned warriors. Some fly with large metallic wings, others straddle handled flying vehicles. All have brass-tubed devices pointed at you. An authoritative-looking man swoops down, followed by a wingless younger woman riding one of the flying machines. The man says, “I am Nazyd. You are trespassing on one of our vessels. Since you arrived before we, sky-pirate law dictates that either my army fights yours, or we each choose a champion to joust for the rights to the wreckage. I choose my daughter, Nedra, who will certainly earn her wings by defeating you. You may, of course, surrender.”
These Tahlmohlian sky-pirates are investigating their comrades’ distress beacon. It should be obvious to the PCs that they have no hope of defeating the army that vastly outnumbers and outguns them (literally!). Consequently, stat blocks for the sky-pirates are not provided. If the party chooses to flee, the pirate’s gunmen wait one round, then target and kill 1 PC (choose randomly); they let the others escape. The best choice for the party is to joust for rights to the wreckage. Nazyd allows the party’s elected champion to use a spare skycycle (“handled flying vehicle”). He provides a laser-lance, and a shield if the champion lacks one. The skycycle follows telepathic commands and is easy for the PC to operate. However, Nazyd can mentally override the skycycle, should the champion use it beyond the contest’s scope.
Nedra: Init ; Atk laser-lance + melee (+deed); AC 16; HD ; hp 20; MV 30’; Act ; SP deed die for Sky Joust Deed table, crits use /III; SV Fort , Ref , Will ; AL L.
Sky Joust Rules: Use the following rules to run a sky joust against the sky-pirates.
• Contestants perform successive passes until someone yields, falls unconscious, or dies.
• Initiative is rolled for each pass.
• Damage for the laser-lances is .
• Those trained with the lance or spear make a attack per pass, with a bonus to hit for each additional action die beyond the first, excluding off-hand attacks. Those untrained (thieves, wizards, etc.) use a (merciful judges may increase this to a for parties lacking someone with training).
• Dwarves may shield bash during the same pass as their lance attack.
• A skycycle flies with MV 60’, but can “charge” at MV 120’. A charging contestant must declare intent to charge at the beginning of the pass. He gains to hit and does double damage, but his opponent gains +2d to hit him for that pass, regardless of initiative order.
• The judge is encouraged to use the Sky Joust Mighty Deed table (see following page).
• A contestant may cast a spell only during a pass, but suffers a -2d spell check penalty due to having to fly the skycycle.
• Although assisting a contestant is forbidden, a halfling’s Luck sharing is undetectable.
• (Optional): If three consecutive passes have no hits, then Nazyd “amplifies” laser-lances to provide a +1d attack bonus for both contestants.
If Nedra loses, Nazyd gives the champion the metallic wings she would have won. If the PCs have acted honorably, the leader warns them that wing self-installation can be fatal for those with weak constitutions. If the wings are placed against a shirtless PC’s back, they install themselves over three rounds. Each round, the PC must make a Fortitude save or take damage.
Round 1: DC 12 or damage
Round 2: DC 14 or damage
Round 3: DC 16 or damage
A cleric assisting a round’s “surgery” bestows a +1d bonus to the PC’s saving throws, though that particular cleric may not do anything else (like lay on hands) for that round. Metallic wings are permanently attached. The PC’s backside is AC 11, but she may not wear any armor that covers her back. She flies at MV 20’, and may carry up to 300 pounds of additional weight at half speed.
If the party is victorious, then sky-pirate law dictates that Nazyd must relinquish the ship’s wreckage to them; he and his army leave the party to their looting. However, PCs may ask him questions about the vessel; he truthfully answers what he can (judge’s discretion). If the party’s champion is defeated, then Nazyd allows the PCs to leave in peace, as long as they immediately disembark and surrender any of the ship’s loot they’ve plundered. Alternatively, the victorious Nedra may demand that the party serve her for a certain period of time; this allows the judge to transport the party to new realms, devise “escape” adventures, etc.
Area 7 Destroyed Jail p.30
Area 7 – Destroyed Jail
Half of this room lies in ruin. Its crushed cells, dead bodies, and bloody tables indicate that it was used for detention and interrogation. Across from the entrance sits a steel vault with four numbered dials. A dull gray monstrosity, with seven 10’-long arms ending in saws, needles, and pincers, stands motionless beside it. A voice announces throughout the ship, “CLEANSING PROTOCOL INITIALIZED! SELFDESTRUCT IN THIRTY AERETH MINUTES!” The metallic monster jumps to life and attacks!
If the party mistakenly deactivated the fuel cell’s containment field (see area 4), the ship’s “voice” says, “WARNING! FUEL CELL CONTAINMENT FIELD MUST BE ACTIVATED!”
The computer AI has deemed that there is no chance for the ship’s inhabitants to be recovered. The ship implodes in 30 minutes of real time. The judge is encouraged to give the players audible updates every 5 minutes, “SELF DESTRUCT IN TWENTY-FIVE AERETH MINUTES.” This builds tension and makes the upcoming fight more frantic. Repeat the fuel cell warning if applicable. Players may com-
Sky Joust Mighty Deed Table
Deed Die Sky Joust Result
3 Shield destroyed! Opponent takes additional damage and suffers to AC for the rest of the passes. Magic shields receive a Fortitude save vs. DC equal to total damage done.
4 Wing Clip! Opponent’s wing or accelerator leg is damaged. He takes additional damage and suffers a cumulative -1d to damage rolls for the rest of the passes.
5 Shoulder wound! Injure opponent’s lance arm for additional damage. She suffers a cumulative -1d penalty to attack rolls for the rest of the passes.
6 Head wound! Gouge opponent’s head for additional damage. He suffers cumulative -1d penalties to attack and damage rolls for the rest of the passes.
7+ Torso rip! Lance rips through opponent’s torso, doing additional damage. She suffers cumulative -1d penalties to attack and damage rolls for the rest of the passes. She must also pass a DC 14 Fortitude save, or die.
plain that the countdown doesn’t make sense (e.g. a combat round is 10 seconds game time, but it takes a lot more real time to run a round); if this occurs, shrug and suggest that the ship’s timer may be broken, something may be altering the passage of time, etc.
If replacement PCs are needed, then some of the dead bodies in the crushed cells are not quite dead yet.
Unlike other robots, the interrogator bot does not have an off switch. However, if it takes electrical/shock damage, there is a 1% chance per point of damage that it deactivates due to a short circuit.
Interrogator Bot: Init ; Atk buzz saw melee (, 10’ reach) or needle-gun missile fire ( plus hallucinogen) or pincher melee ( plus holding, 10’ reach) or stun gas (special); AC 16; HD ; hp 43; MV 20’; Act ; SP stun gas (once per encounter, DC 14 Fortitude save or fall helpless for 2 rounds, 20’ radius), hallucinogen (DC 12 Will save or -1d cumulative penalty to rolls for 1 hour), holding (victim grants bot +1d to attacks until released, DC 14 Strength check to break free), electric vulnerability (1% chance per point shock damage to short circuit and deactivate), immune to mental effects; SV Fort , Ref , Will ; AL N.
The PCs may use torture tables as cover from the needle gun (-1d to hit).
The vault contains gear from prisoners; it is locked and almost impossible to pick (DC 35 pick lock), but may be opened with the correct combination. There are four dials aligned in a row, each with numbers 1, 2, and 3. The four dials start with each having a “1” in the up position. There are four rows of runes above the dials; the first row has two rune-words, the second has one rune-word, the third and fourth have three rune-words each. These are in the Tahlmohlian language (DC 13 read language for thieves, DC 12 spell check for comprehend languages). The runes say:
Prisoners’ Belongings
Restricted
Authorized Personnel Only
Do Not Open
The correct combination is the number of rune-words per line, 2-1-3-3. (Kudos to those who recognize this Flash Gordon reference!) Because of the real-time countdown, players may be stressed when they deal with this puzzle, and may try random combinations without thinking. It takes one round (10 seconds) to try each combination; there are 81 possible combinations.
Inside the vault is a silvered two-handed sword, a suit of mithril half-plate armor, miscellaneous gear (roll six times on Table 3-4 in DCC RPG rulebook, p. 73), and four pouches of 50 gp each. The judge may wish to insert items from other worlds (e.g., DCC #84 Peril on the Purple Planet), and quest items or hooks at her discretion.
Conclusion
The ship implodes after the 30-minute countdown. The fastest way to escape is through area 6, sliding down the ship’s side. Each PC that takes this route suffers falling damage. Otherwise, if there is time, the party can hastily retreat the way they came.
When the ship implodes, any PCs remaining inside are crushed to death. The implosion flings matter-dust for miles, leaving a 20’ cube of an immensely dense alloy. Due to its weight, it may sink into the ground. If the party deactivated the containment field of the fuel cell (see area 4), then there is a nuclear explosion that annihilates the region.